The Qt Graphics View Framework allows you to develop fast and efficient 2D vector graphic scenes. Scenes can contain millions of items, each with their own features and behaviors. By using the Graphics View via PyQt5 you get access to this highly performant graphics layer in Python. Whether you're integrating vector graphics views into an existing PyQt5 application, or simply want a powerful vector graphics interface for Python, Qt's Graphics View is what you're looking for.
Some common uses of the Graphics View include data visualization, mapping applications, 2D design tools, modern data dashboards and even 2D games.
In this tutorial we'll take our first steps looking at the Qt Graphics View framework, building a scene with some simple vector items. This will allow us to familiarize ourselves with the API and coordinate system, which we'll use later to build more complex examples.
What is the QGraphics View Framework?
The Graphics View framework consists of 3 main parts QGraphicsView, QGraphicsScene, and QGraphicsItem, each with different responsibilities.
The framework can be interpreted using the Model-View paradigm, with the QGraphicsScene as the Model and the QGraphicsView as the View. Each scene can have multiple views.
The QGraphicsItems within the scene can be considered as items within the model, holding the visual data that the scene combines to define the complete image.
QGraphicsScene is the central component that glues everything together. It acts as a whiteboard on which all items are drawn (circles, rectangles, lines, pixmaps, etc). The QGraphicsView has the responsibility of rendering a given scene -- or part of it, with some transformation (scaling, rotating, shearing) -- to display it to the user. The view is a standard Qt widget and can be placed inside any Qt layout.
QGraphicsScene provides some important functionalities out of the box, so we can use them to develop advanced applications without struggling with low-level details. For example:
- Collision Detection: detect when a graphics item has collided with another item.
- Item Selection: gives us the ability to deal with multiple items at the same time, for example, the user can select multiple items, and when pressing delete, a function asks the scene to give the list for all selected items, and then delete them.
- Items discovery: the scene can tell us what items are present (or part of them) at a specific point or inside some defined region, for example, if the user adds an item that intersects with a forbidden area, the program will detect them and give them another (mostly red) color.
- Events Propagation: the scene receives the events and then propagates them to items.
To define a QGraphicsScene you define its boundaries or sceneRect which defines the x & y origins and dimensions of the scene. If you don't provide a sceneRect it will default to the minimum bounding rectangle for all child items -- updating as items are added, moved or removed. This is flexible but less efficient.
Items in the scene are represented by QGraphicsItem objects. These are the basic building block of any 2D scene, representing a shape, pixmap or SVG image to be displayed in the scene. Each item has a relative position inside the sceneRect and can have different transformation effects (scale, translate, rotate, shear).
Finally, the QGraphicsView is the renderer of the scene, taking the scene and displaying it -- either wholly or in part -- to the user. The view itself can have transformations (scale, translate, rotate and shear) applied to modify the display without affecting the underlying scene. By default the view will forward mouse and keyboard events to the scene allowing for user interaction. This can be disabled by calling view.setInteractive(False).
Bring Your PyQt/PySide Application to Market — Specialized launch support for scientific and engineering software built using Python & Qt.
Creating a Simple QGraphicsScene
Let's start by creating a simple scene. The following code creates a QGraphicsScene, defining a 400 x 200 scene, and then displays it in a QGraphicsView:
import sys
from PyQt5.QtWidgets import QGraphicsScene, QGraphicsView, QApplication

app = QApplication(sys.argv)

# Defining a scene rect of 400x200, with its origin at 0,0.
# If we don't set this on creation, we can set it later with .setSceneRect
scene = QGraphicsScene(0, 0, 400, 200)

view = QGraphicsView(scene)
view.show()
app.exec_()
If you run this example you'll see an empty window:
 The empty graphics scene, shown in a QGraphicsView window.
Not very exciting yet -- but this is our QGraphicsView displaying our empty scene.
As mentioned earlier, QGraphicsView is a widget. In Qt any widgets without a parent display as windows. This is why our QGraphicsView appears as a window on the desktop.
Adding Graphic Items to the Scene
Let's start adding some items to the scene. There are a number of built-in graphics items which you can customize and add to your scene. In the example below we use QGraphicsRectItem which draws a rectangle. We create the item passing in its dimensions, and then set its position, pen and brush before adding it to the scene:
import sys
from PyQt5.QtWidgets import (
    QGraphicsScene, QGraphicsView, QGraphicsRectItem, QApplication
)
from PyQt5.QtGui import QBrush, QPen
from PyQt5.QtCore import Qt

app = QApplication(sys.argv)

# Defining a scene rect of 400x200, with its origin at 0,0.
# If we don't set this on creation, we can set it later with .setSceneRect
scene = QGraphicsScene(0, 0, 400, 200)

# Draw a rectangle item, setting the dimensions.
rect = QGraphicsRectItem(0, 0, 200, 50)

# Set the origin (position) of the rectangle in the scene.
rect.setPos(50, 20)

# Define the brush (fill).
brush = QBrush(Qt.red)
rect.setBrush(brush)

# Define the pen (line)
pen = QPen(Qt.cyan)
pen.setWidth(10)
rect.setPen(pen)

scene.addItem(rect)

view = QGraphicsView(scene)
view.show()
app.exec_()
Running the above you'll see a single, rather ugly colored, rectangle in the scene:
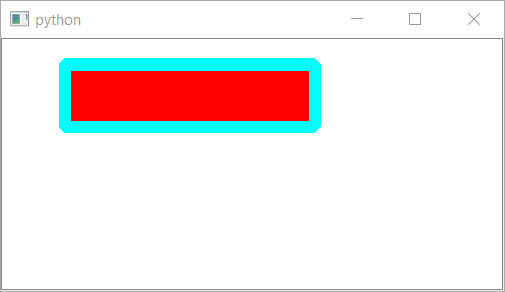 A single rectangle in the scene
Adding more items is simply a case of creating the objects, customizing them and then adding them to the scene. In the example below we add a circle, using QGraphicsEllipseItem -- a circle is just an ellipse with equal height and width:
import sys
from PyQt5.QtWidgets import (
    QGraphicsScene,
    QGraphicsView,
    QGraphicsRectItem,
    QGraphicsEllipseItem,
    QApplication
)
from PyQt5.QtGui import QBrush, QPen
from PyQt5.QtCore import Qt

app = QApplication(sys.argv)

# Defining a scene rect of 400x200, with its origin at 0,0.
# If we don't set this on creation, we can set it later with .setSceneRect
scene = QGraphicsScene(0, 0, 400, 200)

# Draw a rectangle item, setting the dimensions.
rect = QGraphicsRectItem(0, 0, 200, 50)

# Set the origin (position) of the rectangle in the scene.
rect.setPos(50, 20)

# Define the brush (fill).
brush = QBrush(Qt.red)
rect.setBrush(brush)

# Define the pen (line)
pen = QPen(Qt.cyan)
pen.setWidth(10)
rect.setPen(pen)

ellipse = QGraphicsEllipseItem(0, 0, 100, 100)
ellipse.setPos(75, 30)

brush = QBrush(Qt.blue)
ellipse.setBrush(brush)

pen = QPen(Qt.green)
pen.setWidth(5)
ellipse.setPen(pen)

# Add the items to the scene. Items are stacked in the order they are added.
scene.addItem(ellipse)
scene.addItem(rect)

view = QGraphicsView(scene)
view.show()
app.exec_()
The above code will give the following result:
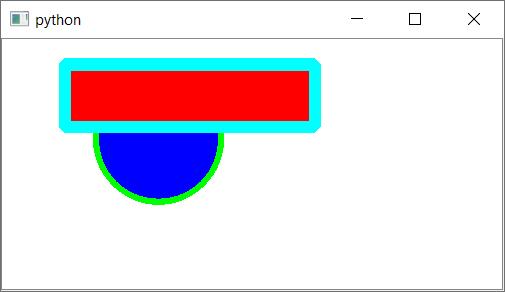 A scene with two items
Controlling Item Stacking Order with ZValue
The order you add items affects the stacking order in the scene -- items added later will always appear on top of items
added first. However, if you need more control you can set the stacking order using .setZValue:
ellipse.setZValue(500)
rect.setZValue(200)
Now the circle (ellipse) appears above the rectangle:
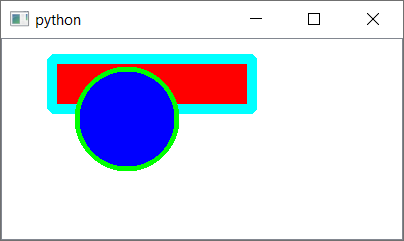 Using ZValue to order items in the scene
Try experimenting with setting the Z value of the two items -- you can set it before or after the items are in the scene, and can change it at any time.
Z in this context refers to the Z coordinate. The X & Y coordinates are the horizontal and vertical position in the scene respectively. The Z coordinate determines the relative position of items toward the front and back of the scene -- coming "out" of the screen towards the viewer.
There is also the convenience method .stackBefore() which allows you to place one QGraphicsItem behind another item in the scene. To place the ellipse in front of the rectangle, you can swap the order and place the rectangle before the ellipse:
rect.stackBefore(ellipse)
You can achieve the same effect by setting the ellipse Z value relative to the rectangle:
ellipse.setZValue(rect.zValue() + 1)
Making Items Moveable and Selectable
Our two QGraphicsItem objects are currently fixed in position where we place them, but they don't have to be! As already mentioned Qt's Graphics View framework allows items to respond to user input, for example allowing them to be dragged and dropped around the scene at will. Simple functionality like this is actually already built in, you just need to enable it on each QGraphicsItem. To do that we need to set the flag QGraphicsItem.GraphicsItemFlags.ItemIsMovable on the item.
The full list of graphics item flags is available here.
import sys
from PyQt5.QtWidgets import (
    QGraphicsScene,
    QGraphicsView,
    QGraphicsItem,
    QGraphicsRectItem,
    QGraphicsEllipseItem,
    QApplication
)
from PyQt5.QtGui import QBrush, QPen
from PyQt5.QtCore import Qt

app = QApplication(sys.argv)

# Defining a scene rect of 400x200, with its origin at 0,0.
# If we don't set this on creation, we can set it later with .setSceneRect
scene = QGraphicsScene(0, 0, 400, 200)

# Draw a rectangle item, setting the dimensions.
rect = QGraphicsRectItem(0, 0, 200, 50)

# Set the origin (position) of the rectangle in the scene.
rect.setPos(50, 20)

# Define the brush (fill).
brush = QBrush(Qt.red)
rect.setBrush(brush)

# Define the pen (line)
pen = QPen(Qt.cyan)
pen.setWidth(10)
rect.setPen(pen)

ellipse = QGraphicsEllipseItem(0, 0, 100, 100)
ellipse.setPos(75, 30)

brush = QBrush(Qt.blue)
ellipse.setBrush(brush)

pen = QPen(Qt.green)
pen.setWidth(5)
ellipse.setPen(pen)

# Add the items to the scene. Items are stacked in the order they are added.
scene.addItem(ellipse)
scene.addItem(rect)

ellipse.setFlag(QGraphicsItem.ItemIsMovable)

view = QGraphicsView(scene)
view.show()
app.exec_()
In the above example we've set ItemIsMovable on the ellipse only. You can drag the ellipse around the scene -- including behind the rectangle -- but the rectangle itself will remain locked in place. Experiment with adding more items and configuring the moveable status.
If you want an item to be selectable you can enable this by setting the ItemIsSelectable flag, for example here using .setFlags() to set multiple flags at the same time:
ellipse.setFlags(QGraphicsItem.ItemIsMovable | QGraphicsItem.ItemIsSelectable)
If you click on the ellipse you'll now see it surrounded by a dashed line to indicate that it is selected. We'll look at how to use item selection in more detail in a later tutorial.
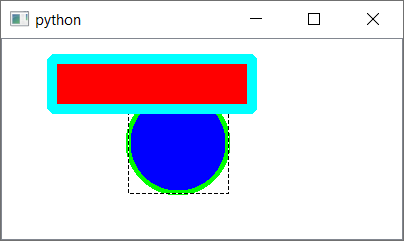 A selected item highlighted with a dashed line
Alternative Way to Create Graphic Items
So far we've been creating items by creating the objects and then adding them to the scene. But you can also create an object in the scene directly by calling one of the helper methods on the scene itself, e.g. scene.addEllipse(). This creates the object and returns it so you can modify it as before:
import sys
from PyQt5.QtWidgets import (
    QGraphicsScene,
    QGraphicsView,
    QGraphicsRectItem,
    QApplication
)
from PyQt5.QtGui import QBrush, QPen
from PyQt5.QtCore import Qt

app = QApplication(sys.argv)

scene = QGraphicsScene(0, 0, 400, 200)

rect = scene.addRect(0, 0, 200, 50)
rect.setPos(50, 20)

# Define the brush (fill).
brush = QBrush(Qt.red)
rect.setBrush(brush)

# Define the pen (line)
pen = QPen(Qt.cyan)
pen.setWidth(10)
rect.setPen(pen)

view = QGraphicsView(scene)
view.show()
app.exec_()
Feel free to use whichever form you find most comfortable in your code.
You can only use this approach for the built-in QGraphicsItem object types.
Building a Complex Scene with Shapes, Text, and Images
So far we've built a simple scene using the basic QGraphicsRectItem and QGraphicsEllipseItem shapes. Now let's use some other QGraphicsItem objects to build a more complex scene, including lines, text and QPixmap images:
from PyQt5.QtCore import QPointF, Qt
from PyQt5.QtWidgets import (
    QGraphicsRectItem,
    QGraphicsScene,
    QGraphicsView,
    QApplication
)
from PyQt5.QtGui import QBrush, QPainter, QPen, QPixmap, QPolygonF
import sys

app = QApplication(sys.argv)

scene = QGraphicsScene(0, 0, 400, 200)

rectitem = QGraphicsRectItem(0, 0, 360, 20)
rectitem.setPos(20, 20)
rectitem.setBrush(QBrush(Qt.red))
rectitem.setPen(QPen(Qt.cyan))
scene.addItem(rectitem)

textitem = scene.addText("QGraphics is fun!")
textitem.setPos(100, 100)

scene.addPolygon(
    QPolygonF(
        [
            QPointF(30, 60),
            QPointF(270, 40),
            QPointF(400, 200),
            QPointF(20, 150),
        ]),
    QPen(Qt.darkGreen),
)

pixmap = QPixmap("cat.jpg")
pixmapitem = scene.addPixmap(pixmap)
pixmapitem.setPos(250, 70)

view = QGraphicsView(scene)
view.setRenderHint(QPainter.Antialiasing)
view.show()
app.exec_()
If you run the example above you'll see the following scene:
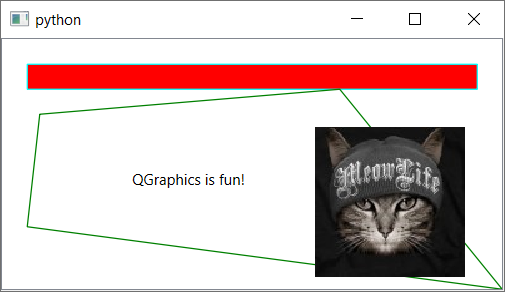 Scene with multiple items including a rectangle, polygon, text and a pixmap.
Let's step through the code looking at the interesting bits.
Polygons are defined using a series of QPointF objects which give the coordinates relative to the item's position. So, for example if you create a polygon object with a point at 30, 20 and then move this polygon object X & Y coordinates 50, 40 then the point will be displayed at 80, 60 in the scene.
Points inside an item are always relative to the item itself, and item coordinates are always relative to the scene -- or the item's parent, if it has one. We'll take a closer look at the Graphics View coordinate system in the next tutorial.
To add an image to the scene we can open it from a file using QPixmap(). This creates a QPixmap object, which can then in turn be added to the scene using scene.addPixmap(pixmap). This returns a QGraphicsPixmapItem which is the QGraphicsItem type for the pixmap -- a wrapper that handles displaying the pixmap in the scene. You can use this object to perform any changes to the item in the scene.
The multiple layers of objects can get confusing, so it's important to choose sensible variable names which make clear the distinction between, e.g. the pixmap itself and the pixmap item that contains it.
Finally, we set the flag RenderHint.Antialiasing on the view to smooth the edges of diagonal lines. You almost always want to enable this on your views as otherwise any rotated
objects will look very ugly indeed. Below is our scene without antialiasing enabled, you can see the jagged lines on the polygon:
 Scene with antialiasing disabled.
Antialiasing has a (small) performance impact however, so if you are building scenes with millions of rotated items it may in some cases make sense to turn it off.
Adding a QGraphicsView to a PyQt5 Layout
The QGraphicsView is subclassed from QWidget, meaning it can be placed in layouts just like any other widget. In the following example we add the view to a simple interface, with buttons which perform a basic effect on the view -- raising and lowering selected item's ZValue. This has the effect of allowing us to move items in front and behind other objects.
The full code is given below:
import sys

from PyQt5.QtCore import Qt
from PyQt5.QtGui import QBrush, QPainter, QPen
from PyQt5.QtWidgets import (
    QApplication,
    QGraphicsEllipseItem,
    QGraphicsItem,
    QGraphicsRectItem,
    QGraphicsScene,
    QGraphicsView,
    QHBoxLayout,
    QPushButton,
    QSlider,
    QVBoxLayout,
    QWidget,
)

class Window(QWidget):
    def __init__(self):
        super().__init__()

        # Defining a scene rect of 400x200, with its origin at 0,0.
        # If we don't set this on creation, we can set it later with .setSceneRect
        self.scene = QGraphicsScene(0, 0, 400, 200)

        # Draw a rectangle item, setting the dimensions.
        rect = QGraphicsRectItem(0, 0, 200, 50)
        rect.setPos(50, 20)
        brush = QBrush(Qt.red)
        rect.setBrush(brush)

        # Define the pen (line)
        pen = QPen(Qt.cyan)
        pen.setWidth(10)
        rect.setPen(pen)

        ellipse = QGraphicsEllipseItem(0, 0, 100, 100)
        ellipse.setPos(75, 30)

        brush = QBrush(Qt.blue)
        ellipse.setBrush(brush)

        pen = QPen(Qt.green)
        pen.setWidth(5)
        ellipse.setPen(pen)

        # Add the items to the scene. Items are stacked in the order they are added.
        self.scene.addItem(ellipse)
        self.scene.addItem(rect)

        # Set all items as moveable and selectable.
        for item in self.scene.items():
            item.setFlag(QGraphicsItem.ItemIsMovable)
            item.setFlag(QGraphicsItem.ItemIsSelectable)

        # Define our layout.
        vbox = QVBoxLayout()

        up = QPushButton("Up")
        up.clicked.connect(self.up)
        vbox.addWidget(up)

        down = QPushButton("Down")
        down.clicked.connect(self.down)
        vbox.addWidget(down)

        rotate = QSlider()
        rotate.setRange(0, 360)
        rotate.valueChanged.connect(self.rotate)
        vbox.addWidget(rotate)

        view = QGraphicsView(self.scene)
        view.setRenderHint(QPainter.Antialiasing)

        hbox = QHBoxLayout(self)
        hbox.addLayout(vbox)
        hbox.addWidget(view)

        self.setLayout(hbox)

    def up(self):
        """Iterate all selected items in the view, moving them forward."""
        items = self.scene.selectedItems()
        for item in items:
            z = item.zValue()
            item.setZValue(z + 1)

    def down(self):
        """Iterate all selected items in the view, moving them backward."""
        items = self.scene.selectedItems()
        for item in items:
            z = item.zValue()
            item.setZValue(z - 1)

    def rotate(self, value):
        """Rotate the object by the received number of degrees."""
        items = self.scene.selectedItems()
        for item in items:
            item.setRotation(value)

app = QApplication(sys.argv)
w = Window()
w.show()
app.exec()
If you run this, you will get a window like that shown below. By selecting an item in the graphics view and then clicking either the "Up" or "Down" button you can move items up and down within the scene -- behind and in front of one another. The items are all moveable, so you can drag them around too. Clicking on the slider will rotate the currently selected items by the set number of degrees:
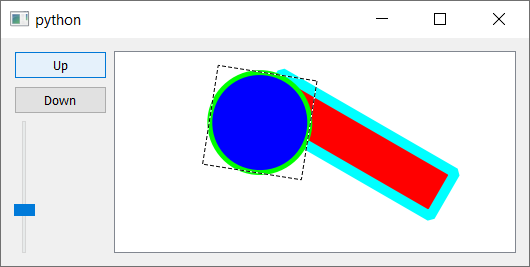 A graphics scene with some custom controls
The raising and lowering is handled by our custom methods up and down, which work by iterating over the currently selected items in the scene -- retrieved using scene.selectedItems() and then getting the item's z value and increasing or decreasing it respectively:
    def up(self):
        """Iterate all selected items in the view, moving them forward."""
        items = self.scene.selectedItems()
        for item in items:
            z = item.zValue()
            item.setZValue(z + 1)
While rotation is handled using the item.setRotation method. This receives the current angle from the QSlider and again, applies it to any currently selected items in the scene:
    def rotate(self, value):
        """Rotate the object by the received number of degrees."""
        items = self.scene.selectedItems()
        for item in items:
            item.setRotation(value)
Take a look at the QGraphicsItem documentation for some other properties you can control with widgets and try extending the interface to allow you to change them dynamically.
Summary
In this tutorial, you've learned the fundamentals of PyQt5's QGraphics framework to create interactive 2D vector graphics scenes in Python. We covered the three core components: QGraphicsScene, QGraphicsView, and QGraphicsItem. We walked through adding shapes, images and text, controlling stacking order with Z values, making items moveable and selectable, enabling antialiasing, and integrating a QGraphicsView into a standard PyQt5 layout with interactive controls.
Hopefully this introduction to the Qt Graphics View framework has given you some ideas of what you can do with it. In the next tutorials we'll look at how events and user interaction can be handled on items and how to create custom & compound items for your own scenes.
Create GUI Applications with Python & Qt6 by Martin Fitzpatrick — (PyQt6 Edition) The hands-on guide to making apps with Python — Save time and build better with this book. Over 15K copies sold.