How can I build an image viewer that browses files and shows thumbnails, similar to KDE's Gwenview? Is there a ready-made widget for this in PyQt, or do I need to build it from scratch?
There isn't a single ready-made widget in Qt that gives you a full thumbnail browser out of the box. But the good news is that Qt's model/view framework makes it straightforward to build one yourself. In this tutorial, we'll walk through two approaches: first, using a QTableView with a custom delegate to draw image thumbnails, and then an alternative using QListView in icon mode with QFileSystemModel for a more file-manager-like experience.
Approach 1: Table View with a Custom Delegate
The model/view framework in Qt separates your data (the model) from how it's displayed (the view). A delegate sits between them and controls the painting of each item. By writing a custom delegate, you can draw thumbnail images inside each cell of a table.
Here's the plan:
- Store image data in a custom
QAbstractTableModel. - Use a
QStyledItemDelegatesubclass to paint scaled thumbnails into each cell. - Display everything in a
QTableView.
Let's start with the full working example. To try it, place the script in a folder that contains some .jpg files.
import glob
import math
import sys
from collections import namedtuple

from PyQt6.QtCore import QAbstractTableModel, Qt, QSize
from PyQt6.QtGui import QImage
from PyQt6.QtWidgets import QApplication, QMainWindow, QTableView, QStyledItemDelegate

# A simple container for our image data.
Preview = namedtuple("Preview", "id title image")

NUMBER_OF_COLUMNS = 4
CELL_PADDING = 20  # Padding on all sides of each thumbnail.


class PreviewDelegate(QStyledItemDelegate):
    def paint(self, painter, option, index):
        # Retrieve the Preview object from the model.
        data = index.model().data(index, Qt.ItemDataRole.DisplayRole)
        if data is None:
            return

        width = option.rect.width() - CELL_PADDING * 2
        height = option.rect.height() - CELL_PADDING * 2

        # Scale the image to fit inside the cell while keeping its aspect ratio.
        scaled = data.image.scaled(
            width,
            height,
            aspectRatioMode=Qt.AspectRatioMode.KeepAspectRatio,
        )

        # Center the image within the cell.
        x = CELL_PADDING + (width - scaled.width()) / 2
        y = CELL_PADDING + (height - scaled.height()) / 2

        painter.drawImage(
            option.rect.x() + x,
            option.rect.y() + y,
            scaled,
        )

    def sizeHint(self, option, index):
        # Give every cell the same fixed size.
        return QSize(300, 200)


class PreviewModel(QAbstractTableModel):
    def __init__(self):
        super().__init__()
        self.previews = []

    def data(self, index, role):
        try:
            data = self.previews[
                index.row() * NUMBER_OF_COLUMNS + index.column()
            ]
        except IndexError:
            # The last row might not be full.
            return None

        if role == Qt.ItemDataRole.DisplayRole:
            return data

        if role == Qt.ItemDataRole.ToolTipRole:
            return data.title

    def columnCount(self, index):
        return NUMBER_OF_COLUMNS

    def rowCount(self, index):
        n_items = len(self.previews)
        return math.ceil(n_items / NUMBER_OF_COLUMNS)


class MainWindow(QMainWindow):
    def __init__(self):
        super().__init__()

        self.view = QTableView()
        self.view.horizontalHeader().hide()
        self.view.verticalHeader().hide()
        self.view.setGridStyle(Qt.PenStyle.NoPen)

        delegate = PreviewDelegate()
        self.view.setItemDelegate(delegate)

        self.model = PreviewModel()
        self.view.setModel(self.model)

        self.setCentralWidget(self.view)

        # Load all .jpg files from the current directory.
        for n, fn in enumerate(glob.glob("*.jpg")):
            image = QImage(fn)
            item = Preview(n, fn, image)
            self.model.previews.append(item)

        self.model.layoutChanged.emit()

        self.view.resizeRowsToContents()
        self.view.resizeColumnsToContents()


app = QApplication(sys.argv)
window = MainWindow()
window.show()
app.exec()
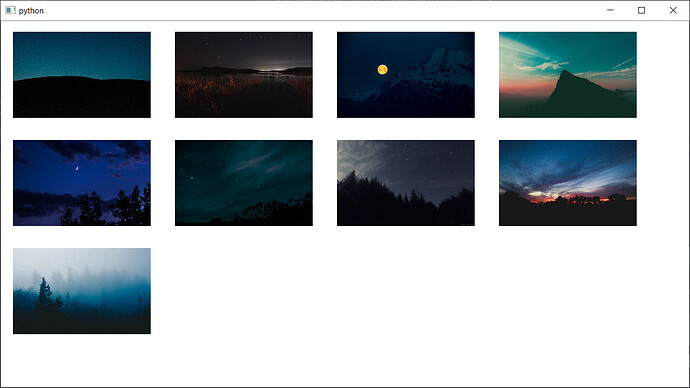
Drop this file into any folder with .jpg images and run it. You'll see your images laid out in a 4-column grid, each scaled to fit within its cell.
Let's walk through how each piece works.
The Preview namedtuple
Preview = namedtuple("Preview", "id title image")
This is a lightweight container that holds an ID number, a title (the filename), and the loaded QImage. Using a namedtuple keeps the code simple — you can access fields by name like data.title or data.image.
Purchasing Power Parity
Developers in [[ country ]] get [[ discount.discount_pc ]]% OFF on all books & courses with code [[ discount.coupon_code ]]The custom delegate
The PreviewDelegate class controls how each cell is drawn. The two methods that matter are paint() and sizeHint().
In paint(), we:
- Get the
Previewobject from the model viaindex.model().data(...). - Calculate the available drawing area by subtracting padding from the cell dimensions.
- Scale the image to fit, preserving its aspect ratio.
- Center the scaled image within the cell.
- Draw it using
painter.drawImage().
The sizeHint() method returns a fixed QSize(300, 200) for every cell. This keeps the grid uniform. You can adjust these values to change how large each thumbnail appears.
The table model
PreviewModel subclasses QAbstractTableModel and stores a flat list of Preview objects in self.previews. The model maps this flat list onto a grid by calculating the index as row * NUMBER_OF_COLUMNS + column. This means the first row contains items 0–3, the second row contains items 4–7, and so on.
The rowCount() method uses math.ceil() to handle the case where the last row isn't completely filled.
Loading images
In MainWindow.__init__(), we use glob.glob("*.jpg") to find all JPEG files in the current directory. Each one is loaded into a QImage and wrapped in a Preview namedtuple before being appended to the model's list.
After adding all items, we call self.model.layoutChanged.emit() to tell the view that the data has changed and it needs to refresh. Then resizeRowsToContents() and resizeColumnsToContents() ensure the cells are sized according to the delegate's sizeHint().
Approach 2: QListView in Icon Mode
The table view approach gives you full control over layout, but if you want something that behaves more like a file manager — with icons that reflow when you resize the window — QListView in icon mode is a great fit.
QListView has a built-in icon mode (QListView.ViewMode.IconMode) that arranges items in a flowing grid, much like the thumbnail view in a file browser. You can combine this with QFileSystemModel to automatically list files from a directory, or use your own model with custom icons.
Here's an example that loads images from a directory and displays them as flowing thumbnails:
import glob
import sys

from PyQt6.QtCore import QSize, Qt, QAbstractListModel
from PyQt6.QtGui import QImage, QIcon, QPixmap
from PyQt6.QtWidgets import QApplication, QMainWindow, QListView


THUMBNAIL_SIZE = QSize(200, 200)


class ImageListModel(QAbstractListModel):
    def __init__(self):
        super().__init__()
        self.images = []  # List of (filename, QIcon) tuples.

    def rowCount(self, parent=None):
        return len(self.images)

    def data(self, index, role):
        if not index.isValid():
            return None

        filename, icon = self.images[index.row()]

        if role == Qt.ItemDataRole.DecorationRole:
            return icon

        if role == Qt.ItemDataRole.DisplayRole:
            return filename

        if role == Qt.ItemDataRole.ToolTipRole:
            return filename

    def add_image(self, filename):
        image = QImage(filename)
        if image.isNull():
            return

        pixmap = QPixmap.fromImage(image).scaled(
            THUMBNAIL_SIZE,
            Qt.AspectRatioMode.KeepAspectRatio,
            Qt.TransformationMode.SmoothTransformation,
        )
        icon = QIcon(pixmap)
        self.images.append((filename, icon))


class MainWindow(QMainWindow):
    def __init__(self):
        super().__init__()
        self.setWindowTitle("Image Browser")
        self.resize(900, 600)

        self.view = QListView()
        self.view.setViewMode(QListView.ViewMode.IconMode)
        self.view.setIconSize(THUMBNAIL_SIZE)
        self.view.setGridSize(QSize(220, 240))
        self.view.setResizeMode(QListView.ResizeMode.Adjust)
        self.view.setMovement(QListView.Movement.Static)
        self.view.setUniformItemSizes(True)
        self.view.setSpacing(10)

        self.model = ImageListModel()
        self.view.setModel(self.model)

        self.setCentralWidget(self.view)

        # Load images from the current directory.
        for fn in glob.glob("*.jpg") + glob.glob("*.png"):
            self.model.add_image(fn)

        self.model.layoutChanged.emit()


app = QApplication(sys.argv)
window = MainWindow()
window.show()
app.exec()
This produces a thumbnail browser where the images reflow automatically when you resize the window — no extra signals or slots needed.
How the list view approach works
A few configuration calls on the QListView make this all come together:
setViewMode(QListView.ViewMode.IconMode)— Switches from the default list layout to a flowing grid of icons, similar to how a file manager displays thumbnails.setIconSize(THUMBNAIL_SIZE)— Tells the view how large to draw each icon.setGridSize(QSize(220, 240))— Sets the size of each cell in the grid. Making this a bit larger than the icon size leaves room for the filename label underneath.setResizeMode(QListView.ResizeMode.Adjust)— This is the line that makes items reflow when the window is resized. Without it, items stay at their original positions and you end up with odd gaps or overlaps.setMovement(QListView.Movement.Static)— Prevents the user from dragging items around to reposition them.setUniformItemSizes(True)— Lets Qt optimize layout performance since all items are the same size.
The list model
ImageListModel is a simple QAbstractListModel. Each item is a (filename, QIcon) tuple. When Qt asks for DecorationRole, we return the icon (the thumbnail). When it asks for DisplayRole, we return the filename, which gets rendered as a label beneath the icon.
In add_image(), we load the image, scale it down to THUMBNAIL_SIZE using smooth transformation for better quality, convert it to a QIcon, and store it. Pre-scaling the images at load time means the view doesn't have to do expensive scaling during painting.
Which approach should you use?
Both approaches work well, and which one you choose depends on what you need:
- The table view + delegate approach gives you pixel-level control over how each item is rendered. You can draw text overlays, borders, status indicators, or anything else you want in the delegate's
paint()method. If you want to learn more about building your own custom widgets with painting, see Creating Your Own Custom Widgets. - The list view in icon mode approach gives you automatic flowing layout with less code. Items rearrange themselves when the window is resized, and you get built-in text labels under each icon for free.
For a file-browser-style application like Gwenview, the QListView approach is usually the better starting point. You can always add a custom delegate to a QListView later if you need more control over how each thumbnail is drawn.
Whichever approach you take, Qt's model/view framework keeps your data and presentation cleanly separated, making it straightforward to add features like sorting and filtering or loading images from different sources as your application grows. For a deeper dive into using table views with real-world data, take a look at the QTableView with numpy and pandas tutorial.
PyQt6 Crash Course by Martin Fitzpatrick — The important parts of PyQt6 in bite-size chunks
