PyQt provides plenty of tools for creating unique and visually appealing graphical user interfaces (GUIs). One aspect of your applications that you may not have considered customizing is the title bar. The title bar is the topmost part of the window, where your users find the app's name, window controls & other elements.
This part of the window is usually drawn by the operating system or desktop environment, and its default look and feel may not gel well with the rest of your application. However, you may want to customize it to add additional functionality. For example, in web browsers the document tabs are now typically collapsed into the title bar to maximize available space for viewing pages.
In this tutorial, you will learn how to create custom title bars in PyQt6 step by step. We'll cover creating frameless windows, adding window control buttons, handling window dragging with the mouse, and styling the title bar with a modern unified look. By the end, you'll have the knowledge to enhance your PyQt applications with personalized and stylish title bars.
You can download the source code for all our articles.
The code for this article is in the folder pyqt6/tutorials/custom-title-bar
Creating Frameless Windows in PyQt6
The first step to providing a PyQt application with a custom title bar is to remove the default title bar and window decoration provided by the operating system. If we don't take this step, we'll end up with multiple title bars at the top of our windows.
In PyQt, we can create a frameless window using the setWindowFlags() method available on all QWidget subclasses, including QMainWindow. We call this method, passing in the FramelessWindowHint flag, which lives in the Qt namespace under the WindowType enumeration.
Here's the code of a minimal PyQt app whose main window is frameless:
from PyQt6.QtCore import Qt
from PyQt6.QtWidgets import QApplication, QMainWindow

class MainWindow(QMainWindow):
    def __init__(self):
        super().__init__()
        self.setWindowTitle("Custom Title Bar")
        self.resize(400, 200)
        self.setWindowFlags(Qt.WindowType.FramelessWindowHint)

if __name__ == "__main__":
    app = QApplication([])
    window = MainWindow()
    window.show()
    app.exec()
After importing the required classes, we create a window by subclassing QMainWindow. In the class initializer method, we set the window's title and resize the window using the resize() method. Then we use the setWindowFlags() to make the window frameless. The rest is the usual boilerplate code for creating PyQt applications.
If you run this app from your command line, you'll get the following window on your screen:
 A frameless window in PyQt6
As you can see, the app's main window doesn't have a title bar or any other decoration. It's only a gray rectangle on your screen.
Packaging Python Applications with PyInstaller by Martin Fitzpatrick — This step-by-step guide walks you through packaging your own Python applications from simple examples to complete installers and signed executables.
Because the window has no buttons, you need to press Alt-F4 on Windows and Linux or Cmd+Q on macOS to close the app.
This isn't very helpful, of course, but we'll be adding back in our custom title bar shortly.
Setting Up the Main Window
Before creating our custom title bar, we'll finish the initialization of our app's main window, import some additional classes and create the window's central widget and layouts.
Here's the code update:
from PyQt6.QtCore import Qt
from PyQt6.QtWidgets import (
    QApplication,
    QLabel,
    QMainWindow,
    QVBoxLayout,
    QWidget,
)

class MainWindow(QMainWindow):
    def __init__(self):
        super().__init__()
        self.setWindowTitle("Custom Title Bar")
        self.resize(400, 200)
        self.setWindowFlags(Qt.WindowType.FramelessWindowHint)
        central_widget = QWidget()
        self.title_bar = CustomTitleBar(self)

        work_space_layout = QVBoxLayout()
        work_space_layout.setContentsMargins(11, 11, 11, 11)
        work_space_layout.addWidget(QLabel("Hello, World!", self))

        centra_widget_layout = QVBoxLayout()
        centra_widget_layout.setContentsMargins(0, 0, 0, 0)
        centra_widget_layout.setAlignment(Qt.AlignmentFlag.AlignTop)
        centra_widget_layout.addWidget(self.title_bar)
        centra_widget_layout.addLayout(work_space_layout)

        central_widget.setLayout(centra_widget_layout)
        self.setCentralWidget(central_widget)

# ...
First, we import the QLabel, QVBoxLayout, and QWidget classes. In our window's initializer, we create a central widget by instantiating QWidget(). Next, we create an instance attribute called title_bar by instantiating a class called CustomTitleBar. We still need to implement this class—we'll do this in a moment.
The next step is to create a layout for our window's workspace. In this example, we're using a QVBoxLayout, but you can use the layout that best fits your needs. We also set some margins for the layout content and added a label containing the phrase "Hello, World!".
Next, we create a global layout for our central widget. Again, we use a QVBoxLayout. We set the layout's margins to 0 and aligned it on the top of our frameless window. In this layout, we need to add the title bar at the top and the workspace at the bottom. Finally, we set the central widget's layout and the app's central widget.
That's it! We have all the boilerplate code we need for our window to work correctly. Now we're ready to write our custom title bar.
Creating a Custom Title Bar Widget
In this section, we will create a custom title bar for our main window. To do this, we will create a new class by inheriting from QWidget. First, go ahead and update your imports like in the code below:
from PyQt6.QtCore import QSize, Qt
from PyQt6.QtGui import QPalette
from PyQt6.QtWidgets import (
    QApplication,
    QHBoxLayout,
    QLabel,
    QMainWindow,
    QStyle,
    QToolButton,
    QVBoxLayout,
    QWidget,
)

# ...
Here, we've imported a few new classes. We will use these classes as building blocks for our title bar. Without further ado, let's get into the title bar code. We'll introduce the code in small consecutive chunks to facilitate the explanation. Here's the first piece:
# ...

class CustomTitleBar(QWidget):
    def __init__(self, parent):
        super().__init__(parent)
        self.setAutoFillBackground(True)
        self.setBackgroundRole(QPalette.ColorRole.Highlight)
        self.initial_pos = None
        title_bar_layout = QHBoxLayout(self)
        title_bar_layout.setContentsMargins(1, 1, 1, 1)
        title_bar_layout.setSpacing(2)
In this code snippet, we create a new class by inheriting from QWidget. This way, our title bar will have all the standard features and functionalities of any PyQt widgets. In the class initializer, we set autoFillBackground to true because we want to give a custom color to the bar. The next line of code sets the title bar's background color to QPalette.ColorRole.Highlight, which is a blueish color.
The next line of code creates and initializes an instance attribute called initial_pos. We'll use this attribute later on when we deal with moving the window around our screen.
The final three lines of code allow us to create a layout for our title bar. Because the title bar should be horizontally oriented, we use a QHBoxLayout class to structure it.
Adding a Window Title Label
The piece of code below deals with our window's title:
# ...

class CustomTitleBar(QWidget):
    def __init__(self, parent):
        # ...
        self.title = QLabel(f"{self.__class__.__name__}", self)
        self.title.setStyleSheet(
            """QLabel {
                   font-weight: bold;
                   border: 2px solid black;
                   border-radius: 12px;
                   margin: 2px;
                }
            """
        )
        self.title.setAlignment(Qt.AlignmentFlag.AlignCenter)
        if title := parent.windowTitle():
            self.title.setText(title)
        title_bar_layout.addWidget(self.title)
The first line of new code creates a title attribute. It's a QLabel object that will hold the window's title. Because we want to build a cool title bar, we'd like to add some custom styling to the title. To do this, we use the setStyleSheet() method with a string representing a CSS style sheet as an argument. The style sheet tweaks the font, borders, and margins of our title label.
Next, we center the title using the setAlignment() method with the Qt.AlignmentFlag.AlignCenter flag as an argument.
In the conditional statement, we check whether our window has a title. If that's the case, we set the text of our title label to the current window's title. Finally, we added the title label to the title bar layout.
Adding Minimize, Maximize, Close, and Restore Buttons
The next step in our journey to build a custom title bar is to provide standard window controls. In other words, we need to add the minimize, maximize, close, and normal buttons. These buttons will allow our users to interact with our window. To create the buttons, we'll use the QToolButton class.
Here's the required code:
# ...

class CustomTitleBar(QWidget):
    def __init__(self, parent):
        # ...
        # Min button
        self.min_button = QToolButton(self)
        min_icon = self.style().standardIcon(
            QStyle.StandardPixmap.SP_TitleBarMinButton
        )
        self.min_button.setIcon(min_icon)
        self.min_button.clicked.connect(self.window().showMinimized)

        # Max button
        self.max_button = QToolButton(self)
        max_icon = self.style().standardIcon(
            QStyle.StandardPixmap.SP_TitleBarMaxButton
        )
        self.max_button.setIcon(max_icon)
        self.max_button.clicked.connect(self.window().showMaximized)

        # Close button
        self.close_button = QToolButton(self)
        close_icon = self.style().standardIcon(
            QStyle.StandardPixmap.SP_TitleBarCloseButton
        )
        self.close_button.setIcon(close_icon)
        self.close_button.clicked.connect(self.window().close)

        # Normal button
        self.normal_button = QToolButton(self)
        normal_icon = self.style().standardIcon(
            QStyle.StandardPixmap.SP_TitleBarNormalButton
        )
        self.normal_button.setIcon(normal_icon)
        self.normal_button.clicked.connect(self.window().showNormal)
        self.normal_button.setVisible(False)
In this code snippet, we define all the required buttons by instantiating the QToolButton class. The minimize, maximize, and close buttons follow the same pattern. We create the button, define an icon for the buttons at hand, and set the icon using the setIcon() method.
Note that we use the standard icons that PyQt provides. For example, the minimize button uses the SP_TitleBarMinButton icon. Similarly, the maximize and close buttons use the SP_TitleBarMaxButton and SP_TitleBarCloseButton icons. We find all these icons in the QStyle.StandardPixmap namespace.
Finally, we connect the button's clicked() signal to the appropriate slot. For the minimize button, the proper slot is .showMinimized(). For the maximize and close buttons, the right slots are .showMaximized() and close(), respectively. All these slots are part of the main window's class.
The normal button at the end of the above code uses the SP_TitleBarNormalButton icon and showNormal() slot. This button has an extra setting. We've set its visibility to False, meaning that the button will be hidden by default. It'll only appear when we maximize the window to allow us to return to the normal state.
Styling and Adding Buttons to the Layout
Now that we've created and tweaked the buttons, we must add them to our title bar. To do this, we can use the following for loop:
# ...

class CustomTitleBar(QWidget):
    def __init__(self, parent):
        # ...
        buttons = [
            self.min_button,
            self.normal_button,
            self.max_button,
            self.close_button,
        ]
        for button in buttons:
            button.setFocusPolicy(Qt.FocusPolicy.NoFocus)
            button.setFixedSize(QSize(28, 28))
            button.setStyleSheet(
                """QToolButton {
                        border: 2px solid white;
                        border-radius: 12px;
                    }
                """
            )
            title_bar_layout.addWidget(button)
This loop iterates over our four buttons in a predefined order. The first thing to do inside the loop is to define the focus policy of each button. We don't want these buttons to steal focus from widgets in the window's workspace, so we set their focus policy to NoFocus.
Next, we set a fixed size of 28 by 28 pixels for the three buttons using the setFixedSize() method with a QSize object as an argument.
Our main goal in this section is to create a custom title bar. A handy way to customize the look and feel of PyQt widgets is to use CSS style sheets. In the above piece of code, we use the setStyleSheet() method to apply a custom CSS style sheet to our four buttons. The sheet defines a white and round border for each button.
The final line in the above code calls the addWidget() method to add each custom button to our title bar's layout. That's it! We're now ready to give our title bar a try. Go ahead and run the application from your command line. You'll see a window like the following:
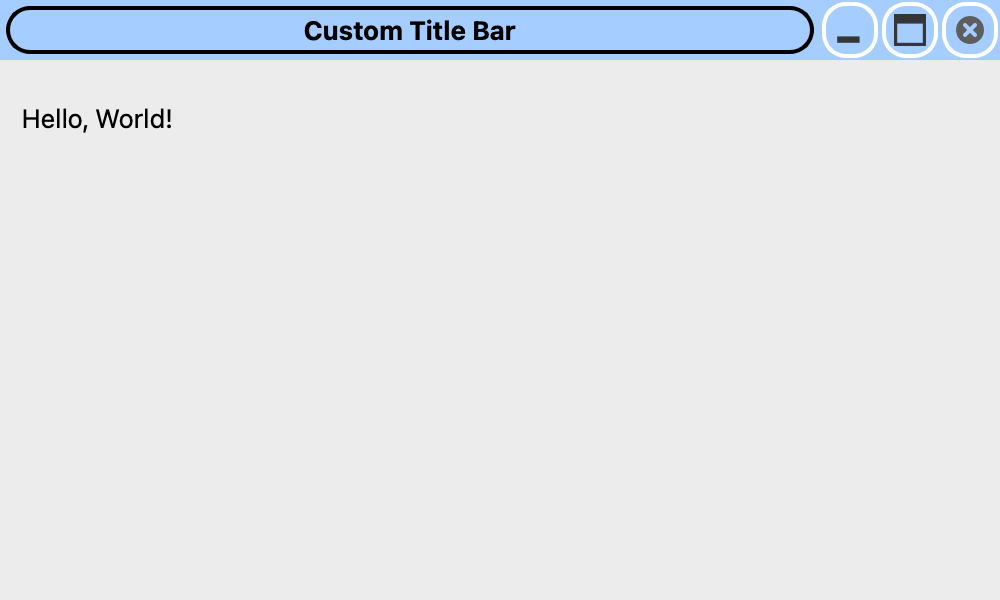 A PyQt6 window with a custom title bar
This is pretty simple styling, but you get the idea. You can tweak the title bar further, depending on your needs. For example, you can change the colors and borders, customize the title's font, add other widgets to the bar, and more.
We'll apply some nicer styles later, once we have the functionality in place! Keep reading.
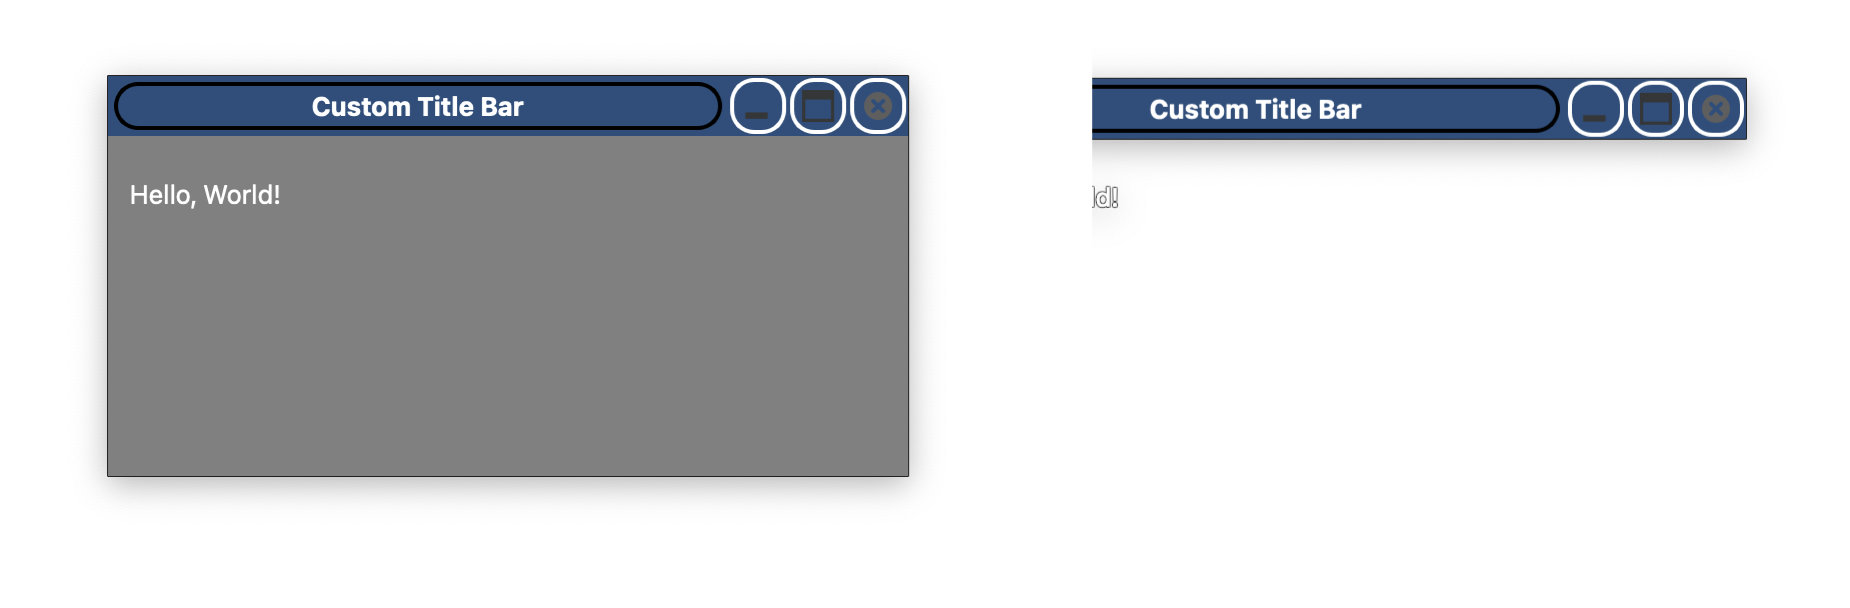
Even though the title bar looks different, it has limited functionality. For example, if you click the maximize button, then the window will change to its maximized state. However, the normal button won't show up to allow you to return the window to its previous state.
In addition to this, if you try to move the window around your screen, you'll quickly notice a problem: it's impossible to move the window!
In the following sections, we'll write the necessary code to fix these issues and make our custom title bar fully functional. To kick things off, let's start by fixing the state issues.
Updating the Window's State on Maximize and Restore
To fix the issue related to the window's state, we'll override the changeEvent() method on the MainWindow class. This method is called directly by Qt whenever the window state changes, e.g. if the window is maximized or hidden. By overriding this event, we can add our own custom behavior.
Here's the code that overrides the changeEvent() method:
from PyQt6.QtCore import QSize, Qt, QEvent
# ...

class MainWindow(QMainWindow):
    # ...

    def changeEvent(self, event):
        if event.type() == QEvent.Type.WindowStateChange:
            self.title_bar.window_state_changed(self.windowState())
        super().changeEvent(event)
        event.accept()
This method is fairly straightforward. We check the event type to see if it is a WindowStateChange. If that's the case, we call the window_state_changed() method of our custom title bar, passing the current window's state as an argument. In the final two lines, we call the parent class's changeEvent() method and accept the event to signal that we've correctly processed it.
Here's the implementation of our window_state_changed() method in CustomTitleBar:
# ...

class CustomTitleBar(QWidget):
    # ...

    def window_state_changed(self, state):
        if state == Qt.WindowState.WindowMaximized:
            self.normal_button.setVisible(True)
            self.max_button.setVisible(False)
        else:
            self.normal_button.setVisible(False)
            self.max_button.setVisible(True)
This method takes a window's state as an argument. Depending on the value of the state parameter, we will show or hide the maximize and restore buttons.
First, if the window is currently maximized we will show the normal button and hide the maximize button. Alternatively, if the window is currently not maximized we will hide the normal button and show the maximize button.
The effect of this, together with the order we added the buttons above, is that when you maximize the window the maximize button will appear to be replaced with the normal button. When you restore the window to its normal size, the normal button will be replaced with the maximize button.
Go ahead and run the app again. Click the maximize button. You'll note that when the window gets maximized, the middle button changes its icon. Now you have access to the normal button. If you click it, then the window will recover its previous state.
Handling Window Dragging with Mouse Events
Now it's time to write the code that enables us to move the window around the screen while holding the mouse's left button on the title bar. To do this, we only need to add code to the CustomTitleBar class.
In particular, we need to override three mouse events:
mousePressEvent()will let us know when the user clicks on our custom title bar using the mouse's left button. This may indicate that the window movement should start.mouseMoveEvent()will let us process window movement.mouseReleaseEvent()will let us know when the user has released the mouse's left button so that we can stop moving the window.
Here's the code that overrides the mousePressEvent() method:
# ...

class CustomTitleBar(QWidget):
    # ...

    def mousePressEvent(self, event):
        if event.button() == Qt.MouseButton.LeftButton:
            self.initial_pos = event.position().toPoint()
        super().mousePressEvent(event)
        event.accept()
In this method, we first check if the user clicks on the title bar using the mouse's left-click button. If that's the case, then we update our initial_pos attribute to the clicked point. Remember that we defined initial_pos and initialized it to None back in the __init__() method of CustomTitleBar.
Next, we need to override the mouseMoveEvent() method. Here's the required code:
# ...

class CustomTitleBar(QWidget):
    # ...

    def mouseMoveEvent(self, event):
        if self.initial_pos is not None:
            delta = event.position().toPoint() - self.initial_pos
            self.window().move(
                self.window().x() + delta.x(),
                self.window().y() + delta.y(),
            )
        super().mouseMoveEvent(event)
        event.accept()
This if statement in mouseMoveEvent() checks if the initial_pos attribute is not None. If this condition is true, then the if code block executes because we have a valid initial position.
The first line in the if code block calculates the difference, or delta, between the current and initial mouse positions. To get the current position, we call the position() method on the event object and convert that position into a QPoint object using the toPoint() method.
The following four lines update the position of our application's main window by adding the delta values to the current window position. The move() method does the hard work of moving the window.
In summary, this code updates the window position based on the movement of our mouse. It tracks the initial position of the mouse, calculates the difference between the initial position and the current position, and applies that difference to the window's position.
Finally, we can complete the mouseReleaseEvent() method:
# ...

class CustomTitleBar(QWidget):
    # ...

    def mouseReleaseEvent(self, event):
        self.initial_pos = None
        super().mouseReleaseEvent(event)
        event.accept()
This method's implementation is pretty straightforward. Its purpose is to reset the initial position by setting it back to None when the mouse is released, indicating that the drag is complete.
That's it! Go ahead and run your app again. Click on your custom title bar and move the window around while holding the mouse's left-click button. Can you move the window? Great! Your custom title bar is now fully functional.
The completed code for the custom title bar is shown below:
from PyQt6.QtCore import QEvent, QSize, Qt
from PyQt6.QtGui import QPalette
from PyQt6.QtWidgets import (
    QApplication,
    QHBoxLayout,
    QLabel,
    QMainWindow,
    QStyle,
    QToolButton,
    QVBoxLayout,
    QWidget,
)

class CustomTitleBar(QWidget):
    def __init__(self, parent):
        super().__init__(parent)
        self.setAutoFillBackground(True)
        self.setBackgroundRole(QPalette.ColorRole.Highlight)
        self.initial_pos = None
        title_bar_layout = QHBoxLayout(self)
        title_bar_layout.setContentsMargins(1, 1, 1, 1)
        title_bar_layout.setSpacing(2)

        self.title = QLabel(f"{self.__class__.__name__}", self)
        self.title.setStyleSheet(
            """QLabel {
                   font-weight: bold;
                   border: 2px solid black;
                   border-radius: 12px;
                   margin: 2px;
                }
            """
        )
        self.title.setAlignment(Qt.AlignmentFlag.AlignCenter)
        if title := parent.windowTitle():
            self.title.setText(title)
        title_bar_layout.addWidget(self.title)

        # Min button
        self.min_button = QToolButton(self)
        min_icon = self.style().standardIcon(
            QStyle.StandardPixmap.SP_TitleBarMinButton,
        )
        self.min_button.setIcon(min_icon)
        self.min_button.clicked.connect(self.window().showMinimized)

        # Max button
        self.max_button = QToolButton(self)
        max_icon = self.style().standardIcon(
            QStyle.StandardPixmap.SP_TitleBarMaxButton,
        )
        self.max_button.setIcon(max_icon)
        self.max_button.clicked.connect(self.window().showMaximized)

        # Close button
        self.close_button = QToolButton(self)
        close_icon = self.style().standardIcon(
            QStyle.StandardPixmap.SP_TitleBarCloseButton
        )
        self.close_button.setIcon(close_icon)
        self.close_button.clicked.connect(self.window().close)

        # Normal button
        self.normal_button = QToolButton(self)
        normal_icon = self.style().standardIcon(
            QStyle.StandardPixmap.SP_TitleBarNormalButton
        )
        self.normal_button.setIcon(normal_icon)
        self.normal_button.clicked.connect(self.window().showNormal)
        self.normal_button.setVisible(False)
        # Add buttons
        buttons = [
            self.min_button,
            self.normal_button,
            self.max_button,
            self.close_button,
        ]
        for button in buttons:
            button.setFocusPolicy(Qt.FocusPolicy.NoFocus)
            button.setFixedSize(QSize(28, 28))
            button.setStyleSheet(
                """QToolButton {
                        border: 2px solid white;
                        border-radius: 12px;
                    }
                """
            )
            title_bar_layout.addWidget(button)

    def window_state_changed(self, state):
        if state == Qt.WindowState.WindowMaximized:
            self.normal_button.setVisible(True)
            self.max_button.setVisible(False)
        else:
            self.normal_button.setVisible(False)
            self.max_button.setVisible(True)

    def mousePressEvent(self, event):
        if event.button() == Qt.MouseButton.LeftButton:
            self.initial_pos = event.position().toPoint()
        super().mousePressEvent(event)
        event.accept()

    def mouseMoveEvent(self, event):
        if self.initial_pos is not None:
            delta = event.position().toPoint() - self.initial_pos
            self.window().move(
                self.window().x() + delta.x(),
                self.window().y() + delta.y(),
            )
        super().mouseMoveEvent(event)
        event.accept()

    def mouseReleaseEvent(self, event):
        self.initial_pos = None
        super().mouseReleaseEvent(event)
        event.accept()

class MainWindow(QMainWindow):
    def __init__(self):
        super().__init__()
        self.setWindowTitle("Custom Title Bar")
        self.resize(400, 200)
        self.setWindowFlags(Qt.WindowType.FramelessWindowHint)
        central_widget = QWidget()
        self.title_bar = CustomTitleBar(self)

        work_space_layout = QVBoxLayout()
        work_space_layout.setContentsMargins(11, 11, 11, 11)
        work_space_layout.addWidget(QLabel("Hello, World!", self))

        central_widget_layout = QVBoxLayout()
        central_widget_layout.setContentsMargins(0, 0, 0, 0)
        central_widget_layout.setAlignment(Qt.AlignmentFlag.AlignTop)
        central_widget_layout.addWidget(self.title_bar)
        central_widget_layout.addLayout(work_space_layout)

        central_widget.setLayout(central_widget_layout)
        self.setCentralWidget(central_widget)

    def changeEvent(self, event):
        if event.type() == QEvent.Type.WindowStateChange:
            self.title_bar.window_state_changed(self.windowState())
        super().changeEvent(event)
        event.accept()

if __name__ == "__main__":
    app = QApplication([])
    window = MainWindow()
    window.show()
    app.exec()
Styling a Modern Unified Title Bar with QSS
So far, we've covered the technical aspects of styling our window with a custom title bar, and added the code to make it function as expected. But it doesn't look great. In this section we'll take our existing code & tweak the styling and buttons to produce something that's a little more professional looking.
One common reason for wanting to apply custom title bars to a window is to integrate the title bar with the rest of the application. This technique is called a unified title bar and can be seen in some popular applications such as web browsers, or Spotify:
In this section, we'll look at how we can reproduce the same effect in PyQt using a combination of stylesheets and icons. Below is a screenshot of the final result which we'll be building:
As you can see the window and the toolbar blend nicely together and the window has rounded corners. There are a few different ways to do this, but we'll cover a simple approach using Qt stylesheets to apply styling over the entire window.
Creating a Translucent Background Window
In order to customize the shape of the window, we need to first tell the OS to stop drawing the default window outline and background for us. We do that by setting a window attribute on the window. This is similar to the flags we already discussed, in that it turns on and off different window manager behaviors:
# ...
class MainWindow(QMainWindow):
    def __init__(self):
        super().__init__()
        self.setWindowTitle("Custom Title Bar")
        self.resize(400, 200)
        self.setWindowFlags(Qt.WindowType.FramelessWindowHint)
        self.setAttribute(Qt.WidgetAttribute.WA_TranslucentBackground)
        # ...
We've added a call to self.setAttribute(), which sets the attribute Qt.WidgetAttribute.WA_TranslucentBackground on the window. If you run the code now, you will see the window has become transparent, with only the widget text and toolbar visible.
Applying Rounded Corners with a Container Widget
Next, we'll tell Qt to draw a new custom background for us. If you've worked with QSS before, the most obvious way to apply curved edges to the window using QSS stylesheets would be to set border-radius styles on the main window directly:
#...
class MainWindow(QMainWindow):
    def __init__(self):
        super().__init__()
        # ...
        self.setAttribute(Qt.WidgetAttribute.WA_TranslucentBackground)
        self.setStyleSheet("background-color: gray; border-radius: 10px;")
#...
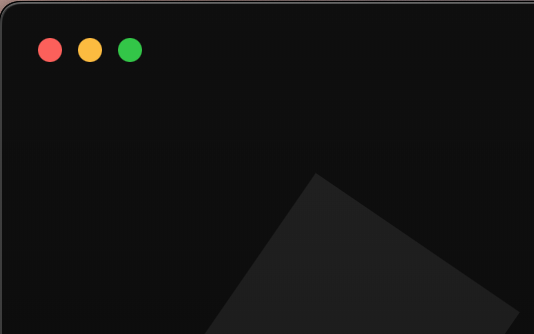
However, if you try this, you'll notice that it doesn't work. If you enable a translucent background, the background of the window is not drawn (including your styles). If you don't set translucent background, the window is filled to the edges with a solid color ignoring the border radius:
 .
.
The good news is that, with a bit of lateral thinking, there is a simple solution. We already know that we can construct interfaces by nesting widgets in layouts. Since we can't style the border-radius of a window, but we can style any other widget, the solution is to simply add a container widget into our window and apply the curved-edge and background styles to that.
On our MainWindow class, we already have a central widget which contains our layout, so we can apply the styles there:
# ...

class MainWindow(QMainWindow):
    def __init__(self):
        super().__init__()
        # ...
        central_widget = QWidget()
        # This container holds the window contents, so we can style it.
        central_widget.setObjectName("Container")
        central_widget.setStyleSheet(
            """#Container {
                    background: qlineargradient(x1:0 y1:0, x2:1 y2:1, stop:0 #051c2a stop:1 #44315f);
                    border-radius: 5px;
                }
            """
        )
        self.title_bar = CustomTitleBar(self)
        # ...
We've taken the existing central_widget object and assigned an object name to it. This is an ID which we can use to refer to the widget from QSS and apply our styles specifically to that widget.
If you're familiar with CSS, you might expect that IDs like #Container must be unique. However, they are not: you can give multiple widgets the same object name if you like. So you can re-use this technique and QSS on multiple windows in your application without problems.
With this style applied on our window, we have a nice gradient background with curved corners.
Making the Title Bar Transparent
Unfortunately, the title bar we created is drawn filled, so the background and curved corners of our window are overwritten. To make things look coherent we need to make our title bar also transparent by removing the background color & auto-fill behavior we set earlier.
We don't need to set any flags or attributes on this widget because it is not a window. A QWidget object is transparent by default.
We can also make some tweaks to the style of the title label, such as making the title capitalized using text-transform: uppercase, adjusting the font size and color -- feel free to customize this yourself:
# ...

class CustomTitleBar(QWidget):
    def __init__(self, parent):
        super().__init__(parent)
        # self.setAutoFillBackground(True) # <-- remove
        # self.setBackgroundRole(QPalette.ColorRole.Highlight) # <-- remove
        self.initial_pos = None
        title_bar_layout = QHBoxLayout(self)
        title_bar_layout.setContentsMargins(1, 1, 1, 1)
        title_bar_layout.setSpacing(2)
        self.title = QLabel(f"{self.__class__.__name__}", self)
        self.title.setAlignment(Qt.AlignmentFlag.AlignCenter)
        self.title.setStyleSheet(
            """QLabel {
                    text-transform: uppercase;
                    font-size: 10pt;
                    margin-left: 48px;
                    color: white;
                }
            """
        )
QSS is very similar to CSS, especially for text styling.
The margin-left: 48px is to compensate for the 3 × 16 px window icons on the right-hand side so the text aligns centrally.
Using Custom SVG Icons for Window Buttons
The icons are currently using built-in Qt icons which are a little bit plain & ugly. Next let's update the icons, using custom SVG icons of simple colored circles, for the minimize, maximize, close & restore buttons:
from PyQt6.QtGui import QIcon
# ...
class CustomTitleBar(QWidget):
    def __init__(self, parent):
        super().__init__(parent)
        # ...
        # Min button
        self.min_button = QToolButton(self)
        min_icon = QIcon()
        min_icon.addFile('min.svg')
        self.min_button.setIcon(min_icon)
        self.min_button.clicked.connect(self.window().showMinimized)

        # Max button
        self.max_button = QToolButton(self)
        max_icon = QIcon()
        max_icon.addFile('max.svg')
        self.max_button.setIcon(max_icon)
        self.max_button.clicked.connect(self.window().showMaximized)

        # Close button
        self.close_button = QToolButton(self)
        close_icon = QIcon()
        close_icon.addFile('close.svg') # Close has only a single state.
        self.close_button.setIcon(close_icon)
        self.close_button.clicked.connect(self.window().close)

        # Normal button
        self.normal_button = QToolButton(self)
        normal_icon = QIcon()
        normal_icon.addFile('normal.svg')
        self.normal_button.setIcon(normal_icon)
        self.normal_button.clicked.connect(self.window().showNormal)
        self.normal_button.setVisible(False)
        # ...
This code follows the same basic structure as before, but instead of using the built-in icons here we're loading our icons from SVG images. These images are very simple, consisting of a single circle in green, red or yellow for the different states mimicking macOS.
The normal.svg file for returning a maximized window to normal size shows a semi-transparent green circle for simplicity's sake, but you can include iconography and hover behaviors on the buttons if you prefer.
The final step is to iterate through the created buttons, adding them to the title bar layout. This is slightly tweaked from before to remove the border styling replacing it with simple padding and setting the icon sizes to 16px. Because we are using SVG files, the icons will automatically scale to the available space:
# ...

class CustomTitleBar(QWidget):
    def __init__(self, parent):
        super().__init__(parent)
        # ...
        for button in buttons:
            button.setFocusPolicy(Qt.FocusPolicy.NoFocus)
            button.setFixedSize(QSize(16, 16))
            button.setStyleSheet(
                """QToolButton {
                        border: none;
                        padding: 2px;
                    }
                """
            )
            title_bar_layout.addWidget(button)
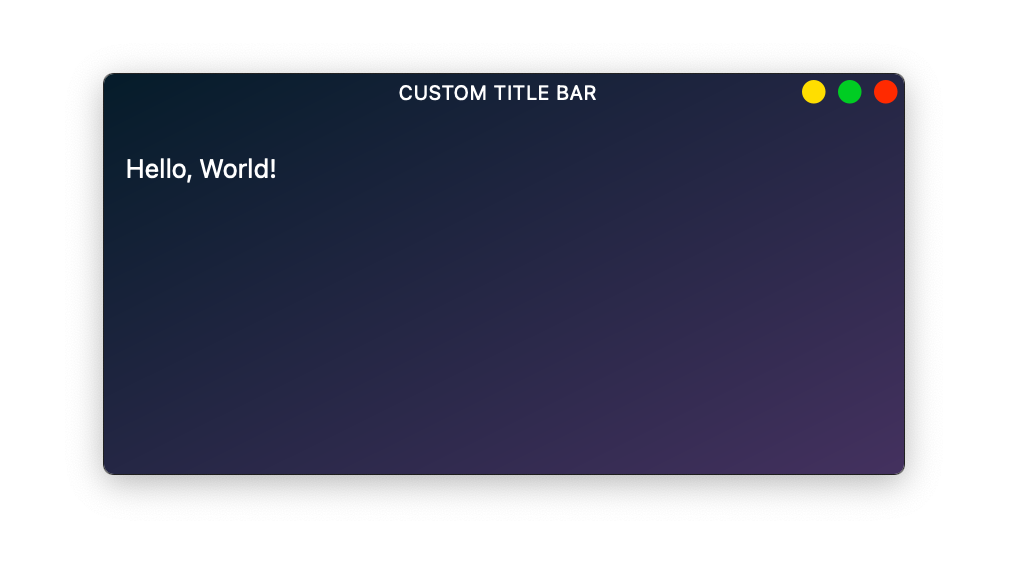
And that's it! With these changes, you can now run your application and you'll see a nice sleek modern-looking UI with unified title bar and custom controls:
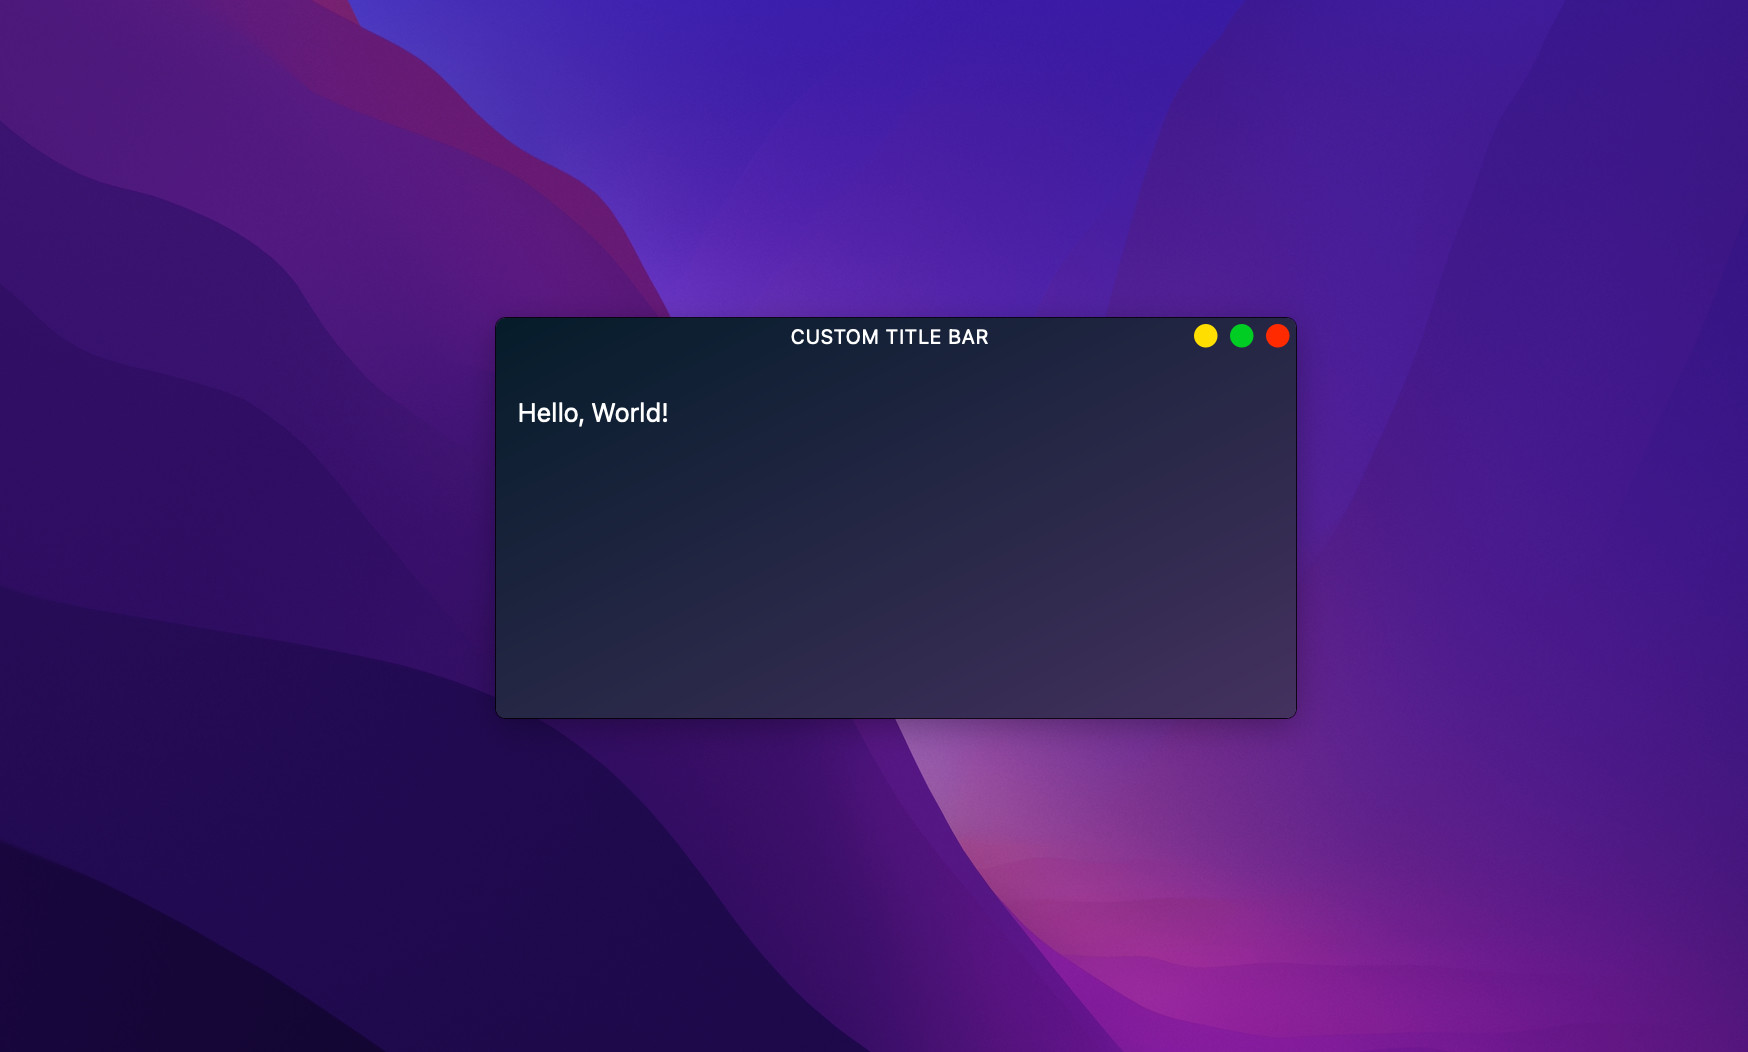 The final result, showing our unified title bar and window design.
Complete Code for the Styled Custom Title Bar
The complete code is shown below:
from PyQt6.QtCore import QEvent, QSize, Qt
from PyQt6.QtGui import QIcon
from PyQt6.QtWidgets import (
    QApplication,
    QHBoxLayout,
    QLabel,
    QMainWindow,
    QToolButton,
    QVBoxLayout,
    QWidget,
)

class CustomTitleBar(QWidget):
    def __init__(self, parent):
        super().__init__(parent)
        self.initial_pos = None
        title_bar_layout = QHBoxLayout(self)
        title_bar_layout.setContentsMargins(1, 1, 1, 1)
        title_bar_layout.setSpacing(2)
        self.title = QLabel(f"{self.__class__.__name__}", self)
        self.title.setAlignment(Qt.AlignmentFlag.AlignCenter)
        self.title.setStyleSheet(
            """QLabel {
                    text-transform: uppercase;
                    font-size: 10pt;
                    margin-left: 48px;
                    color: white;
                }
            """
        )

        if title := parent.windowTitle():
            self.title.setText(title)
        title_bar_layout.addWidget(self.title)

        # Min button
        self.min_button = QToolButton(self)
        min_icon = QIcon()
        min_icon.addFile("min.svg")
        self.min_button.setIcon(min_icon)
        self.min_button.clicked.connect(self.window().showMinimized)

        # Max button
        self.max_button = QToolButton(self)
        max_icon = QIcon()
        max_icon.addFile("max.svg")
        self.max_button.setIcon(max_icon)
        self.max_button.clicked.connect(self.window().showMaximized)

        # Close button
        self.close_button = QToolButton(self)
        close_icon = QIcon()
        close_icon.addFile("close.svg")  # Close has only a single state.
        self.close_button.setIcon(close_icon)
        self.close_button.clicked.connect(self.window().close)

        # Normal button
        self.normal_button = QToolButton(self)
        normal_icon = QIcon()
        normal_icon.addFile("normal.svg")
        self.normal_button.setIcon(normal_icon)
        self.normal_button.clicked.connect(self.window().showNormal)
        self.normal_button.setVisible(False)
        # Add buttons
        buttons = [
            self.min_button,
            self.normal_button,
            self.max_button,
            self.close_button,
        ]
        for button in buttons:
            button.setFocusPolicy(Qt.FocusPolicy.NoFocus)
            button.setFixedSize(QSize(16, 16))
            button.setStyleSheet(
                """QToolButton {
                        border: none;
                        padding: 2px;
                    }
                """
            )
            title_bar_layout.addWidget(button)

    def window_state_changed(self, state):
        if state == Qt.WindowState.WindowMaximized:
            self.normal_button.setVisible(True)
            self.max_button.setVisible(False)
        else:
            self.normal_button.setVisible(False)
            self.max_button.setVisible(True)

    def mousePressEvent(self, event):
        if event.button() == Qt.MouseButton.LeftButton:
            self.initial_pos = event.position().toPoint()
        super().mousePressEvent(event)
        event.accept()

    def mouseMoveEvent(self, event):
        if self.initial_pos is not None:
            delta = event.position().toPoint() - self.initial_pos
            self.window().move(
                self.window().x() + delta.x(),
                self.window().y() + delta.y(),
            )
        super().mouseMoveEvent(event)
        event.accept()

    def mouseReleaseEvent(self, event):
        self.initial_pos = None
        super().mouseReleaseEvent(event)
        event.accept()

class MainWindow(QMainWindow):
    def __init__(self):
        super().__init__()
        self.setWindowTitle("Custom Title Bar")
        self.resize(400, 200)
        self.setWindowFlags(Qt.WindowType.FramelessWindowHint)
        self.setAttribute(Qt.WidgetAttribute.WA_TranslucentBackground)
        central_widget = QWidget()
        # This container holds the window contents, so we can style it.
        central_widget.setObjectName("Container")
        central_widget.setStyleSheet(
            """#Container {
                    background: qlineargradient(x1:0 y1:0, x2:1 y2:1, stop:0 #051c2a stop:1 #44315f);
                    border-radius: 5px;
                }
            """
        )
        self.title_bar = CustomTitleBar(self)

        work_space_layout = QVBoxLayout()
        work_space_layout.setContentsMargins(11, 11, 11, 11)
        hello_label = QLabel("Hello, World!", self)
        hello_label.setStyleSheet("color: white;")
        work_space_layout.addWidget(hello_label)

        centra_widget_layout = QVBoxLayout()
        centra_widget_layout.setContentsMargins(0, 0, 0, 0)
        centra_widget_layout.setAlignment(Qt.AlignmentFlag.AlignTop)
        centra_widget_layout.addWidget(self.title_bar)
        centra_widget_layout.addLayout(work_space_layout)

        central_widget.setLayout(centra_widget_layout)
        self.setCentralWidget(central_widget)

    def changeEvent(self, event):
        if event.type() == QEvent.Type.WindowStateChange:
            self.title_bar.window_state_changed(self.windowState())
        super().changeEvent(event)
        event.accept()

if __name__ == "__main__":
    app = QApplication([])
    window = MainWindow()
    window.show()
    app.exec()
Note that you've also set the color of the "Hello, World!" label to white so that it's visible on a dark background.
Conclusion
In this tutorial, we have learned the fundamentals of creating custom title bars in PyQt. To do this, we have combined PyQt's widgets, layouts, and styling capabilities to create a visually appealing title bar for a PyQt app.
With this skill under your belt, you're now ready to create title bars that align perfectly with your application's unique style and branding. This will allow you to break away from the standard window decoration provided by your operating system and add a personal touch to your user interface.
Now let your imagination run and transform your PyQt application's UX.