Dashboard applications are a popular way to display live data and user controls, whether for interacting with APIs or controlling locally attached devices. However, as we add more controls, our dashboards can quickly become out of control, making it hard to find the controls we need.
One common solution is to provide a way to filter the displayed controls, allowing users to focus on the information and tools that are most important to them.
There are many ways to filter lists of objects, including dropdowns and facets. However, one of the most intuitive ways is to use a live search box. In this tutorial, we'll implement a prefix search, where results are shown when a widget name starts with the text entered by the user.
In this tutorial, we'll build a dashboard with a search-based filter. It'll be an app to control the electrical sensors and gadgets around our home. The finished app will behave as shown below:
The interface includes a search bar with autocomplete and a scrollable area containing a series of independent custom widgets representing switches for electrical devices.
You can download the source code for all our articles.
The code for this article is in the folder pyside6/tutorials/widget-search-bar
Creating a Basic Application
We start from the basic application template shown below, which you can save to a file called app.py:
from PySide6.QtWidgets import (
    QApplication,
    QMainWindow,
    QVBoxLayout,
    QWidget,
)

class MainWindow(QMainWindow):
    def __init__(self):
        super().__init__()
        self.setGeometry(600, 100, 800, 600)
        self.setWindowTitle("Control Panel")

        # Main container
        container = QWidget()
        container_layout = QVBoxLayout()
        container.setLayout(container_layout)
        self.setCentralWidget(container)

app = QApplication([])
window = MainWindow()
window.show()
app.exec()
In this code, we create a MainWindow class by subclassing QMainWindow. In the __init__() method, we add a container QWidget within a vertical layout with QVBoxLayout. This widget is the central widget of our window.
You can run the app from your terminal with the following command:
$ python app.py
You'll get a blank window. Next, we'll define our control widget, which we can then add to the window's layout.
Building a Custom Widget
For our control panel, we'll create a compound widget that combines two or more standard widgets together. By adding our own logic to these widgets, we can create our custom behaviors.
If you're interested in creating more complex custom widgets, take a look at our custom widgets tutorials.
Create a new file called customwidgets.py in the same folder as app.py. We will define our custom widget here, then import it into our main application code. The custom widget is a simple On/Off toggle widget, so we've given it the slightly uninspired name OnOffWidget.

Purchasing Power Parity
Developers in [[ country ]] get [[ discount.discount_pc ]]% OFF on all books & courses with code [[ discount.coupon_code ]]Start by adding the imports and creating a basic stub for the widget class. The widget accepts a single parameter name, which we store in self.name to use for searching later. This is also used to create a label for the widget later:
from PySide6.QtWidgets import (
    QHBoxLayout, QLabel, QPushButton, QWidget
)

class OnOffWidget(QWidget):
    def __init__(self, name):
        super().__init__()

        self.name = name  # Name of widget used for searching
        self.is_on = False  # Current state (true=ON, false=OFF)
Note that we've also added an attribute self.is_on, which holds the widget's current state, with True for ON and False for OFF. We'll add logic to update this later.
In app.py we can import this custom widget as follows:
from customwidgets import OnOffWidget
For prototyping purposes, let's create a single instance of OnOffWidget and add it to the container_layout in the parent app. This will allow you to see the effects of your changes to the widgets' code by running app.py:
from PySide6.QtWidgets import (
    QApplication, QMainWindow, QVBoxLayout, QWidget
)

from customwidgets import OnOffWidget

class MainWindow(QMainWindow):
    def __init__(self):
        super().__init__()
        self.setGeometry(600, 100, 800, 600)
        self.setWindowTitle("Control Panel")

        # Main container
        container = QWidget()
        container_layout = QVBoxLayout()
        container.setLayout(container_layout)
        self.setCentralWidget(container)

        onoff = OnOffWidget("Stove")
        container_layout.addWidget(onoff)

app = QApplication([])
window = MainWindow()
window.show()
app.exec()
Running this app will produce a window containing a single OnOffWidget. However, since the widget does not display anything itself, the window will appear empty. We'll fix that now by specifying the layout of our custom widget and adding some content.
OnOffWidget is a custom widget containing a label and two On/Off toggle buttons that we could use to control lights or gadgets in our house:
class OnOffWidget(QWidget):
    def __init__(self, name):
        super().__init__()

        self.name = name
        self.is_on = False

        self.name_label = QLabel(self.name)  #  The widget label
        self.on_button = QPushButton("On")  # The ON button
        self.off_button = QPushButton("Off")  # The OFF button

        layout = QHBoxLayout()  # A horizontal layout to encapsulate the above
        layout.addWidget(self.name_label)  # Add the label to the layout
        layout.addWidget(self.on_button)  # Add the ON button to the layout
        layout.addWidget(self.off_button)  # Add the OFF button to the layout
        self.setLayout(layout)
The passed-in name is stored in self.name and is now used to create a QLabel to identify the widget. Next, we create two buttons labelled On and Off to act as toggles, and then add the label and the two buttons into a layout for display:
![]() OnOffWidget plain, without toggle styles
OnOffWidget plain, without toggle styles
As it currently stands, the widget can be created, and the buttons can be clicked. However, they don't do anything. Next, we'll hook up the button signals and use them to toggle the widget's state from ON to OFF.
Updating the Custom Widget State
The buttons' colors will signal the widget's current state. When in the ON state, the On button turns green, and when OFF, the Off button turns red.
We do this by defining two methods on() and off(), which are called to turn the widget to ON and OFF states, respectively. We also add an update_button_state() method, which updates the appearance of the buttons to indicate the current state:
class OnOffWidget(QWidget):
    def __init__(self, name):
        super().__init__()

        self.name = name
        self.is_on = False

        self.name_label = QLabel(self.name)
        self.on_button = QPushButton("On")
        self.off_button = QPushButton("Off")

        layout = QHBoxLayout()
        layout.addWidget(self.name_label)
        layout.addWidget(self.on_button)
        layout.addWidget(self.off_button)
        self.setLayout(layout)

        self.on_button.clicked.connect(self.on)
        self.off_button.clicked.connect(self.off)

        self.update_button_state()

    def on(self):
        self.is_on = True
        self.update_button_state()

    def off(self):
        self.is_on = False
        self.update_button_state()

    def update_button_state(self):
        if self.is_on:
            self.on_button.setStyleSheet(
                "background-color: #4CAF50; color: #fff;"
            )
            self.off_button.setStyleSheet("")
        else:
            self.on_button.setStyleSheet("")
            self.off_button.setStyleSheet(
                "background-color: #D32F2F; color: #fff;"
            )
Notice that we call update_button_state() at the end of __init__() to set the initial state of the buttons, and the on() and off() methods both call update_button_state() after changing is_on.
In this simple example, you could combine the update_button_state() code into the on() and off() methods, but as you build more complex controls, it is a good idea to keep a central update_button_state() method to ensure consistency.
The on() and off() methods are connected to the button's clicked signals as follows:
self.on_button.clicked.connect(self.on)
For a refresher on using Qt signals and slots, see the Signals & Slots tutorial.
With these signals connected up, clicking the buttons will now toggle the widget's is_on state and update the buttons' appearance:
Building the Dashboard GUI Layout
Now that we have completed our custom control widget, we can finish the layout of the main application. The full code is shown first, and then explained in steps below:
from PySide6.QtCore import Qt
from PySide6.QtWidgets import (
    QApplication,
    QLineEdit,
    QMainWindow,
    QScrollArea,
    QSizePolicy,
    QSpacerItem,
    QVBoxLayout,
    QWidget,
)

from customwidgets import OnOffWidget

class MainWindow(QMainWindow):
    def __init__(self):
        super().__init__()
        self.setGeometry(600, 100, 800, 600)
        self.setWindowTitle("Control Panel")

        # Control widgets
        controls = QWidget()
        controls_layout = QVBoxLayout()
        devices = [
            "Heater",
            "Stove",
            "Living Room Light",
            "Balcony Light",
            "Fan",
            "Room Light",
            "Oven",
            "Desk Light",
            "Bedroom Heater",
            "Wall Switch",
        ]
        self.widgets = []
        for device in devices:
            switch = OnOffWidget(device)
            controls_layout.addWidget(switch)
            self.widgets.append(switch)

        spacer = QSpacerItem(
            1,
            1,
            QSizePolicy.Policy.Minimum,
            QSizePolicy.Policy.Expanding,
        )
        controls_layout.addItem(spacer)
        controls.setLayout(controls_layout)

        # Scroll area
        scroll_area = QScrollArea()
        scroll_area.setHorizontalScrollBarPolicy(
            Qt.ScrollBarPolicy.ScrollBarAlwaysOff,
        )
        scroll_area.setWidgetResizable(True)
        scroll_area.setWidget(controls)

        # Search bar
        searchbar = QLineEdit(placeholderText="Search devices...")

        # Main container
        container = QWidget()
        container_layout = QVBoxLayout()
        container_layout.addWidget(searchbar)
        container_layout.addWidget(scroll_area)
        container.setLayout(container_layout)
        self.setCentralWidget(container)

app = QApplication([])
window = MainWindow()
window.show()
app.exec()
We'll now step through the sections of the above code, explaining how each of the key parts works in turn.
We start by creating our OnOffWidget widget instances. First, we create a list of device names, each as a str. To generate the widgets, we iterate over this list, passing the names into the OnOffWidget constructor. This creates a new OnOffWidget with the name as a QLabel (see the widget definition above). This same name will be used for searching later:
        # Control widgets
        controls = QWidget()
        controls_layout = QVBoxLayout()
        devices = [
            "Heater",
            "Stove",
            "Living Room Light",
            "Balcony Light",
            "Fan",
            "Room Light",
            "Oven",
            "Desk Light",
            "Bedroom Heater",
            "Wall Switch",
        ]
        self.widgets = []
        for device in devices:
            switch = OnOffWidget(device)
            controls_layout.addWidget(switch)
            self.widgets.append(switch)
Once a widget is created, it is added to the layout and appended to our widget list in self.widgets. We can iterate over this list later to perform our search.
In addition to the OnOffWidgets that we've added to our controls_layout, we also need to add a spacer. Without a spacer, the widgets in the window will spread out to take up all the available space rather than remaining compact and consistently sized.
The spacer is set to a 1x1 default dimension, with the Y dimension set as expanding, so it will expand vertically to fill all available space:
        spacer = QSpacerItem(
            1,
            1,
            QSizePolicy.Policy.Minimum,
            QSizePolicy.Policy.Expanding,
        )
        controls_layout.addItem(spacer)
        controls.setLayout(controls_layout)
Since we're adding this to a QVBoxLayout, the X dimension of the spacer is irrelevant.
Next, we create a scrolling area, setting the horizontal scrollbar to always off, and adding the controls widget to it:
        # Scroll area
        scroll_area = QScrollArea()
        scroll_area.setHorizontalScrollBarPolicy(
            Qt.ScrollBarPolicy.ScrollBarAlwaysOff,
        )
        scroll_area.setWidgetResizable(True)
        scroll_area.setWidget(controls)
If you're unfamiliar with adding scrolling regions to your applications, check out our QScrollArea tutorial.
Finally, we assemble our search bar using a QLineEdit widget. The container widget holds the entire layout and will be set using setCentralWidget() on the window:
        # Search bar
        searchbar = QLineEdit(placeholderText="Search devices...")

        # Main container
        container = QWidget()
        container_layout = QVBoxLayout()
        container_layout.addWidget(searchbar)
        container_layout.addWidget(scroll_area)
        container.setLayout(container_layout)
        self.setCentralWidget(container)
For more on using QLineEdit and other input widgets, see our PySide6 widgets tutorial.
Running the app, you'll see the following window, with a search bar on top and a list of our custom OnOffWidget widgets:
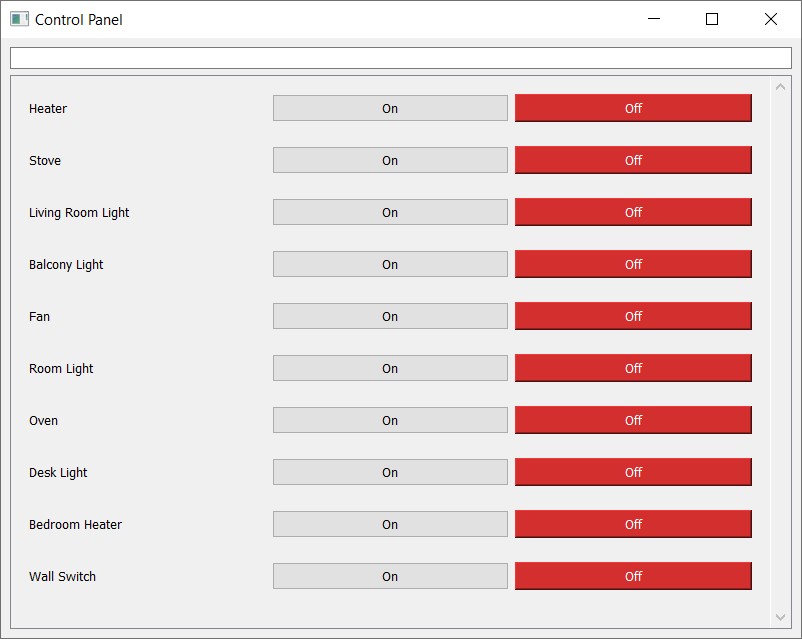 Search Bar and Widget List
If you try typing in the box, you'll notice that the search is not working and the widgets aren't filtered. In the following section, we'll step through the process of adding the search functionality.
Adding Search Functionality
Finally, we get to the main objective of this article: adding the search functionality! We can accomplish this by connecting the search bar signal and adding one method on MainWindow. Make the following additions to the MainWindow class:
class MainWindow(QMainWindow):
    def __init__(self):
        super().__init__()
        # ...

        # Search bar
        searchbar = QLineEdit(placeholderText="Search devices...")
        searchbar.textChanged.connect(self.update_display)
        # ...

    def update_display(self, text):
        search = text.strip().casefold()
        for widget in self.widgets:
            if widget.name.casefold().startswith(search):
                widget.show()
            else:
                widget.hide()
As shown, the searchbar.textChanged signal can be attached in the __init__() after the creation of the searchbar. This connects the QLineEdit.textChanged signal to our custom update_display() method. The textChanged signal fires every time the text in the box changes, and sends the current text to any connected slots.
We then create a method update_display() which performs the following:
- Strip and case-fold the search text using the
strip()andcasefold()methods, respectively - Iterate through each
OnOffWidgetinself.widgets - Determine whether the case-folded
nameof the widget starts with thesearchtext coming from the search bar (prefix match) - If there is a match, we show the widget by calling
widget.show(). Otherwise, we hide the widget by callingwidget.hide()
By applying casefold() to both the widget name and the search string, we perform a case-insensitive search, making it easier to find our widgets.
Because this uses a prefix match, entering heater will match Heater, but it will not match Bedroom Heater.
If you consider the OnOffWidget definition, then you'll remember that we assigned the name passed when creating the widget to self.name. This is the value we're checking now on each of our widgets.
Now, as you type text in the box, the current text is sent to update_display(), the widgets are then iterated, matched, and shown or hidden as appropriate:
Predicting Search Results
Searching for widgets is a cool feature, but we can make things even more convenient for the user by adding text completion to speed up the search. This is particularly handy when you have a number of widgets with similar names. With prediction, it is possible to jump to the correct widgets by typing only a few letters and then selecting one of the suggested options with the keyboard.
Qt has built-in support for text completion through the QCompleter class. Add the code below to the __init__() method of MainWindow after the search bar is created (as searchbar). The basic completer requires only two lines of code, one to create the completer and a second to attach it to the QLineEdit.
Here, we also set the search case sensitivity mode to CaseInsensitive to match the search:
        # Adding text completer
        completer = QCompleter(devices)
        completer.setCaseSensitivity(Qt.CaseSensitivity.CaseInsensitive)
        searchbar.setCompleter(completer)
The complete app.py code is shown below:
from PySide6.QtCore import Qt
from PySide6.QtWidgets import (
    QApplication,
    QCompleter,
    QLineEdit,
    QMainWindow,
    QScrollArea,
    QSizePolicy,
    QSpacerItem,
    QVBoxLayout,
    QWidget,
)

from customwidgets import OnOffWidget

class MainWindow(QMainWindow):
    def __init__(self):
        super().__init__()
        self.setGeometry(600, 100, 800, 600)
        self.setWindowTitle("Control Panel")

        # Control widgets
        controls = QWidget()
        controls_layout = QVBoxLayout()
        devices = [
            "Heater",
            "Stove",
            "Living Room Light",
            "Balcony Light",
            "Fan",
            "Room Light",
            "Oven",
            "Desk Light",
            "Bedroom Heater",
            "Wall Switch",
        ]
        self.widgets = []
        for device in devices:
            switch = OnOffWidget(device)
            controls_layout.addWidget(switch)
            self.widgets.append(switch)

        spacer = QSpacerItem(
            1,
            1,
            QSizePolicy.Policy.Minimum,
            QSizePolicy.Policy.Expanding,
        )
        controls_layout.addItem(spacer)
        controls.setLayout(controls_layout)

        # Scroll area
        scroll_area = QScrollArea()
        scroll_area.setHorizontalScrollBarPolicy(
            Qt.ScrollBarPolicy.ScrollBarAlwaysOff,
        )
        scroll_area.setWidgetResizable(True)
        scroll_area.setWidget(controls)

        # Search bar
        searchbar = QLineEdit(placeholderText="Search devices...")
        searchbar.textChanged.connect(self.update_display)

        # Adding text completer
        completer = QCompleter(devices)
        completer.setCaseSensitivity(Qt.CaseSensitivity.CaseInsensitive)
        searchbar.setCompleter(completer)

        # Main container
        container = QWidget()
        container_layout = QVBoxLayout()
        container_layout.addWidget(searchbar)
        container_layout.addWidget(scroll_area)
        container.setLayout(container_layout)
        self.setCentralWidget(container)

    def update_display(self, text):
        search = text.strip().casefold()
        for widget in self.widgets:
            if widget.name.casefold().startswith(search):
                widget.show()
            else:
                widget.hide()

app = QApplication([])
window = MainWindow()
window.show()
app.exec()
And the customwidgets.py file below:
from PySide6.QtWidgets import (
    QHBoxLayout, QLabel, QPushButton, QWidget
)

class OnOffWidget(QWidget):
    def __init__(self, name):
        super().__init__()

        self.name = name
        self.is_on = False

        self.name_label = QLabel(self.name)
        self.on_button = QPushButton("On")
        self.off_button = QPushButton("Off")

        layout = QHBoxLayout()
        layout.addWidget(self.name_label)
        layout.addWidget(self.on_button)
        layout.addWidget(self.off_button)
        self.setLayout(layout)

        self.on_button.clicked.connect(self.on)
        self.off_button.clicked.connect(self.off)

        self.update_button_state()

    def on(self):
        self.is_on = True
        self.update_button_state()

    def off(self):
        self.is_on = False
        self.update_button_state()

    def update_button_state(self):
        if self.is_on:
            self.on_button.setStyleSheet(
                "background-color: #4CAF50; color: #fff;"
            )
            self.off_button.setStyleSheet("")
        else:
            self.on_button.setStyleSheet("")
            self.off_button.setStyleSheet(
                "background-color: #D32F2F; color: #fff;"
            )
Conclusion
By adding a search bar, we've made it easier for users to navigate and filter through lists of controls. You can use this same approach to filter through a list of status panels, graphs, or any other widgets. It allows you to build complex dashboards without the interface becoming overwhelming for the user.
To further customize the look and feel of your dashboard, consider using Qt Style Sheets (QSS) to style your widgets and controls. If you need to arrange your widgets in a grid rather than a vertical list, our PySide6 layouts tutorial covers the different layout options available.
Bring Your PyQt/PySide Application to Market — Specialized launch support for scientific and engineering software built using Python & Qt.
