So far we've successfully created a window, and we've added a widget to it. However we normally want to add more than one widget to a window, and have some control over where it ends up. To do this in Qt we use layouts. In this tutorial you'll learn how to use PySide6 layouts to arrange and position widgets in your Python GUI applications.
You can download the source code for all our articles.
The code for this article is in the folder pyside6/tutorials/layouts
Basic PySide6 Layouts
There are 4 basic layouts available in Qt, which are listed in the following table.
| Layout | behavior |
|---|---|
QHBoxLayout |
Linear horizontal layout |
QVBoxLayout |
Linear vertical layout |
QGridLayout |
In indexable grid XxY |
QStackedLayout |
Stacked (z) in front of one another |
You can also design and lay out your interface graphically using the Qt designer. Here we're using code, so you can understand the underlying system.
As you can see, there are three positional layouts available in Qt. The QVBoxLayout, QHBoxLayout and QGridLayout. In addition there is also QStackedLayout which allows you to place widgets one on top of the other within the same space, yet showing only one layout at a time.
Setting Up the Application
Before we start we need a simple application outline. Save the following code in a file named app.py -- we'll modify this application to experiment with different layouts.
import sys
from PySide6.QtWidgets import QApplication, QMainWindow, QWidget
from PySide6.QtGui import QPalette, QColor

class MainWindow(QMainWindow):

    def __init__(self):
        super().__init__()

        self.setWindowTitle("My App")


app = QApplication(sys.argv)
window = MainWindow()
window.show()
app.exec()
Creating a Color Widget Helper
To make it easier to visualize the layouts, we'll first create a simple custom widget that displays a solid color of our choosing. This will help to distinguish widgets that we add to the layout. Create a new file called layout_colorwidget.py with the following code:
from PySide6.QtGui import QColor, QPalette
from PySide6.QtWidgets import QWidget


class Color(QWidget):
    def __init__(self, color):
        super().__init__()
        self.setAutoFillBackground(True)

        palette = self.palette()
        palette.setColor(QPalette.ColorRole.Window, QColor(color))
        self.setPalette(palette)
Save this code as a new file called layout_colorwidget.py in the same folder as your main script. Then we can import it below.
In this code we subclass QWidget to create our own custom widget Color. We accept a single parameter when creating the widget — color (a str). We first set .setAutoFillBackground to True to tell the widget to automatically fill its background with the window color. Next we get the current palette (which is the global desktop palette by default) and change the current QPalette.Window color to a new QColor described by the value color we passed in. Finally we apply this palette back to the widget. The end result is a widget that is filled with a solid color, that we specified when we created it.
PyQt/PySide Development Services — Stuck in development hell? I'll help you get your project focused, finished and released. Benefit from years of practical experience releasing software with Python.
If you find the above confusing, don't worry too much. We'll cover custom widgets in more detail later. For now it's sufficient that you understand that you can create a solid-filled red widget by doing the following:
Color('red')
First let's test our new Color widget by using it to fill the entire window in a single color. Once it's complete we can add it to the QMainWindow using .setCentralWidget and we get a solid red window.
import sys

from PySide6.QtWidgets import QApplication, QMainWindow, QWidget

from layout_colorwidget import Color


class MainWindow(QMainWindow):
    def __init__(self):
        super().__init__()
        self.setWindowTitle("My App")

        widget = Color("red")
        self.setCentralWidget(widget)


app = QApplication(sys.argv)
window = MainWindow()
window.show()
app.exec()
Run it! The window will appear, filled completely with the color red. Notice how the widget expands to fill all the available space.
Next we'll look at each of the available Qt layouts in turn. Note that to add our layouts to the window we will need a dummy QWidget to hold the layout.
QVBoxLayout — Vertically Arranged Widgets
With QVBoxLayout you arrange widgets one above the other linearly. Adding a widget adds it to the bottom of the column. This is one of the most commonly used layouts in PySide6 applications.
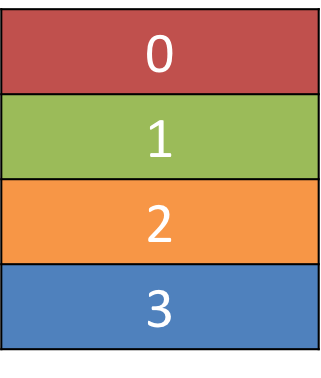 A QVBoxLayout, filled from top to bottom.
Let's add our widget to a layout. Note that in order to add a layout to the QMainWindow we need to apply it to a dummy QWidget. This allows us to then use .setCentralWidget to apply the widget (and the layout) to the window. Our colored widgets will arrange themselves in the layout, contained within the QWidget in the window.
First, we need to import QVBoxLayout from PySide6.QtWidgets and then add the red widget as before:
class MainWindow(QMainWindow):
    def __init__(self):
        super().__init__()

        self.setWindowTitle("My App")

        layout = QVBoxLayout()

        layout.addWidget(Color('red'))

        widget = QWidget()
        widget.setLayout(layout)
        self.setCentralWidget(widget)
Run it! Notice the border now visible around the red widget. This is the layout spacing — we'll see how to adjust that later.
If you add a few more colored widgets to the layout you'll notice that they line themselves up vertically in the order they are added.
class MainWindow(QMainWindow):
    def __init__(self):
        super().__init__()

        self.setWindowTitle("My App")

        layout = QVBoxLayout()

        layout.addWidget(Color('red'))
        layout.addWidget(Color('green'))
        layout.addWidget(Color('blue'))

        widget = QWidget()
        widget.setLayout(layout)
        self.setCentralWidget(widget)
QHBoxLayout — Horizontally Arranged Widgets
QHBoxLayout is the same as QVBoxLayout, except widgets are arranged moving horizontally. Adding a widget adds it to the right hand side.
 A QHBoxLayout, filled from left to right.
To use it we can simply change the QVBoxLayout to a QHBoxLayout. The boxes now flow left to right.
class MainWindow(QMainWindow):
    def __init__(self):
        super().__init__()

        self.setWindowTitle("My App")

        layout = QHBoxLayout()

        layout.addWidget(Color('red'))
        layout.addWidget(Color('green'))
        layout.addWidget(Color('blue'))

        widget = QWidget()
        widget.setLayout(layout)
        self.setCentralWidget(widget)
Nesting Layouts in PySide6
For more complex layouts you can nest layouts inside one another using .addLayout on a layout. Below we add a QVBoxLayout into the main QHBoxLayout. If we add some widgets to the QVBoxLayout, they'll be arranged vertically in the first slot of the parent layout.
class MainWindow(QMainWindow):
    def __init__(self):
        super().__init__()

        self.setWindowTitle("My App")

        layout1 = QHBoxLayout()
        layout2 = QVBoxLayout()
        layout3 = QVBoxLayout()

        layout2.addWidget(Color('red'))
        layout2.addWidget(Color('yellow'))
        layout2.addWidget(Color('purple'))

        layout1.addLayout( layout2 )

        layout1.addWidget(Color('green'))

        layout3.addWidget(Color('red'))
        layout3.addWidget(Color('purple'))

        layout1.addLayout( layout3 )

        widget = QWidget()
        widget.setLayout(layout1)
        self.setCentralWidget(widget)
Run it! The widgets should arrange themselves in 3 columns horizontally, with the first column also containing 3 widgets stacked vertically. Experiment!
Layout Spacing and Margins
You can set the spacing around the layout using .setContentsMargins or set the spacing between elements using .setSpacing.
layout1.setContentsMargins(0,0,0,0)
layout1.setSpacing(20)
The following code shows the combination of nested widgets and layout margins and spacing. Experiment with the numbers til you get a feel for them.
class MainWindow(QMainWindow):
    def __init__(self):
        super().__init__()

        self.setWindowTitle("My App")

        layout1 = QHBoxLayout()
        layout2 = QVBoxLayout()
        layout3 = QVBoxLayout()

        layout1.setContentsMargins(0,0,0,0)
        layout1.setSpacing(20)

        layout2.addWidget(Color('red'))
        layout2.addWidget(Color('yellow'))
        layout2.addWidget(Color('purple'))

        layout1.addLayout( layout2 )

        layout1.addWidget(Color('green'))

        layout3.addWidget(Color('red'))
        layout3.addWidget(Color('purple'))

        layout1.addLayout( layout3 )

        widget = QWidget()
        widget.setLayout(layout1)
        self.setCentralWidget(widget)
QGridLayout — Widgets Arranged in a Grid
As useful as they are, if you try and use QVBoxLayout and QHBoxLayout for laying out multiple elements, e.g. for a form, you'll find it very difficult to ensure differently sized widgets line up. The solution to this is QGridLayout.
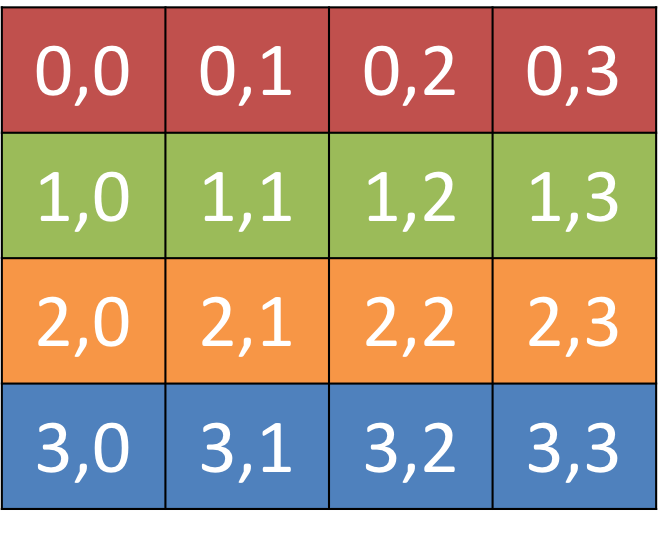 A QGridLayout showing the grid positions for each location.
QGridLayout allows you to position items specifically in a grid. You specify row and column positions for each widget. You can skip elements, and they will be left empty.
Usefully, for QGridLayout you don't need to fill all the positions in the grid.
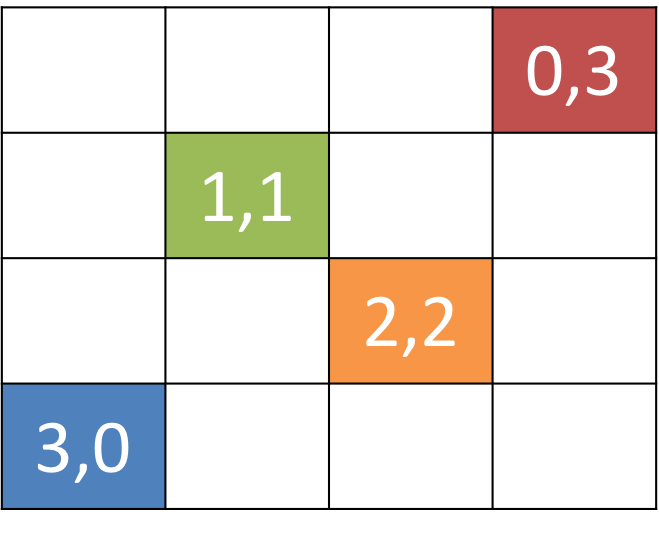 A QGridLayout with unfilled slots.
class MainWindow(QMainWindow):
    def __init__(self):
        super().__init__()

        self.setWindowTitle("My App")

        layout = QGridLayout()

        layout.addWidget(Color('red'), 0, 0)
        layout.addWidget(Color('green'), 1, 0)
        layout.addWidget(Color('blue'), 1, 1)
        layout.addWidget(Color('purple'), 2, 1)

        widget = QWidget()
        widget.setLayout(layout)
        self.setCentralWidget(widget)
QStackedLayout — Multiple Widgets in the Same Space
The final layout we'll cover is the QStackedLayout. As described, this layout allows you to position elements directly in front of one another. You can then select which widget you want to show. You could use this for drawing layers in a graphics application, or for imitating a tab-like interface. Note there is also QStackedWidget which is a container widget that works in exactly the same way. This is useful if you want to add a stack directly to a QMainWindow with .setCentralWidget.
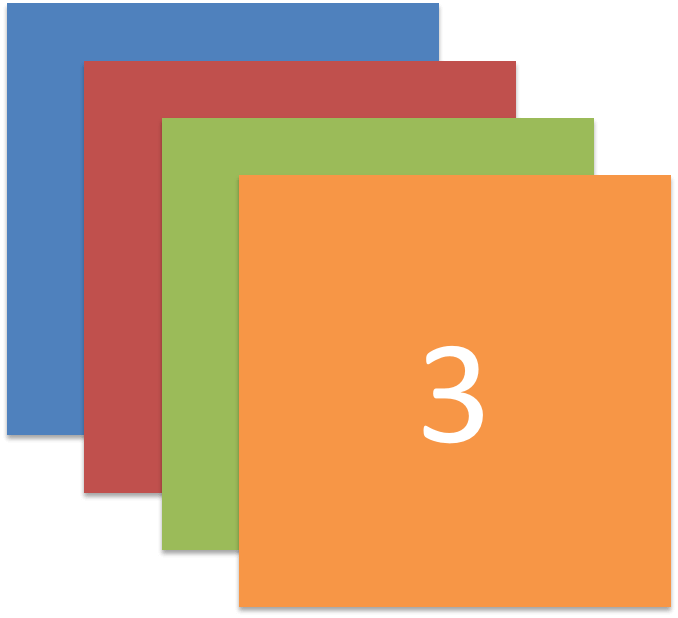 QStackedLayout — in use only the uppermost widget is visible, which is by default the first widget added to the layout.
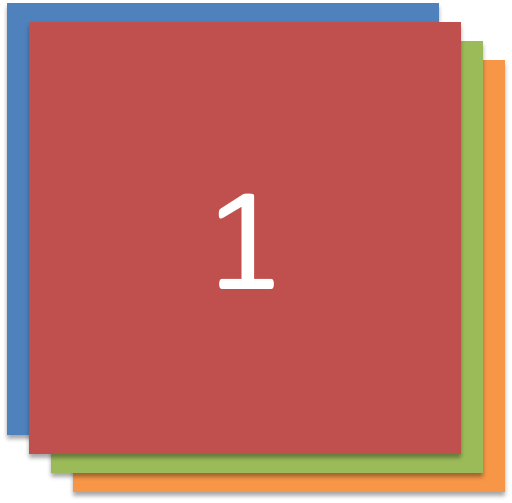 QStackedLayout, with the 2nd (1) widget selected and brought to the front.
from PySide6.QtWidgets import QStackedLayout  # add this import


class MainWindow(QMainWindow):
    def __init__(self):
        super().__init__()

        self.setWindowTitle("My App")

        layout = QStackedLayout()

        layout.addWidget(Color("red"))
        layout.addWidget(Color("green"))
        layout.addWidget(Color("blue"))
        layout.addWidget(Color("yellow"))

        layout.setCurrentIndex(3)

        widget = QWidget()
        widget.setLayout(layout)
        self.setCentralWidget(widget)
QStackedWidget is exactly how tabbed views in applications work. Only one view ('tab') is visible at any one time. You can control which widget to show at any time by using .setCurrentIndex() or .setCurrentWidget() to set the item by either the index (in order the widgets were added) or by the widget itself.
Building a Tab-like Interface with QStackedLayout
Below is a short demo using QStackedLayout in combination with QPushButton to provide a tab-like interface to an application:
import sys

from PySide6.QtCore import Qt
from PySide6.QtWidgets import (
    QApplication,
    QHBoxLayout,
    QLabel,
    QMainWindow,
    QPushButton,
    QStackedLayout,
    QVBoxLayout,
    QWidget,
)

from layout_colorwidget import Color


class MainWindow(QMainWindow):
    def __init__(self):
        super().__init__()

        self.setWindowTitle("My App")

        pagelayout = QVBoxLayout()
        button_layout = QHBoxLayout()
        self.stacklayout = QStackedLayout()

        pagelayout.addLayout(button_layout)
        pagelayout.addLayout(self.stacklayout)

        btn = QPushButton("red")
        btn.pressed.connect(self.activate_tab_1)
        button_layout.addWidget(btn)
        self.stacklayout.addWidget(Color("red"))

        btn = QPushButton("green")
        btn.pressed.connect(self.activate_tab_2)
        button_layout.addWidget(btn)
        self.stacklayout.addWidget(Color("green"))

        btn = QPushButton("yellow")
        btn.pressed.connect(self.activate_tab_3)
        button_layout.addWidget(btn)
        self.stacklayout.addWidget(Color("yellow"))

        widget = QWidget()
        widget.setLayout(pagelayout)
        self.setCentralWidget(widget)

    def activate_tab_1(self):
        self.stacklayout.setCurrentIndex(0)

    def activate_tab_2(self):
        self.stacklayout.setCurrentIndex(1)

    def activate_tab_3(self):
        self.stacklayout.setCurrentIndex(2)


app = QApplication(sys.argv)
window = MainWindow()
window.show()
app.exec()
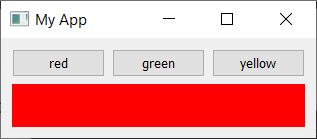 A custom tab-like interface implemented using QStackedLayout.
Using QTabWidget for Tabbed Interfaces
Helpfully, Qt actually provides a built-in QTabWidget that provides this kind of layout out of the box — albeit in widget form. Below the tab demo is recreated using QTabWidget:
import sys

from PySide6.QtCore import Qt
from PySide6.QtWidgets import (
    QApplication,
    QLabel,
    QMainWindow,
    QPushButton,
    QTabWidget,
    QWidget,
)

from layout_colorwidget import Color


class MainWindow(QMainWindow):
    def __init__(self):
        super().__init__()

        self.setWindowTitle("My App")

        tabs = QTabWidget()
        tabs.setTabPosition(QTabWidget.West)
        tabs.setMovable(True)

        for color in ["red", "green", "blue", "yellow"]:
            tabs.addTab(Color(color), color)

        self.setCentralWidget(tabs)


app = QApplication(sys.argv)
window = MainWindow()
window.show()
app.exec()
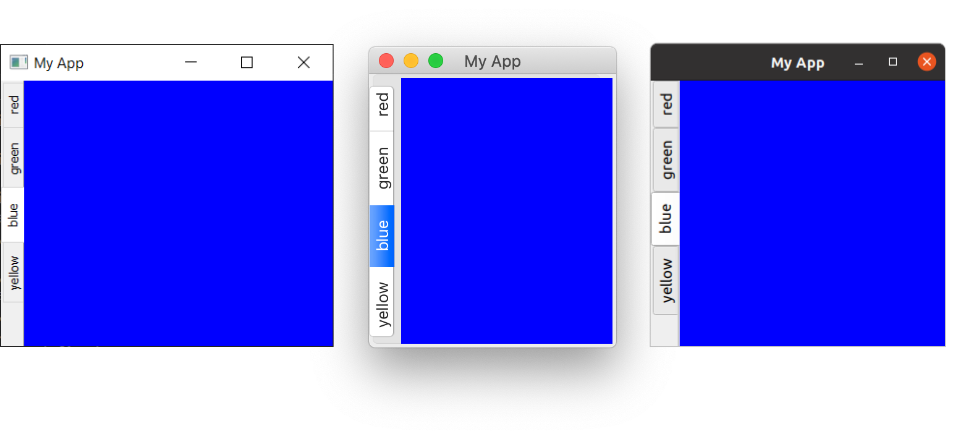 A tabbed interface using the QTabWidget.
As you can see, it's a little more straightforward — and a bit more attractive! You can set the position of the tabs using the cardinal directions, toggle whether tabs are moveable with .setMoveable. You'll notice that the macOS tab bar looks quite different to the others -- by default on macOS tabs take on a pill or bubble style. On macOS this is typically used for tabbed configuration panels. For documents, you can turn on document mode to give slimline tabs similar to what you see on other platforms. This option has no effect on other platforms.
    tabs = QTabWidget()
    tabs.setDocumentMode(True)
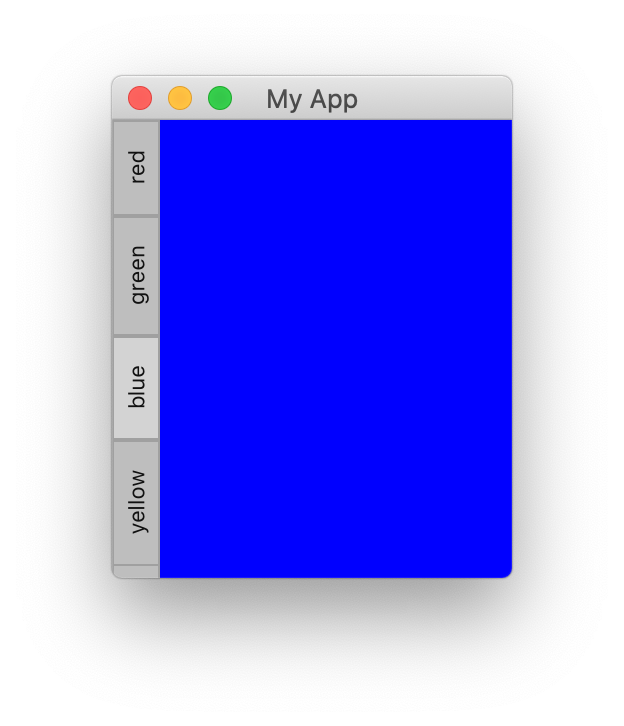 QTabWidget in document mode on macOS.
We'll encounter more of these advanced widgets later.

