Bundling data files with PyInstaller usually works quite well. However, there can be issues with using relative paths, particularly when bundling cross-platform applications, as different systems have different standards for dealing with data files. If you hit these problems they can unfortunately be quite difficult to debug.
Thankfully, Qt comes to the rescue with its resource system. Since we're using Qt for our GUI we can make use of Qt Resources to bundle, identify and load resources in our application. The resulting bundled data is included in your application as Python code, so PyInstaller will automatically pick it up and we can be sure it will end up in the right place.
In this section we'll look at how to bundle files with our application using the Qt Resources system.
The QRC file
The core of the Qt Resources system is the resource file or QRC. The .qrc file is a simple XML file, which can be opened and edited with any text editor.
You can also create QRC files and add and remove resources using Qt Designer, which we'll cover later.
Simple QRC example
A very simple resource file is shown below, containing a single resource (our application icon).
<!DOCTYPE RCC>
<RCC version="1.0">
    <qresource prefix="icons">
        <file alias="hand_icon.ico">hand_icon.ico</file>
    </qresource>
</RCC>
The name between the <file> </file> tags is the path to the file, relative to the resource file. The alias is the name which this resource will be known by from within your application. You can use this to rename icons to something more logical or simpler in your app, while keeping the original name externally.
For example, if we wanted to use the name application_icon.ico internally, we could change this line to:
<file alias="application_icon.ico">hand_icon.ico</file>
This only changes the name used *inside* your application, the filename remains unchanged.
Outside this tag is the qresource tag which specifies a prefix. This is a namespace which can be used to group resources together. This is effectively a virtual folder, under which nested resources can all be found.
Using a QRC file
To use a .qrc file in your application you first need to compile it to Python. PySide6 comes with a command line tool to do this, which takes a .qrc file as input and outputs a Python file containing the compiled data. This can then be imported into your app as for any other Python file or module.
To compile our resources.qrc file to a Python file named resources.py we can use
pyside6-rcc resources.qrc -o resources.py
To use the resource file in our application we need to make a few small changes. Firstly, we need to import resources at the top of our app, to load the resources into the Qt resource system, and then secondly we need to update the path to the icon file to use the resource path format as follows:
app.setWindowIcon(QtGui.QIcon(':/icons/hand_icon.ico'))
The prefix :/ indicates that this is a resource path. The first name "icons" is the prefix namespace and the filename is taken from the file alias, both as defined in our resources.qrc file.
The updated application is shown below.
from PySide6 import QtWidgets, QtGui

try:
    from ctypes import windll  # Only exists on Windows.
    myappid = 'mycompany.myproduct.subproduct.version'
    windll.shell32.SetCurrentProcessExplicitAppUserModelID(myappid)
except ImportError:
    pass


import sys
import resources  # Import the compiled resource file.

class MainWindow(QtWidgets.QMainWindow):

    def __init__(self, *args, **kwargs):
        super().__init__(*args, **kwargs)

        self.setWindowTitle("Hello World")
        l = QtWidgets.QLabel("My simple app.")
        l.setMargin(10)
        self.setCentralWidget(l)

        self.show()

if __name__ == '__main__':
    app = QtWidgets.QApplication(sys.argv)
    app.setWindowIcon(QtGui.QIcon(':/icons/hand_icon.ico'))
    w = MainWindow()
    app.exec()
You can run the build as follows,
pyinstaller --windowed --icon=hand_icon.ico app.py
or re-run it using your existing .spec file.
pyinstaller app.spec
If you run the resulting application in dist you should see the icon is working as intended.
![]() The hand icon showing on the toolbar
The hand icon showing on the toolbar
The advantage of this method is that your data files are guaranteed to be bundled as they are treated as code — PyInstaller finds them through the imports in your source. You also don't need to worry about platform-specific locations for data files. You only need to take care to rebuild the resources.py file any time you add or remove data files from your project.
Of course, this approach isn't appropriate for any files you want to be readable or editable by end-users. However, there is nothing stopping you from combining this approach with the previous one as needed.
Example Build: Bundling Qt Designer UIs and Icons
We've now managed to build a simple app with a single external icon file as a dependency. Now for something a bit more realistic!
In complex Qt applications it's common to use Qt Designer to define the UI, including icons on buttons and menus. How can we distribute UI files with our applications and ensure the linked icons continue to work as expected?
Below is the UI for a demo application we'll use to demonstrate this. The app is a simple counter, which allows you to increase, decrease or reset the counter by clicking the respective buttons. You can also download the source code and associated files.
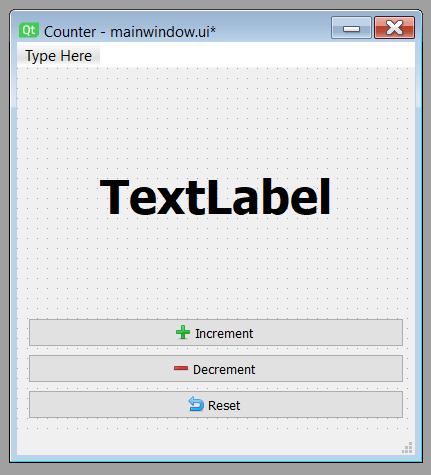 The counter UI created in Qt Designer
The UI consists of a QMainWindow with a vertical layout containing a single QLabel and 3 QPushButton widgets. The buttons have Increment, Decrement and Reset labels, along with icons from the Fugue set by p.yusukekamiyamane. The application icon is a free icon from Freepik.
The UI was created in Qt Designer as described in this tutorial.
Resources
The icons in this project were added to the buttons from within Qt Designer. When doing this you have two options —
Purchasing Power Parity
Developers in [[ country ]] get [[ discount.discount_pc ]]% OFF on all books & courses with code [[ discount.coupon_code ]]- add the icons as files, and ensure that the relative path locations of icons are maintained after installation (not always possible, or fun)
- add the icons using the Qt Resource system
Here we're using approach (2) because it's less prone to errors.
The method for Qt Resources in your UI differs depending on whether you're using Qt Creator or Qt Designer standalone. The steps are described below.
Adding Resources in Qt Designer (Preferred)
If you're using the standalone Qt Designer, the resource browser is available as a dockable widget, visible in the bottom right by default. If the Resource Browser is hidden you can show it through the "View" menu on the toolbar.
To add, edit and remove resource files click on the pencil icon in the Resource browser panel. This will open the resource editor.
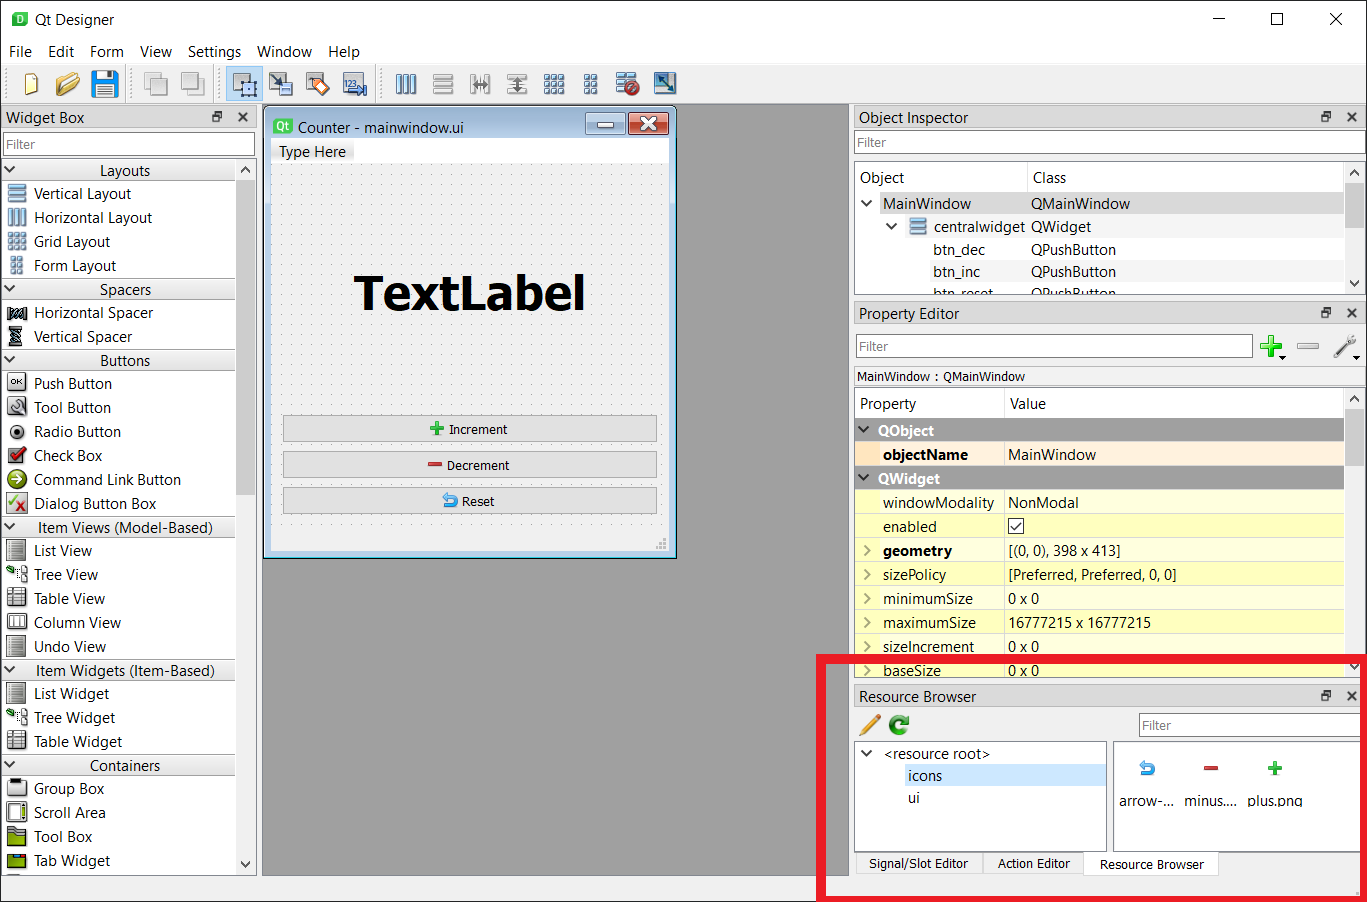 Qt Designer resource browser
In the resource editor view you can open an existing resource file by clicking on the document folder icon (middle icon) on the bottom left.
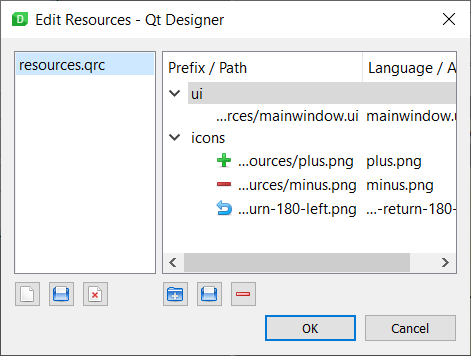 Qt Designer resource editor
In this screenshot above we've included the .ui file in the QResource bundle, but I recommend you compile the UI file to Python instead (see below).
On the left hand panel you can also create and delete resource files from your UI. While on the right you can create new prefixes, add files to the prefix and delete items. Changes to the resource file are saved automatically.
Adding Resources in Qt Creator
In order to be able to add icons using the Qt Resource system from within Qt Creator you need to have an active Qt Project, and add both your UI and resource files to it.
If you don't have a Qt Creator project set up you can create one in your existing source folder. Qt Creator will prompt before overwriting any of your files. Click on "+ New", choose "Qt for Python - Empty" for project type. Select the folder above your source folder for "Create in", and provide the name of your source folder as the project name. You can delete any files created, except the .pyproject which holds the project settings.
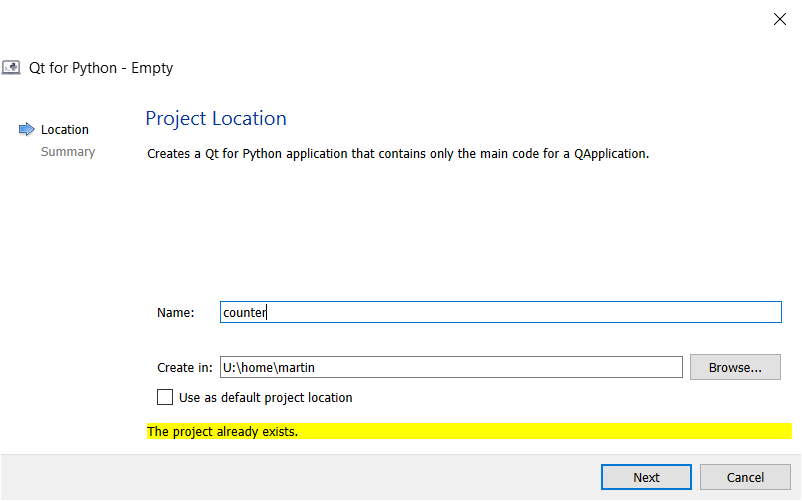 This message will be shown when creating a new Qt Creator project in an existing folder
To add resources to your existing project, select the "Edit" view on the left hand panel. You will see a file tree browser in the left hand panel. Right-click on the folder and choose "Add existing files…" and add your existing .qrc file to the project.
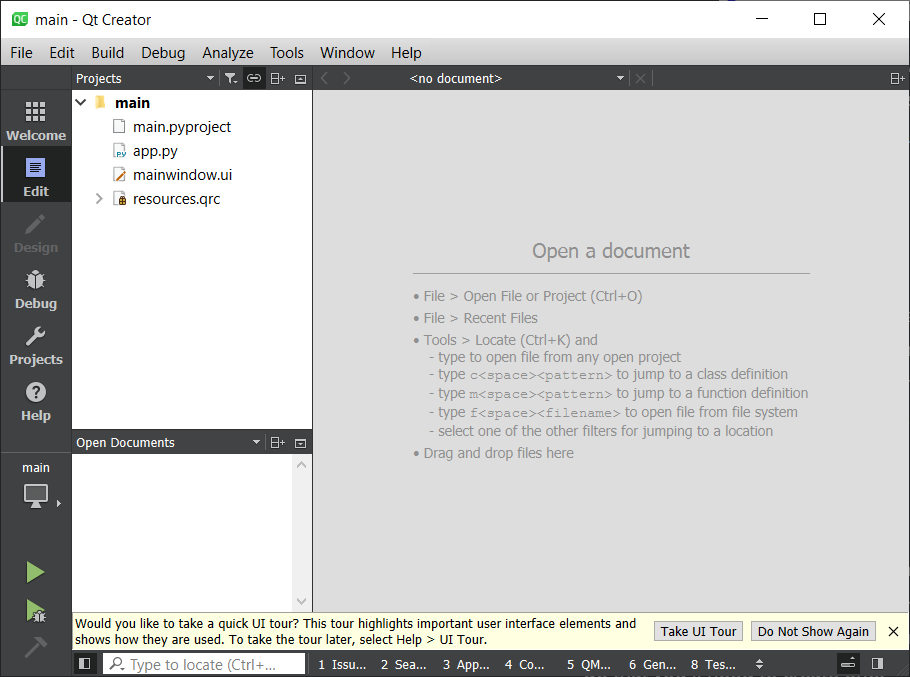 Qt Creator "Edit" view, showing a list of files in the project
The UI doesn't update when you add/remove things here, this seems to be a bug in Qt Creator. If you close and re-open Qt Creator the files will be there.
Once you have added the QRC file to the file listing you should be able to expand the file as if it were a folder, and browse the resources within. You can also add and remove resources using this interface.
Using resources in Qt Creator and Qt Designer
Once the Resource file is loaded you will be able to access it from the designer properties. The screenshot below shows the Designer with our counter app open, and the increment button selected. The icon for the button can be chosen by clicking the small black down arrow and selecting "Choose Resource…"
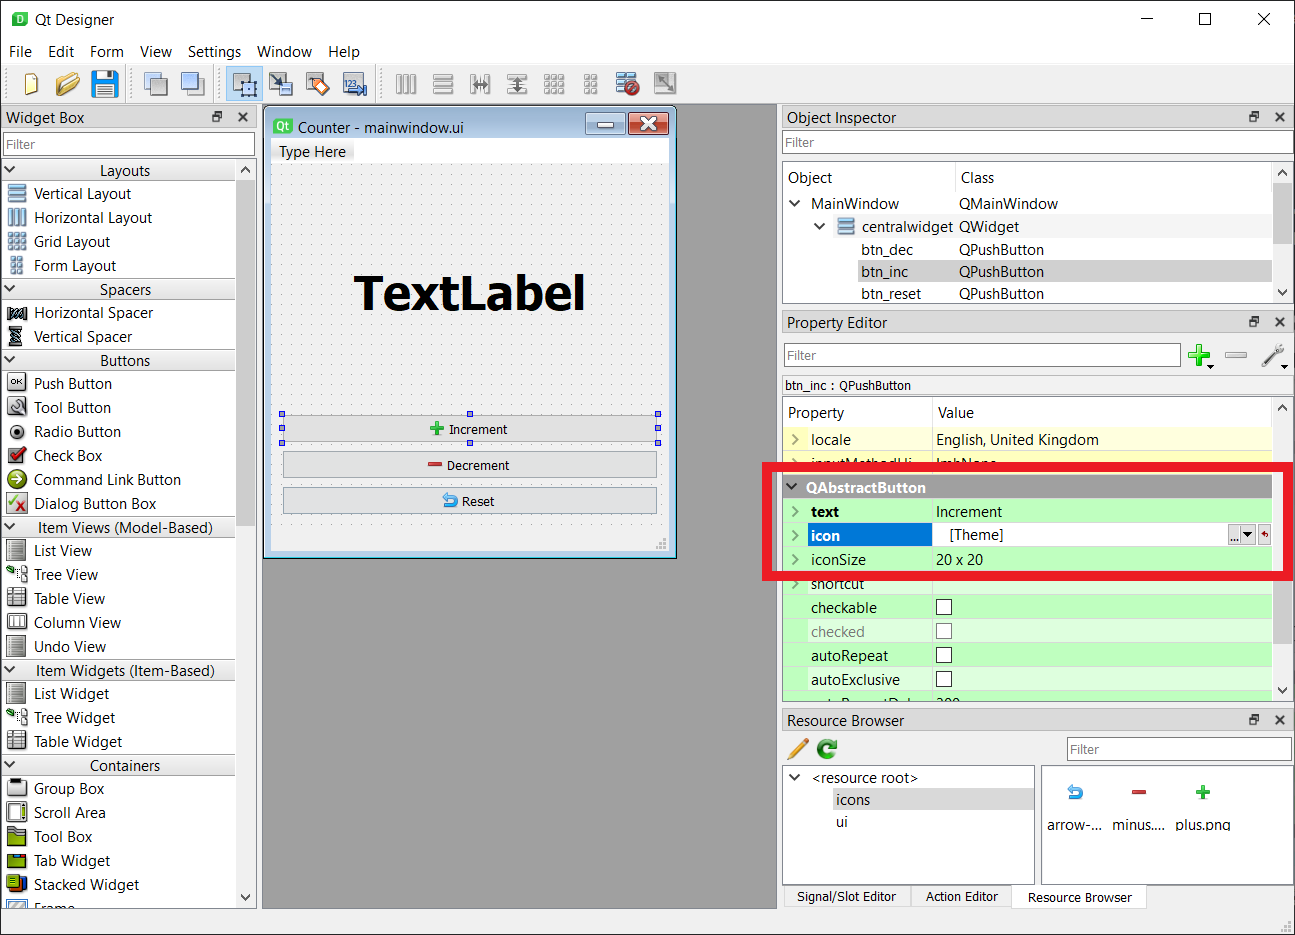 Setting the icon for a button in Qt Designer (or Qt Creator)
The Resource chooser window that appears allows you to pick icons from the resource file(s) in the project to use in your UI.
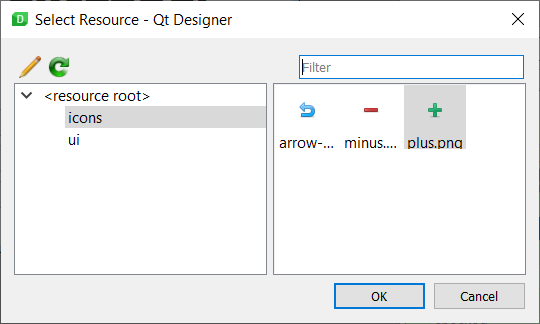 Selecting a resource in the Qt Designer resource dialog
Selecting the icons from the resource file in this way ensures that they will always work, as long as you compile and bundle the compiled resource file with your app.
Compiling the UI file
The simplest way to bundle your UIs using resources is to compile them into Python. The resulting Python file will be automatically packaged by PyInstaller (once it's imported) and will also itself automatically load the related resources file.
pyside6-uic mainwindow.ui -o MainWindow.py
You may want to wrap this in a function if you're using it a lot.
The finished app
Below is our updated app.py which loads the mainwindow.ui file and defines 3 custom slots to increment, decrement and reset the number. These are connected to signals of the widgets defined in the UI (btn_inc, btn_dec and btn_reset for the 3 buttons respectively) along with a method to update the displayed number (label for the QLabel).
from PySide6 import QtWidgets, QtCore, QtGui
import sys
from MainWindow import Ui_MainWindow

try:
    from ctypes import windll  # Only exists on Windows.
    myappid = 'mycompany.myproduct.subproduct.version'
    windll.shell32.SetCurrentProcessExplicitAppUserModelID(myappid)
except ImportError:
    pass


class MainWindow(QtWidgets.QMainWindow, Ui_MainWindow):

    def __init__(self, *args, **kwargs):
        super().__init__(*args, **kwargs)

        # Load the UI
        self.setupUi(self)

        # Set value of counter
        self.counter = 0
        self.update_counter()

        # Bind
        self.btn_inc.clicked.connect(self.inc)
        self.btn_dec.clicked.connect(self.dec)
        self.btn_reset.clicked.connect(self.reset)

    def update_counter(self):
        self.label.setText(str(self.counter))

    def inc(self):
        self.counter += 1
        self.update_counter()

    def dec(self):
        self.counter -= 1
        self.update_counter()

    def reset(self):
        self.counter = 0
        self.update_counter()


if __name__ == '__main__':
    app = QtWidgets.QApplication(sys.argv)
    app.setWindowIcon(QtGui.QIcon(':/icons/counter.ico'))
    main = MainWindow()
    main.show()
    sys.exit(app.exec())
If you have made any changes to the resources.qrc file, or haven't compiled it yet do so now using pyside6-rcc resources.qrc -o resources.py
If you run this application you should see the following window.
![]() Counter app, with all icons showing
Counter app, with all icons showing
We'll build our app as before using the command line to perform an initial build and generate a .spec file for us. We can use that .spec file in future to repeat the build.
pyinstaller --windowed --icon=resources/counter.ico app.py
PyInstaller will analyse our app.py file, bundling all the necessary dependencies, including our compiled resources.py and MainWindow.py into the dist folder.
Once the build process is complete, open the dist folder and run the application. You should find it works, with all icons — from the application itself, through to the icons embedded in our UI file — working as expected.
![]() Counter app, with all icons showing
Counter app, with all icons showing
This shows the advantage of using this approach — if your application works before bundling, you can be pretty sure it will continue to work after.
Building a Windows Installer with Installforge
The applications so far haven't done very much. Next we'll look at something more complete — our custom Piecasso Paint application. The source code is available to download here or in the 15 minute apps repository.
The source code is not covered in depth here, only the steps required to package the application. The source and more info is available in the 15 minute apps repository of example Qt applications. The custom application icons were created using icon art by Freepik.
Prepared for packaging the project has the following structure (truncated for clarity).
.
├── paint.py
├── Piecasso.spec
├── mainwindow.ui
├── MainWindow.py
├── README.md
├── requirements.txt
├── resources.qrc
├── resources_rc.py
├── screenshot-paint1.jpg
├── screenshot-paint2.jpg
├── icons
│   ├── blue-folder-open-image.png
│   ├── border-weight.png
│   ├── cake.png
│   ├── disk.png
│   ├── document-image.png
│   ├── edit-bold.png
│   ...
└── stamps
    ├── pie-apple.png
    ├── pie-cherry.png
    ├── pie-cherry2.png
    ├── pie-lemon.png
    ├── pie-moon.png
    ├── pie-pork.png
    ├── pie-pumpkin.png
    └── pie-walnut.png
The main source of the application is in the paint.py file.
Packaging Resources
The resources for Piecasso are bundled using the Qt Resource system, referenced from the resources.qrc file in the root folder. There are two folders of images, icons which contains the icons for the interface and stamps which contains the pictures of pie for "stamping" the image when the application is running.
The icons were added to the UI in Qt Designer, while the stamps are loaded in the application itself using Qt Resource paths, e.g. :/stamps/<image name>.
The icons folder also contains the application icon, in .ico format.
The UI in Qt Designer
The UI for Piecasso was designed using Qt Designer. Icons on the buttons and actions were set from the Qt resources file already described.
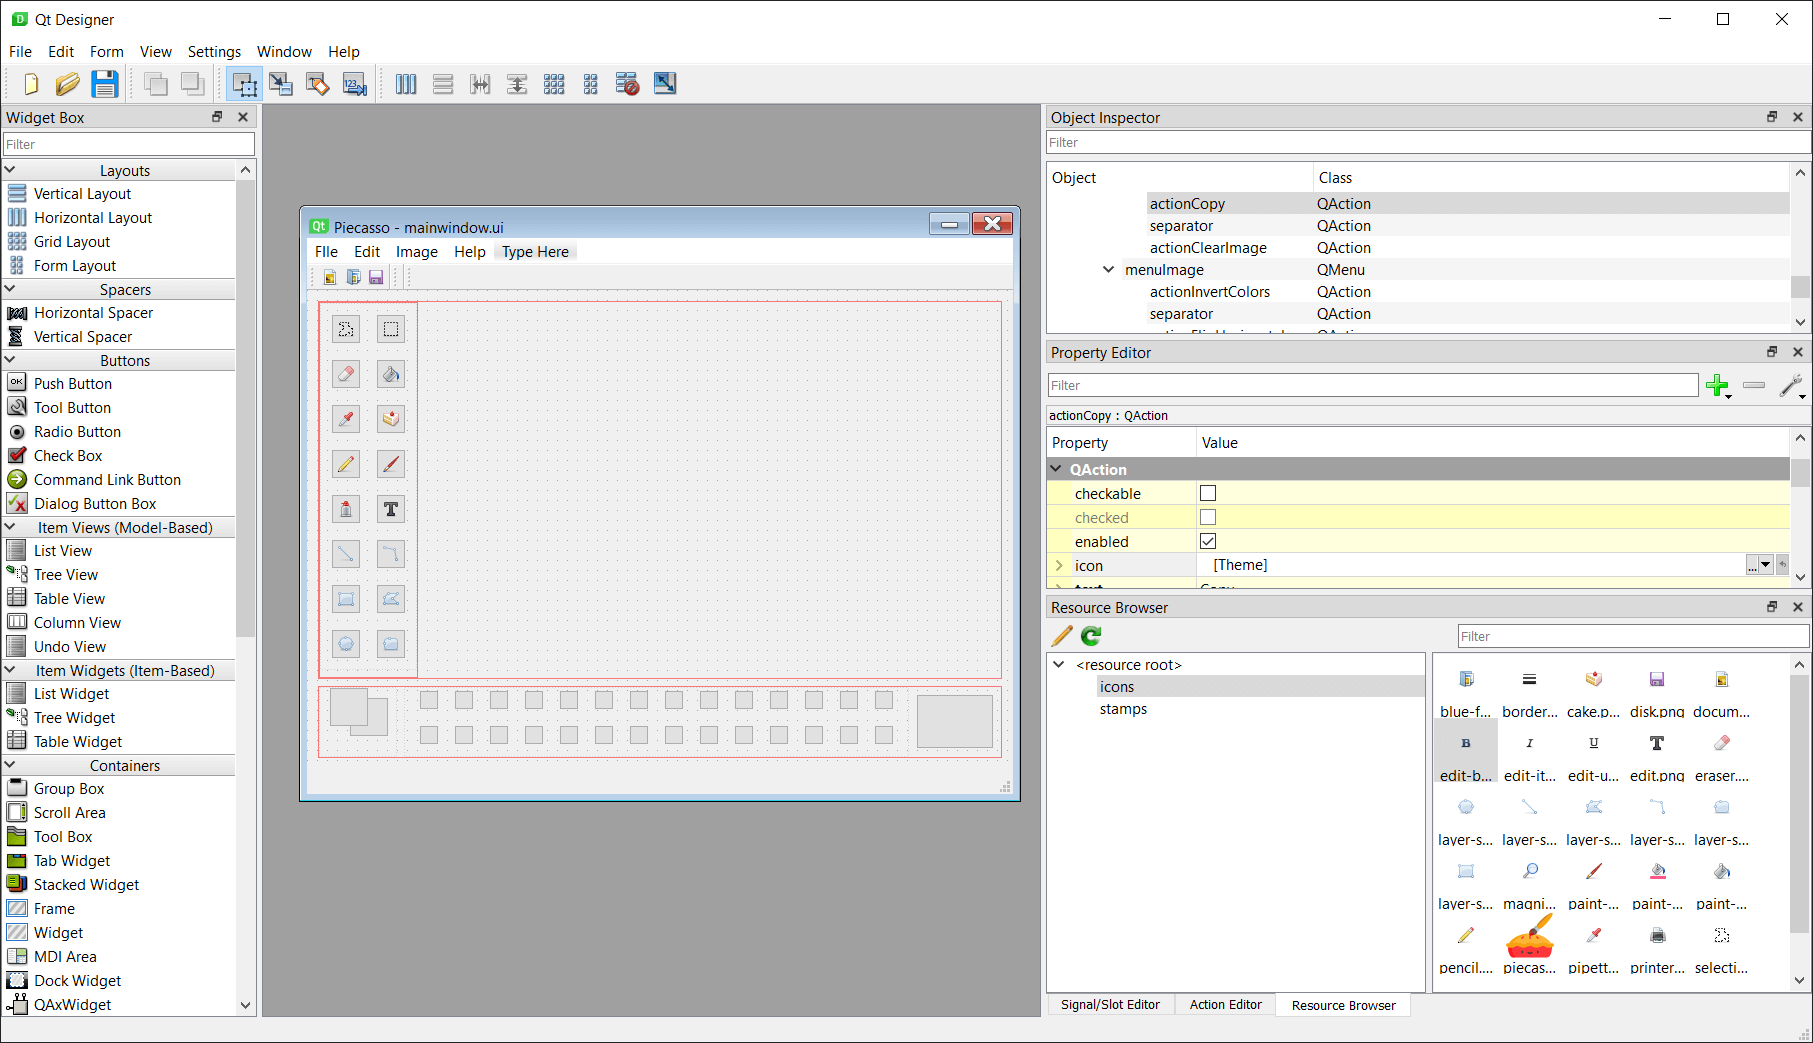 Piecasso UI, created in Qt Designer
The resulting UI file was saved in the root folder of the project as mainwindow.ui and then compiled using the UI compiler to produce an importable .py file, as follows.
pyside6-uic mainwindow.ui -o MainWindow.py
For more on building UIs with Qt Designer see the introductory tutorial.
This build process also adds imports to MainWindow.py for the compiled version of the resources used in the UI, in our case resources.qrc. This means we do not need to import the resources separately into our app. However, we still need to build them, and use the specific name that is used for the import in MainWindow.py, here resources_rc.
pyside6-rcc resources.qrc -o resources_rc.py
pyside6-uic follows the pattern <resource name>_rc.py when adding imports for the resource file, so you will need to follow this when compiling resources yourself. You can check your compiled UI file (e.g. MainWindow.py) to double check the name of the import if you have problems.
Building the app
With all the above setup, we can build Piecasso as follows from the source folder.
pyinstaller --windowed --icon=icons/piecasso.ico --name Piecasso paint.py
If you download the source code, you will also be able to run the same build using the provided .spec file.
pyinstaller Piecasso.spec
This packages everything up ready to distribute in the dist/Piecasso folder. We can run the executable to ensure everything is bundled correctly, and see the following window, minus the terrible drawing.
 Piecasso Screenshot, with a poorly drawn cat
Creating an installer
So far we've used PyInstaller to bundle applications for distribution. The output of this bundling process is a folder, named dist which contains all the files our application needs to run.
While you could share this folder with your users as a ZIP file it's not the best user experience. Desktop applications are normally distributed with installers which handle the process of putting the executable (and any other files) in the correct place, adding Start Menu shortcuts and the like.
Now we've successfully bundled our complex application, we'll next look at how we can take our dist folder and use it to create a functioning Windows installer.
To create our installer we'll be using a tool called InstallForge. InstallForge is free and you can download the installer from this page.
The InstallForge configuration is also in the Piecasso source folder, Piecasso.ifp however bear in mind that the source paths will need to be updated for your system.
Another popular tool is NSIS which is a scriptable installer, meaning you configure its behavior by writing custom scripts. If you're going to be building your application frequently and want to automate the process, it's definitely worth a look.
We'll now walk through the basic steps of creating an installer with InstallForge. If you're impatient, you can download the Piecasso Installer for Windows here.
General
When you first run InstallForge you'll be presented with this General tab. Here you can enter the basic information about your application, including the name, program version, company and website.
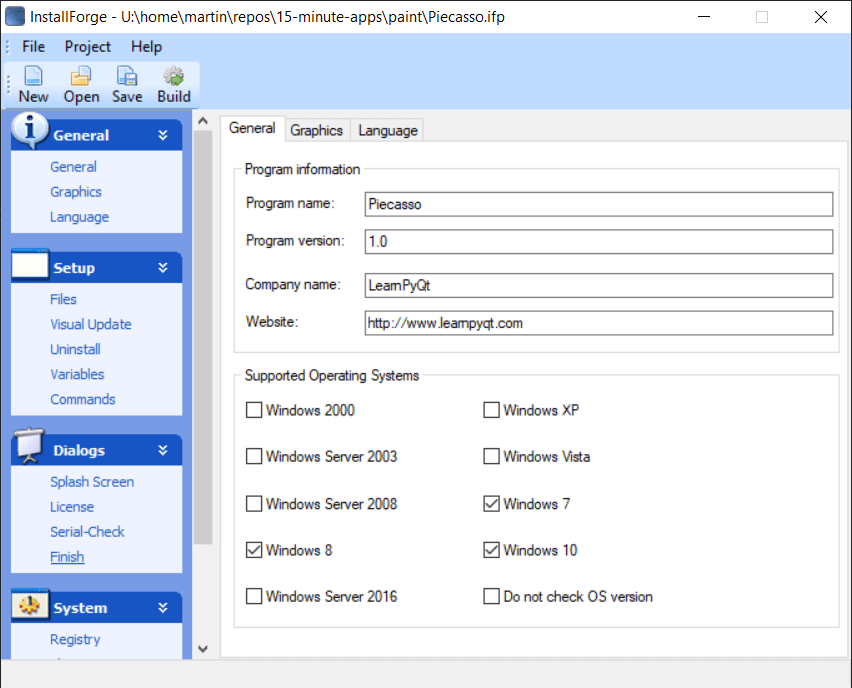 InstallForge initial view, showing General settings
You can also select the target platforms for the installer, from various versions of Windows that are available. For desktop applications you currently probably only want to target Windows 7, 8 and 10.
Setup
Click on the left sidebar to open the "Files" page under "Setup". Here you can specify the files to be bundled in the installer.
Use "Add Files…" and select all the files in the dist/Piecasso folder produced by PyInstaller. The file browser that pops up allows multiple file selections, so you can add them all in a single go, however you need to add folders separately. Click "Add Folder…" and add any folders under dist/Piecasso.
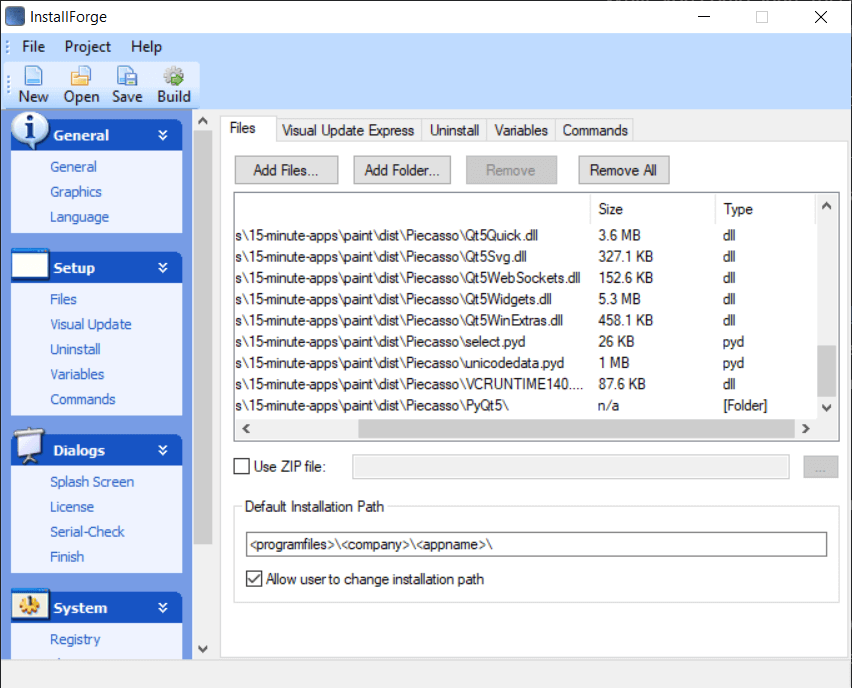 InstallForge Files view, add all files & folders to be packaged
Once you're finished scroll through the list to the bottom and ensure that the folders are listed to be included. You want all files and folders under dist/Piecasso to be present. But the folder dist/Piecasso itself should not be listed.
The default install path can be left as-is. The values between angled brackets, e.g. <company> , are variables and will be filled automatically.
Next, it's nice to allow your users to uninstall your application. Even though it's undoubtedly awesome, they may want to remove it at some time in the future. You can do this under the "Uninstall" tab, simply by ticking the box. This will also make the application appear in "Add or Remove Programs".
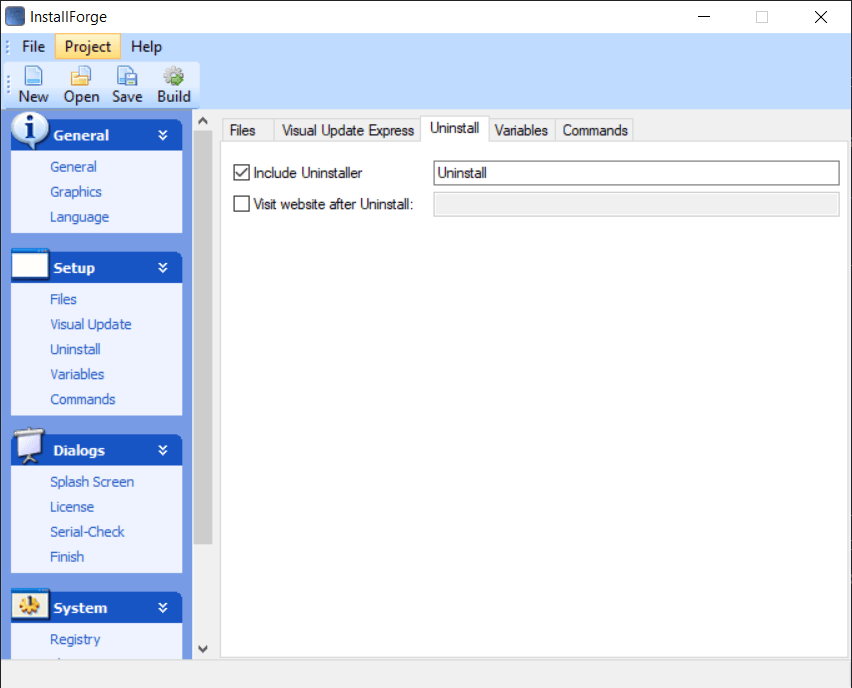 InstallForge add Uninstaller for your app
Dialogs
The "Dialogs" section can be used to show custom messages, splash screens or license information to the user. The "Finish" tab lets you control what happens once the installer is complete, and it's helpful here to give the user the option to run your program.
To do this you need to tick the box next to "Run program" and add your own application EXE into the box. Since <installpath>\ is already specified, we can just add Piecasso.exe.
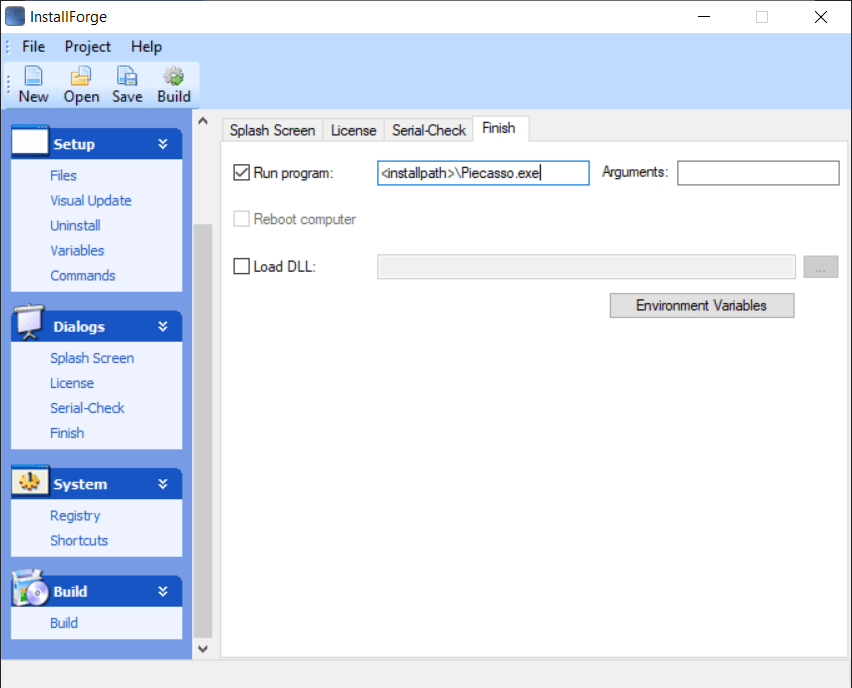 InstallForge configure optional run program on finish install
System
Under "System" select "Shortcuts" to open the shortcut editor. Here you can specify shortcuts for both the Start Menu and Desktop if you like.
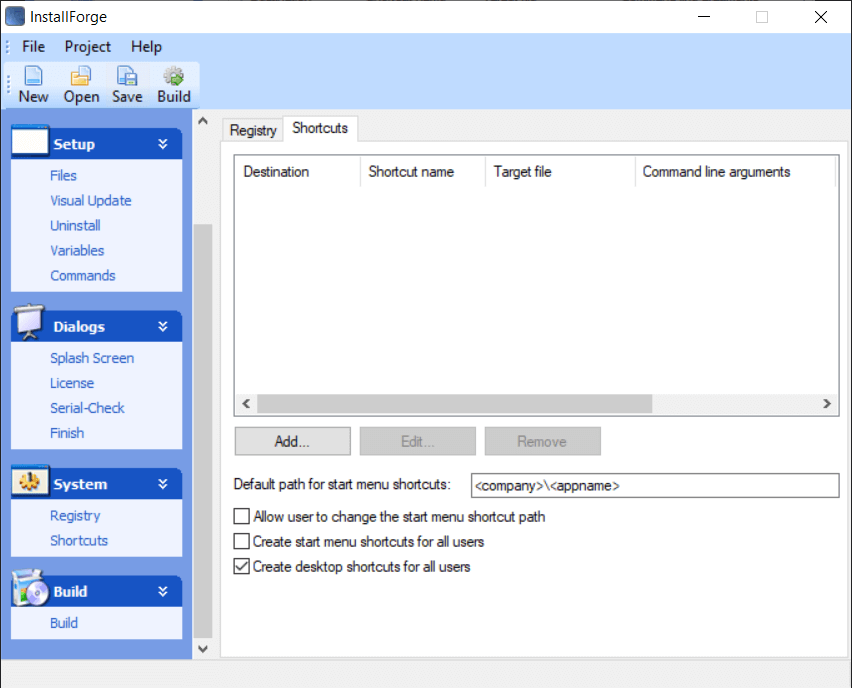 InstallForge configure Shortcuts, for Start Menu and Desktop
Click "Add…" to add new shortcuts for your application. Choose between Start menu and Desktop shortcuts, and fill in the name and target file. This is the path your application EXE will end up at once installed. Since <installpath>\ is already specified, you simply need to add your application's EXE name onto the end, here Piecasso.exe
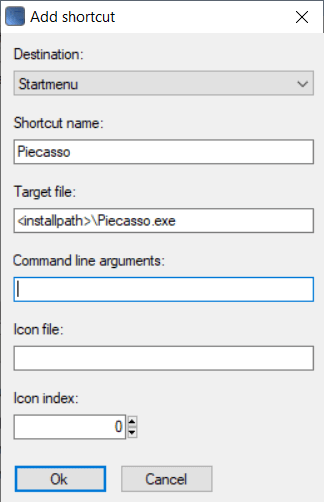 InstallForge, adding a Shortcut
Build
With the basic settings in place, you can now build your installer.
At this point you can save your InstallForge project so you can re-build the installer from the same settings in future.
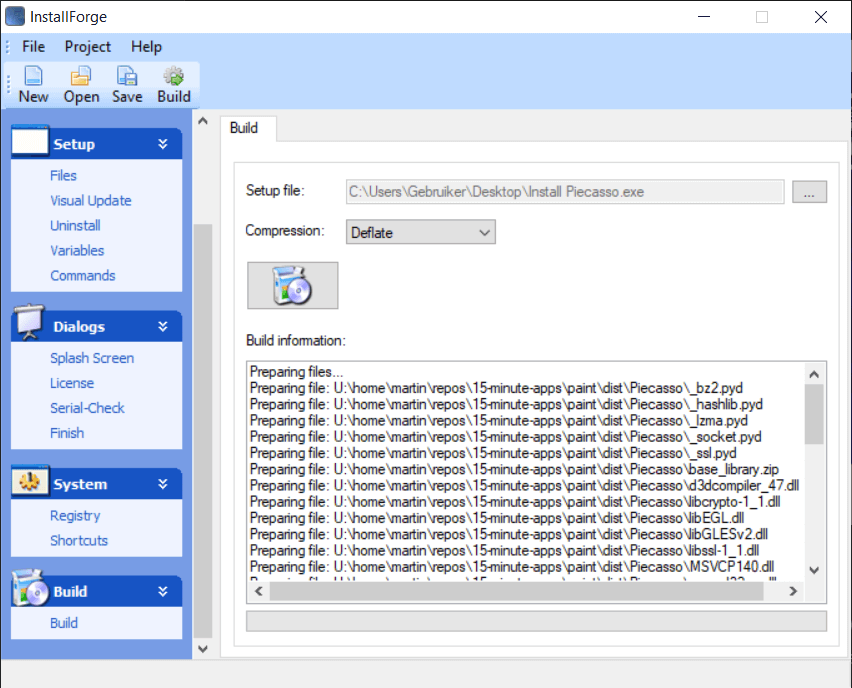
Click on the "Build" section at the bottom to open the build panel.
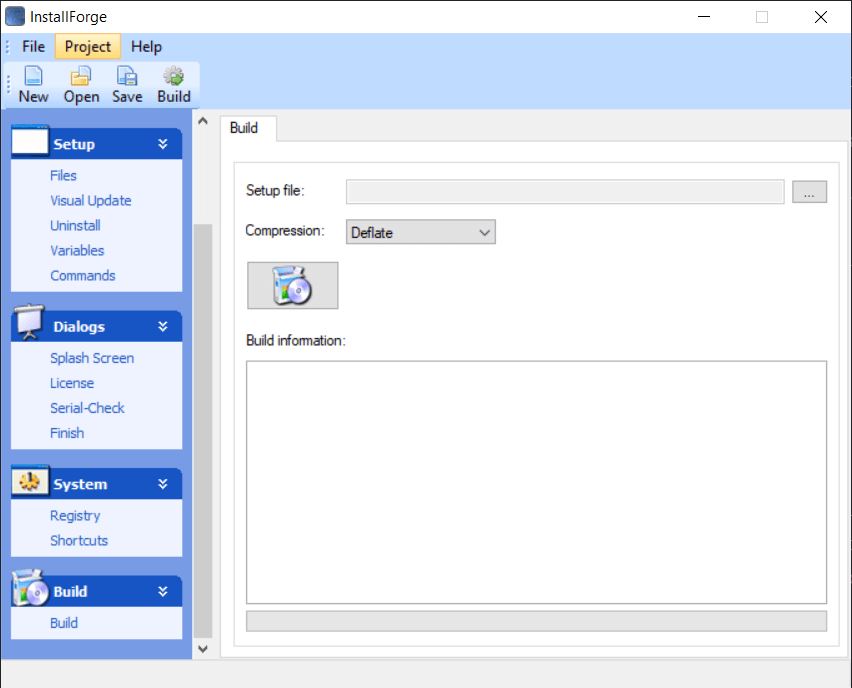 InstallForge, ready to build
Click on the large icon button to start the build process. If you haven't already specified a setup file location you will be prompted for one. This is the location where you want the completed installer to be saved.
Don't save it in your dist folder.
The build process will begin, collecting and compressing the files into the installer.
 InstallForge, build complete
Once complete you will be prompted to run the installer. This is entirely optional, but a handy way to find out if it works.
Running the installer
The installer itself shouldn't have any surprises, working as expected. Depending on the options selected in InstallForge you may have extra panels or options.
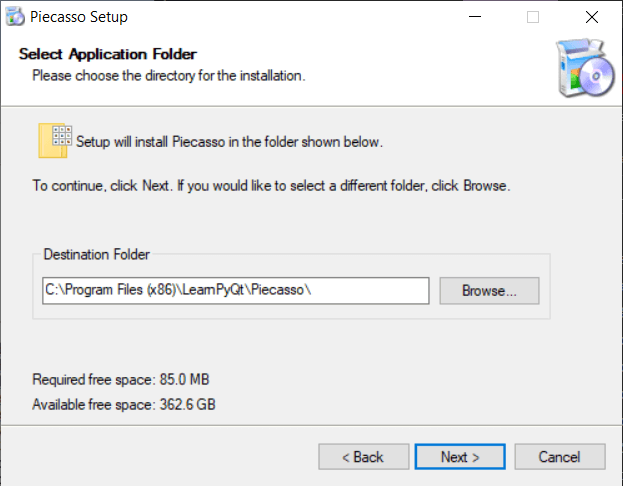 InstallForge, running the resulting installer
Step through the installer until it is complete. You can optionally run the application from the last page of the installer, or you can find it in your start menu.
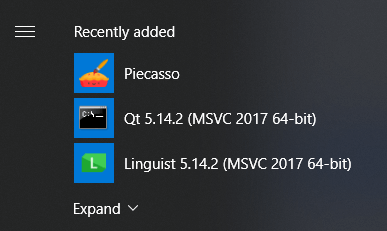 Piecasso in the Start Menu on Windows 10
Wrapping up
In this tutorial we've covered how to build your PySide6 applications into a distributable EXE using PyInstaller. Following this we walked through the steps of using InstallForge to build an installer for the app. Following these steps you should be able to package up your own applications and make them available to other people.
For a complete view of all PyInstaller bundling options take a look at the PyInstaller usage documentation.
Packaging Python Applications with PyInstaller by Martin Fitzpatrick — This step-by-step guide walks you through packaging your own Python applications from simple examples to complete installers and signed executables.
