In the previous tutorial we implemented a basic QML clock application using Python code to get the current time, format it into a string and send that through to our QML layout for display using Qt signals.
That gave us a good overview of the structure of Python/QML applications, but wasn't really taking advantage of the graphical capabilities of QML. In this tutorial we're going to take that simple application a step further, using image transformations and animations to draw a live analog clock face with PySide6 and QtQuick.
For building QML applications you can use PySide2 or PySide6. However, if using Qt 6 you will need v6.1 or later.
We will start from where we got to in the previous tutorial. The complete code is shown below for both the main.py (Python) and main.qml (QML) files.
main.py
import sys

from PySide6.QtGui import QGuiApplication
from PySide6.QtQml import QQmlApplicationEngine
from PySide6.QtCore import QTimer, QObject, Signal

from time import strftime, localtime

app = QGuiApplication(sys.argv)

engine = QQmlApplicationEngine()
engine.quit.connect(app.quit)
engine.load('main.qml')


class Backend(QObject):

    updated = Signal(str, arguments=['time'])

    def __init__(self):
        super().__init__()

        # Define timer.
        self.timer = QTimer()
        self.timer.setInterval(100)  # msecs 100 = 1/10th sec
        self.timer.timeout.connect(self.update_time)
        self.timer.start()

    def update_time(self):
        # Pass the current time to QML.
        curr_time = strftime("%H:%M:%S", localtime())
        self.updated.emit(curr_time)


# Define our backend object, which we pass to QML.
backend = Backend()

engine.rootObjects()[0].setProperty('backend', backend)

# Initial call to trigger first update. Must be after the setProperty to connect signals.
backend.update_time()

sys.exit(app.exec())
main.qml
import QtQuick 2.15
import QtQuick.Controls 2.15

ApplicationWindow {
    visible: true
    width: 400
    height: 600
    x: screen.desktopAvailableWidth - width - 12
    y: screen.desktopAvailableHeight - height - 48
    title: "Clock"
    flags: Qt.FramelessWindowHint | Qt.Window
    property string currTime: "00:00:00"
    property QtObject backend

    Rectangle {
        anchors.fill: parent

        Image {
            sourceSize.width: parent.width
            sourceSize.height: parent.height
            source: "./images/background.png"
            fillMode: Image.PreserveAspectCrop
        }

        Rectangle {
            anchors.fill: parent
            color: "transparent"


            Text {
                anchors {
                    bottom: parent.bottom
                    bottomMargin: 12
                    left: parent.left
                    leftMargin: 12
                }
                text: currTime  // used to be; text: "16:38:33"
                font.pixelSize: 48
                color: "white"
            }

        }

    }

    Connections {
        target: backend

        function onUpdated(msg) {
            currTime = msg;
        }
    }

}
Place these files in a folder together, with an additional folder named images inside. In this folder add this background.png image to provide the background for the clock text. You can also download these files as a zip file.
If you run this version of the app, you will see a rectangular window with the current local time.
python main.py
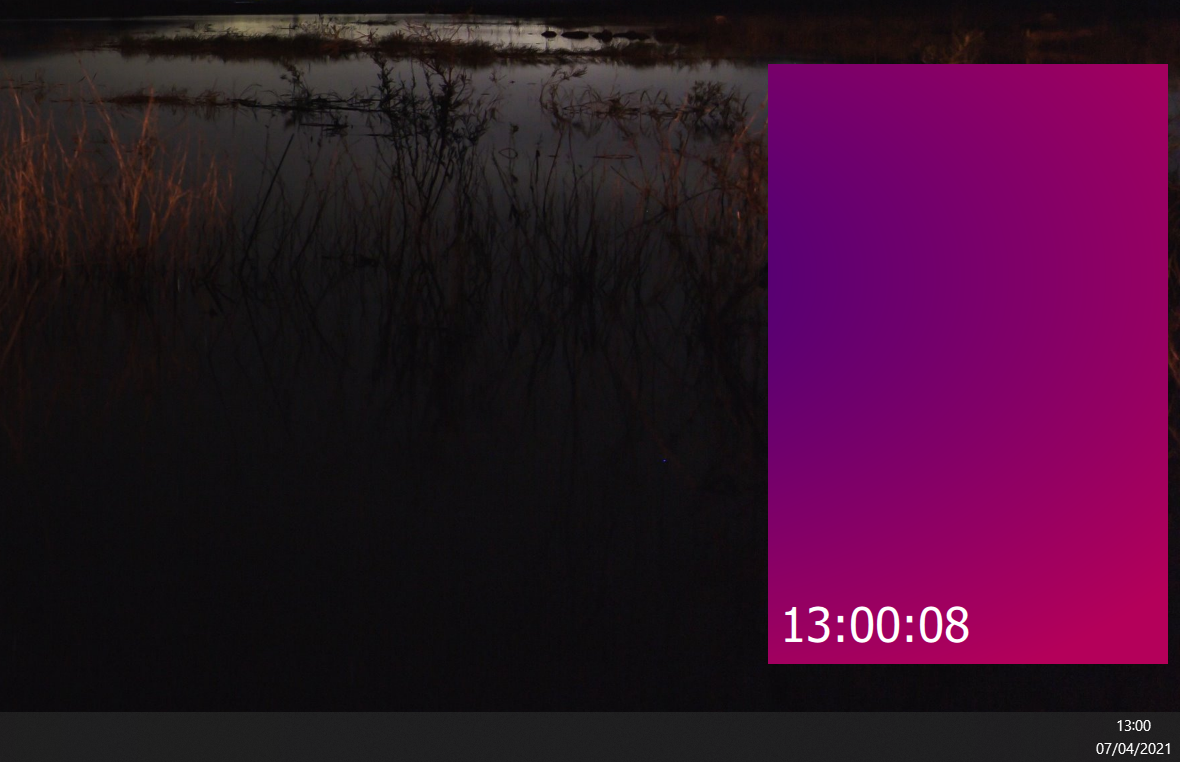 The current simple text clock with no window decorations
We'll use this simple clock as the basis to build an analog clock face using QML graphics and transformations.
Sending time data from Python to QML
With the digital clock face we sent the time through as a pre-formatted string -- on the QML side we only needed to display that string to show the current time.
For an analog clock face we need to calculate the positions of the hands, based on the current time. To do this we need the hours, minutes and seconds as numbers (integers). First, lets add another signal to send the data we need. Update the Backend class to add an additional hms signal which passes three int values (hours, minutes, seconds).
class Backend(QObject):

    updated = Signal(str, arguments=['time'])
    hms = Signal(int, int, int, arguments=['hours','minutes','seconds'])

    def __init__(self):
        super().__init__()

        # Define timer.
        self.timer = QTimer()
        self.timer.setInterval(100)  # msecs 100 = 1/10th sec
        self.timer.timeout.connect(self.update_time)
        self.timer.start()

    def update_time(self):
        # Pass the current time to QML.
        local_time = localtime()
        curr_time = strftime("%H:%M:%S", local_time)
        self.updated.emit(curr_time)
        self.hms.emit(local_time.tm_hour, local_time.tm_min, local_time.tm_sec)
Receiving the time data in QML
Next we need to add a new variable on the QML side to hold our time data -- we'll be using a Javascript object named hms to keep the hours, minutes and seconds together in a single variable -- similar to a Python dictionary. Then we need to add a signal handler which can take the incoming data from Python and store it into our QML property hms. Finally, we modify the Connections object to add a handler for the hms signal named onHms.
ApplicationWindow {
    ...
    property QtObject backend
    property var hms

    ...

    Connections {
        target: backend

        function onUpdated(msg) {
            currTime = msg;
        }

        function onHms(hours, minutes, seconds) {
            hms = {'hours': hours, 'minutes': minutes, 'seconds': seconds }
        }
    }
As the QML code blocks get very large, I've only included the relevant changes. The marker ... indicates where you should leave existing code as-is. The end of the tutorial has a complete working code example if things get mixed up.
The name of the handler onHms must match the name of the signal in Python -- hms -- with the first letter uppercased and then preceded by on.
As you can see our onHms function accepts three arguments -- as sent by our Python signal -- and then packs these into an object using {} as hours, minutes and seconds, storing them in the hms property. Any UI elements that use hms.hours, hms.minutes or hms.seconds will be updated automatically when this change is applied.
Drawing the clock face with QML images
We now have all the data we need being sent through to QML. The next step is to use the hour, minute and second values to draw a clock face. In this example we're going to construct the clock face from a series of images -- one for the clock face and one each for each of the hands (hours, minutes, seconds).
Purchasing Power Parity
Developers in [[ country ]] get [[ discount.discount_pc ]]% OFF on all books & courses with code [[ discount.coupon_code ]]We can place the clock in our window by adding a new Image object. By setting the width to the parent (the window) and leaving the height unset with fillMode as ImagePreserveAspectFit then the clock face will fill the window horizontally, while remaining circular.
ApplicationWindow {
    ...
    property string currTime: "00:00:00"
    property var hms: {'hours': 0, 'minutes': 0, 'seconds': 0 }
    property QtObject backend

    Rectangle {

        Image { ... }

        Image {
            sourceSize.width: parent.width
            fillMode: Image.PreserveAspectFit
            source: "./images/clockface.png"
        }

        ...
You'll need to download the images and drop them into your images/ folder.
If you run the example now you'll see a window as before with the time shown as text. But at the top of the window there is now a circle -- our clock face from the image.
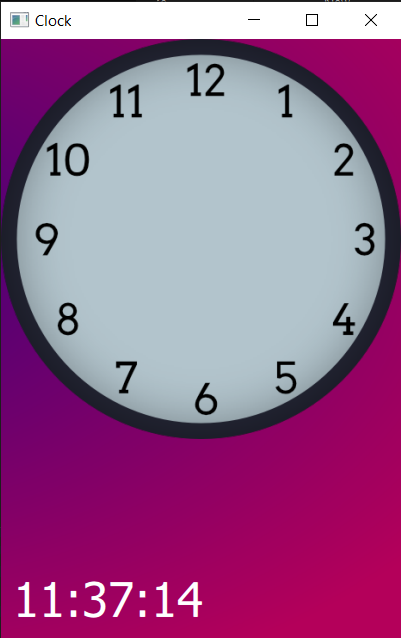 Clock face added to our existing app
There are no hands on the clock yet, we'll add them next. In the QML code below we define a series of images inside our clockface image. Each of these images is one of our hands -- first hours, then minutes, then seconds. The final image is the "cap" -- a red circle used to hide the square ends of the hands and which will appear attached to the red second hand.
ApplicationWindow {
    ...
    property QtObject backend
    property var hms

    Rectangle {

        Image {
            id: clockface
            sourceSize.width: parent.width
            fillMode: Image.PreserveAspectFit
            source: "./images/clockface.png"

            Image {
                x: clockface.width/2 - width/2
                y: (clockface.height/2) - height/2
                scale: clockface.width/465
                source: "./images/hour.png"
            }

            Image {
                x: clockface.width/2 - width/2
                y: clockface.height/2 - height/2
                source: "./images/minute.png"
                scale: clockface.width/465
            }

            Image {
                x: clockface.width/2 - width/2
                y: clockface.height/2 - height/2
                source: "./images/second.png"
                scale: clockface.width/465
            }

            Image {
                x: clockface.width/2 - width/2
                y: clockface.height/2 - height/2
                source: "./images/cap.png"
                scale: clockface.width/465
            }

        }

    ...
Notice that we've added an id for the clockface itself, so we can reference it in our calculations for the hands (we could also use parent). Each hand is positioned by default facing up (pointing to the 12) positioned at half the width of the clock face, minus half it's own width -- this positions the center line of the hand over the middle of the clock. For the vertical position we cheat a little by using hand images that are 2x the length of the hand, with blank space. This allows us to also position them vertically in the same way.
To scale the hands with the clock face we use a calculation of the clockface size divided by the size of the original image (465 pixels). This gives us a ratio to scale the hands by to keep them in the same relative size -- e.g. if the clockface is being displayed at 930 pixels wide, we'd need to scale the hands by 930/465=2.0x.
If you run the example now you'll see a static clock face, with the hands all pointing up towards the 12 position.
 Clock face with all hands showing, pointing to 12
We'll leave the background and text time in place for the time being, it's useful to double-check our analog clock is behaving correctly as we start to implement it.
Rotating clock hands with QML Rotation transforms
Now lets get the hands moving. We want the hands to rotate as the time changes and we can do this by applying a Rotation transformation to the image.
            ...
            Image {
                x: clockface.width/2 - width/2
                y: (clockface.height/2) - height/2
                scale: clockface.width/465
                source: "./images/hour.png"
                transform: Rotation {
                        origin.x: 12.5; origin.y: 166;
                        angle: hms.hours * 30
                }
            }
            ...
If you want to add multiple transforms, wrap them in a list, e.g. transform: [ Rotation{}, Scale{} ]
The Rotation transform accepts parameters for the angle through which to rotate and the origin.x and origin.y. The origin is the point in the image around which we want to rotate -- in our case, the center.
The calculation for the rotation of the hour hand is hms.hours * 30. There are 12 hours on the clock face and 360 degrees for a full rotation -- so each hour the hour hand advances 360/12=30 degrees. By multiplying the current hour by 30 we get the number of degrees to rotate the hands. By setting this calculation on the angle property, the hand will be positioned correctly and update automatically.
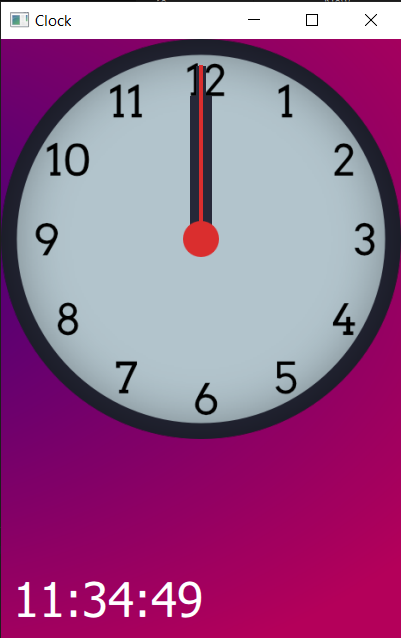
Run the app now and you will see the hour hand is pointing at the current hour!
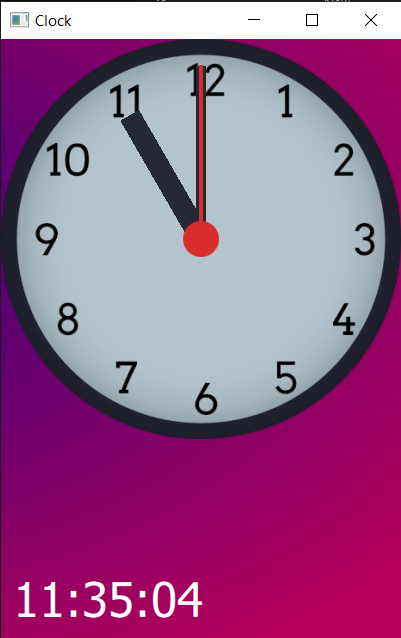 Clock face with hour hand rotated to correct position
If you look closely you'll notice some jaggy-edges on the side of the hour hand. This is an artefact of rotating an image and displaying on a screen made of discrete pixels. To hide this effect we can apply antialiasing to the rotated image, using the antialiasing: true directive in our QML file.
Update the hour hand to add antialiasing and add the minute and second hands too.
            ...
            Image {
                x: clockface.width/2 - width/2
                y: (clockface.height/2) - height/2
                scale: clockface.width/465
                source: "./images/hour.png"
                antialiasing: true
                transform: Rotation {
                    origin.x: 12.5; origin.y: 166;
                    angle: (hms.hours * 30)
                }
            }

            Image {
                x: clockface.width/2 - width/2
                y: clockface.height/2 - height/2
                source: "./images/minute.png"
                scale: clockface.width/465
                antialiasing: true
                transform: Rotation {
                    origin.x: 5.5; origin.y: 201;
                    angle: hms.minutes * 6
                }
            }

            Image {
                x: clockface.width/2 - width/2
                y: clockface.height/2 - height/2
                source: "./images/second.png"
                scale: clockface.width/465
                antialiasing: true
                transform: Rotation {
                    origin.x: 2; origin.y: 202;
                    angle: hms.seconds * 6
                }
            }
            ...
Notice that the origin of the rotation changes for each hand, since the size of the individual images is different -- in each case it is precisely half the original height and width of the image. The rotation of the minutes and second hand are calculated with x * 6 because there are 60 minutes/seconds on the clock face and 360/60=6.
With these two images added into your QML definition, running the clock should show you the fully working clock face.
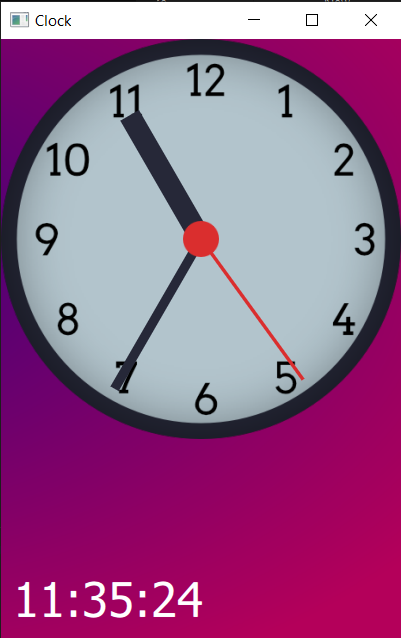 Clock face with all hands rotated to the correct position and antialiased
Because the rotation of our hands depends on the hms variable and we are updating that variable via a signal from Python, the hands will always show the current time -- with the second hand ticking forward once per second, in time with your system clock.
Animating clock hands with SpringAnimation
The clock is now fully functional with the time updating correctly as it ticks by. But we can add some final touches to bring it to life. If you've seen this type of analog clock in real life you might have noticed that the hour hand moves along with the minute hand -- half way through the hour, it will be half way between the two hours. We can replicate this by adding minutes into the calculation for the hour hand. Modify the hour Image object as follows.
            ...
            Image {
                x: clockface.width/2 - width/2
                y: (clockface.height/2) - height/2
                scale: clockface.width/465
                source: "./images/hour.png"
                transform: Rotation {
                        origin.x: 12.5; origin.y: 166;
                        angle: (hms.hours * 30) + (hms.minutes * 0.5)
                }
            }
            ...
We've already seen each hour on the clock face is 30 degrees (360/12=30) and there are 60 minutes in each hour. That means that the hour hand should progress 30/60 = 0.5 for each additional minute, on top of the current hour position. That gives us the calculation shown in the code above. Remember, the minutes will reset to zero on each hour.
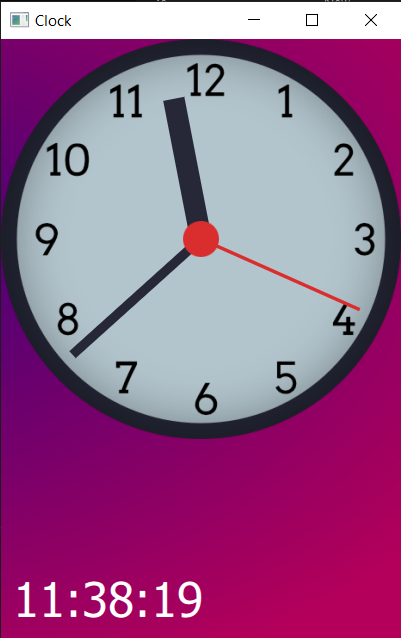 Hour hand progressing through the hour
Another nice touch is to add some weight to the hands. On a real clock, as the second hand jumps forward each second the hand will oscillate a little bit. You can see the same effect, but lesser on the minute hand and the hour hand typically moves too slowly for this to be apparent. We can use QML's SpringAnimation on the Rotation transform's angle property to implement this realistic spring effect.
Update the minute and second hands to add a behavior block on the angle of the transform adding a SpringAnimation. This animation causes the angle property to track any change in value using a spring-like motion -- it will accelerate towards the target value, overshoot it and then spring back and forth until it settles.
            ...
            Image {
                x: clockface.width/2 - width/2
                y: clockface.height/2 - height/2
                source: "./images/minute.png"
                scale: clockface.width/465
                transform: Rotation {
                        origin.x: 5.5; origin.y: 201;
                        angle: hms.minutes * 6
                        Behavior on angle {
                            SpringAnimation { spring: 1; damping: 0.2; modulus: 360 }
                        }
                    }
            }

            Image {
                x: clockface.width/2 - width/2
                y: clockface.height/2 - height/2
                source: "./images/second.png"
                scale: clockface.width/465
                transform: Rotation {
                        origin.x: 2; origin.y: 202;
                        angle: hms.seconds * 6
                        Behavior on angle {
                            SpringAnimation { spring: 3; damping: 0.2; modulus: 360 }
                        }
                    }
            }
            ...
The size of the effect is determined by the spring value and the rate of decay by the damping value. The modulus value indicates a value to wrap at -- the value will not go above this limit instead wrapping around to zero. We use 360 as the max because we're working with angles in degrees.
After making these changes run the example again, and you will see the second hand springing forward on each second.
Creating a frameless window for a desktop clock widget
To create a desktop-widget like application you can hide the window decorations on your QML app. This removes the title bar and buttons for closing/minimizing the app. However, you can still close the window from the taskbar if you need to. Make the following changes to the top of the QML file, setting the flags property and positioning the widget into the bottom right of the display.
main.qml
...
ApplicationWindow {
    visible: true
    width: 400
    height: 600
    x: screen.desktopAvailableWidth - width - 12
    y: screen.desktopAvailableHeight - height - 48
    title: "Clock"
    flags: Qt.FramelessWindowHint | Qt.Window  // Remove the Qt.Window to hide from the taskbar.
...
The code sets x, y for the window and adds the flag Qt.FramelessWindowHint to make the window frameless. The Qt.Window flag ensures that even though the window is frameless, we still get an entry on the taskbar -- this makes it easier to close, but you can change this if you wish. Run it, and you will see the window we've created.
 Frameless window with window decorations removed
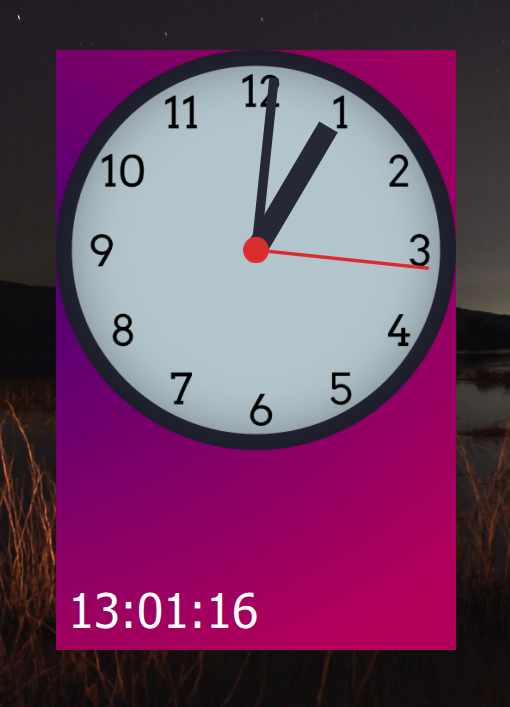
Making a transparent background clock widget
Finally, lets remove the background entirely. For the best effect we're also going to remove the textual time display and adjust the window size to a square, to frame the analog clock perfectly. This will give us a floating clock widget in the bottom corner of the screen. We can also optionally remove the Qt.Window flag to hide the application from our taskbar.
In the QML definition, remove the outer Rectangle making the clockface image the top level element. Set the ApplicationWindow color to transparent. Remove the Text object, the currTime property and the signal handler that updates it. Lastly, set the width and height to 400.
import QtQuick 2.15
import QtQuick.Controls 2.15

ApplicationWindow {
    visible: true
    width: 400
    height: 400
    x: screen.desktopAvailableWidth - width - 12
    y: screen.desktopAvailableHeight - height - 48
    title: "Clock"
    flags: Qt.FramelessWindowHint | Qt.Window
    property var hms: {'hours': 0, 'minutes': 0, 'seconds': 0 }
    property QtObject backend

    color: "transparent"


    Image {
        id: clockface
        sourceSize.width: parent.width
        fillMode: Image.PreserveAspectFit
        source: "./images/clockface.png"

        Image {
            x: clockface.width/2 - width/2
            y: (clockface.height/2) - height/2
            scale: clockface.width/465
            source: "./images/hour.png"
            transform: Rotation {
                    origin.x: 12.5; origin.y: 166;
                    angle: (hms.hours * 30) + (hms.minutes * 0.5)
            }
        }

        Image {
            x: clockface.width/2 - width/2
            y: clockface.height/2 - height/2
            source: "./images/minute.png"
            scale: clockface.width/465
            transform: Rotation {
                    origin.x: 5.5; origin.y: 201;
                    angle: hms.minutes * 6
                    Behavior on angle {
                        SpringAnimation { spring: 1; damping: 0.2; modulus: 360 }
                    }
                }
        }

        Image {
            x: clockface.width/2 - width/2
            y: clockface.height/2 - height/2
            source: "./images/second.png"
            scale: clockface.width/465
            transform: Rotation {
                    origin.x: 2; origin.y: 202;
                    angle: hms.seconds * 6
                    Behavior on angle {
                        SpringAnimation { spring: 3; damping: 0.2; modulus: 360 }
                    }
                }
        }

        Image {
            x: clockface.width/2 - width/2
            y: clockface.height/2 - height/2
            source: "./images/cap.png"
            scale: clockface.width/465
        }

    }

    Connections {
        target: backend

        function onHms(hours, minutes, seconds) {
            hms = {'hours': hours, 'minutes': minutes, 'seconds': seconds }
        }
    }

}
You don't need to update the Python code as the unused signal will be ignored, but you can if you wish.
import sys

from PySide6.QtGui import QGuiApplication
from PySide6.QtQml import QQmlApplicationEngine
from PySide6.QtCore import QTimer, QObject, Signal

from time import localtime

app = QGuiApplication(sys.argv)

engine = QQmlApplicationEngine()
engine.quit.connect(app.quit)
engine.load('main.qml')


class Backend(QObject):

    hms = Signal(int, int, int, arguments=['hours','minutes','seconds'])

    def __init__(self):
        super().__init__()

        # Define timer.
        self.timer = QTimer()
        self.timer.setInterval(100)  # msecs 100 = 1/10th sec
        self.timer.timeout.connect(self.update_time)
        self.timer.start()

    def update_time(self):
        # Pass the current time to QML.
        local_time = localtime()
        self.hms.emit(local_time.tm_hour, local_time.tm_min, local_time.tm_sec)


# Define our backend object, which we pass to QML.
backend = Backend()

engine.rootObjects()[0].setProperty('backend', backend)

# Initial call to trigger first update. Must be after the setProperty to connect signals.
backend.update_time()

sys.exit(app.exec())
If you run the code now, you'll see a floating clock appear in the bottom corner of your screen. The window will be fully transparent with no decorations.
Experiment with the example, changing animation properties or modifying the images to create different styles of clocks. You could also use this clock widget as the basis for other measurements such as RPM or processor usage in dashboards.
Create GUI Applications with Python & Qt6 by Martin Fitzpatrick — (PySide6 Edition) The hands-on guide to making apps with Python — Save time and build better with this book. Over 15K copies sold.
