In the previous tutorial we looked at how you can build custom widgets with PySide2.
The widget we built used a combination of layouts, nested widgets
and a simple QPainter canvas to create a customized widget you can drop into any application.
But that just scratched the surface of what is possible with custom widgets in PySide2.
In this tutorial we'll look at how you can use Qt's QPropertyAnimation to enhance
your custom widgets with visual effects and animations.
The custom animated toggle checkbox in action.
QPropertyAnimation allows you to change the value of an attribute of an object from a startValue to a endValue over a certain amount of time, and optionally following a custom easingCurve.
To do this the attribute you want to change must be defined as a Qt property.
Before moving forward with QPropertyAnimation let's take a look at
the property concept in Python & Qt.
Understanding Properties in Python and Qt
Objects in Python have attributes which you can set and get values from. These
can be defined on the class itself (making them class attributes) or on the
object instance (making them object attributes). Default values for object
attributes are usually set in the __init__ method of the class, by assigning
to self.<attribute name>.
class MyObject:

    def __init__(self):
        self.my_attribute = 1
        self.my_attribute2 = 2

obj = MyObject()
print(obj.my_attribute)
print(obj.my_attribute2)
obj.my_attribute = 'hello'
print(obj.my_attribute)
If you run this example, you'll see the following output.
1
2
hello
When we create an instance of the MyObject class, the __init__ method sets
the two attributes my_attribute and my_attribute2. We can read these by
accessing from the instance with obj.my_attribute, or set them by assigning to
the attribute with obj.my_attribute = <value>.
While simple attributes are great for most use-cases, sometimes it is useful to be able to perform additional steps when getting and setting a value. For example, perhaps you want to send notifications in response to a change, or perform some kind of calculation on values as they are set. In these cases, you can use properties.
Python Properties with Getters and Setters
Python properties behave outwardly exactly like attributes -- you can set and get them just as you would a normal attribute. Internally however each property uses getter and (optionally) setter methods to handle the get and set operations respectively.
The getter and setter methods are separate from one another. The getter is mandatory. If you don't define a setter, the property is read only.
You define properties using the property built-in. You can use this to define a property in two ways --
PyQt/PySide Office Hours 1:1 with Martin Fitzpatrick — Save yourself time and frustration. Get one on one help with your projects. Bring issues, bugs and questions about usability to architecture and maintainability, and leave with solutions.
- Using
property()as a function. - Using
@propertyas a decorator1
The following example shows how to define custom properties on a simple class using both these approaches.
- decorator
- function
class MyCustomClass:

    def __init__(self):
        self._value = None

    @property
    def value(self):
        print("getting the value", self._value)
        return self._value

    @value.setter
    def value(self, value):
        print("setting the value", value)
        self._value = value


obj = MyCustomClass()

a = obj.value       # Access the value
print(a)            # Print the value
obj.value = 'hello' # Set the value
b = obj.value       # Access the value
print(b)            # Print the value
class MyCustomClass:

    def __init__(self):
        self._value = None

    def getValue(self):
        print("getting the value", self._value)
        return self._value

    def setValue(self, value):
        print("setting the value", value)
        self._value = value

    value = property(getValue, setValue)


obj = MyCustomClass()

a = obj.value       # Access the value
print(a)            # Print the value
obj.value = 'hello' # Set the value
b = obj.value       # Access the value
print(b)            # Print the value
I prefer the @decorator syntax, since it keeps the method names the same as the
value that you are setting/getting through the property -- but which you choose
is up to you. If you run either example, you'll see the same output.
getting the value None
None
setting the value hello
getting the value hello
hello
When we access the obj.value property the @property decorated value method
is run, printing the "getting the value" message. The value is returned as for any other
object attribute. When we set the value, the @value.setter decorated method is run,
printing the "setting the value" message.
The actual value is stored internally in a private attribute self._value which we provide
with a default value in the object __init__.
Defining Qt Properties in PySide2
Qt properties work in a similar way, allowing us to define attributes on Qt classes and implement getter and setter methods to perform other functions. However, defining Qt properties also allows us to integrate with other Qt components.
To define a property in PySide2 we use Property which is importable from the QtCore module. As with Python properties,
both can be used either as a function or as a decorator.
The only difference with the Python approach, is that for Qt we must also provide a
type for the property -- in the example below int -- so Qt knows what type of data it can receive from/send to this property.
- PySide2 @decorator
- PySide2 function
from PySide2.QtCore import Property

class CustomObject(QObject):
    def __init__(self):
        super().__init__()
        self._value = 0        # the default value

    @Property(int)
    def value(self):
        return self._value

    @value.setter
    def value(self, value):
        self._value = value
from PySide2.QtCore import Property

class CustomObject(QObject):
    def __init__(self):
        super().__init__()
        self._value = 0        # the default value

    def getValue(self):
        return self._value

    def setValue(self, value):
        self._value = value

    value = Property(int, getValue, setValue)
As before, if we create an instance of this class, we can now get and set its value member as if it is a normal attribute, e.g. --
obj = CustomObject()
obj.value = 7
print(obj.value)
One simple use for getter/setter methods in PySide2 applications is to emit
signals when certain attributes are changed. For example, in the below
snippet we've added a custom Signal to the class, and
emit the new value whenever the value changed.
from PySide2.QtCore import Property, Signal

class CustomObject(QObject):

    valueChanged = Signal(int)

    def __init__(self):
        super().__init__()
        self._value = 0        # the default value

    # change the setter function to be as:
    @value.setter
    def value(self, value):
        # here, the check is very important..
        # to prevent unneeded signal being propagated.
        if value != self._value:
            self._value = value
            self.valueChanged.emit(value)
Now we're familiar with using properties in PySide2 (and Python) we'll now look
at how we can use QPropertyAnimation to animate properties and use this to
create custom widget animations.
Animating Widget Properties with QPropertyAnimation
So far we've defined simple properties with setter and getter methods that behave like simple attributes. We also added a side-effect to a setter method to emit a signal notifying of a change.
QPropertyAnimation is an interface built upon properties which can be used
to animate -- or interpolate -- between start and end values for a given property.
Using this we can trigger a change and have a series of timed values set automatically.
If altering this property triggers a refresh of the widget (or we use the animated value
in a paintEvent()) the widget will appear to animate.
Below is an example using QPropertyAnimation to animate the position of a simple
QWidget -- a red filled square -- in a window. The animation updates the position of the widget via .pos
which automatically triggers a repaint by Qt.
from PySide2.QtWidgets import QWidget
from PySide2.QtCore import QPropertyAnimation, QPoint, QEasingCurve

class Window(QWidget):
    def __init__(self):
        super().__init__()
        self.resize(600, 600)
        self.child = QWidget(self)
        self.child.setStyleSheet("background-color:red;border-radius:15px;")
        self.child.resize(100, 100)
        self.anim = QPropertyAnimation(self.child, b"pos")
        self.anim.setEndValue(QPoint(400, 400))
        self.anim.setDuration(1500)
        self.anim.start()
This will produce the following animation. By default the animation is linear,
with the QWidget moving towards the end position at a constant rate.
Single linear animation of a widget.
To create an animation using QPropertyAnimation you need to provide the following --
- Tell the
QPropertyAnimationwhich object we want to animate, hereself.child - Provide a property name here
b"pos"(must be specified as bytesb"value") - [Optional] the start value.
- The end value.
- [Optional] the duration of interpolation [in ms], by default it's 250 ms.
The property you're animating must have a setter -- default properties on built-in widgets have setters, but for custom widgets you need to implement this.
Rather than a simple linear animation you often want to add acceleration and deceleration
to the animation. This can be useful for creating widgets that feel realistic and physical, or
to add interesting eye-catching effects. To add acceleration and deceleration to an
animation you use easing curves via QEasingCurve.
Using QEasingCurve for Smooth Animations
QEasingCurve is a Qt object which describes the transition -- or interpolation --
between two points. We can apply this transition to our animated properties to
change how they behave.
In physical objects changes rarely happen at constant speed, but rather have an acceleration and deceleration phase. For example the speed of a falling object will start slow and increase over time due to gravity. A kicked ball accelerates rapidly -- but not instantly -- to full speed, and then decelerates due to air resistance. If you move an object with your hand you will accelerate it gradually before decelerating as you reach the destination for accuracy.
Try it in real life! Just grab any thing nearby and watch how your hand moves.
When moving a GUI component it can look unnatural if it has constant speed. To allow us to define more natural looking behaviors, Qt provides us with several common predefined easing curves.
The graphs may seem a little strange if you are not familiar with transition curves, so we'll look at them in a little more detail.
Each curve represents a value vs. time relationship, i.e. they show how a value will change over time. If the line is rising, the value is increasing, if the line is falling the value is decreasing. The slope or gradient of the line at any given point represents the rate of change (how quickly the value is changing) at that particular point. Steeper slopes indicate faster changes, while a horizontal line indicates the value is not changing, or constant, at that point.
Common QEasingCurve Types
The default "curve" is not a curve at all, but a line. This Linear easing curve interpolates between two values in regular, consistent steps.
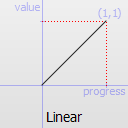
QEasingCurve.Linear
Next is one of the most common transition curves used in UIs -- InOutCubic. This starts with a low slope, which increases until the mid-point, before decreasing again. The effect of this curve is a gradual change, which accelerates to the mid-point, before decelerating to a stop at the end.
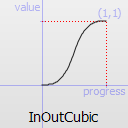
QEasingCurve.InOutCubic
There are also variants that only apply this transition in one direction (in, or out).
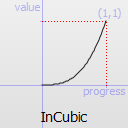
QEasingCurve.InCubic
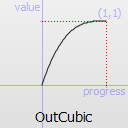
QEasingCurve.OutCubic
The OutInCubic is the reverse of InOutCubic and accelerates rapidly at the beginning, slowing down at the midpoint, then accelerates towards the end. This may be useful for slideshows or infinitely moving and changing components, where you want elements to rush into view and then pause before exiting.
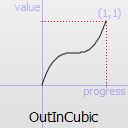
QEasingCurve.OutInCubic
Last one OutBounce, which shows a fun out-of-the-box animation effect. Take a look at its animated demo below.
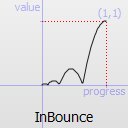
QEasingCurve.InBounce
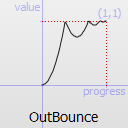
QEasingCurve.OutBounce
It's easier to understand these transitions if you see them in action. Below are a series of complete examples which you can experiment with, and adapt to the other transitions.
- InOutCubic
- OutInCubic
- OutBounce
from PySide2.QtWidgets import QWidget
from PySide2.QtCore import QPropertyAnimation, QPoint, QEasingCurve

class Window(QWidget):
    def __init__(self):
        super().__init__()
        self.resize(600, 600)
        self.child = QWidget(self)
        self.child.setStyleSheet("background-color:red;border-radius:15px;")
        self.child.resize(100, 100)
        self.anim = QPropertyAnimation(self.child, b"pos")
        self.anim.setEasingCurve(QEasingCurve.InOutCubic)
        self.anim.setEndValue(QPoint(400, 400))
        self.anim.setDuration(1500)
        self.anim.start()
from PySide2.QtWidgets import QWidget
from PySide2.QtCore import QPropertyAnimation, QPoint, QEasingCurve

class Window(QWidget):
    def __init__(self):
        super().__init__()
        self.resize(600, 600)
        self.child = QWidget(self)
        self.child.setStyleSheet("background-color:red;border-radius:15px;")
        self.child.resize(100, 100)
        self.anim = QPropertyAnimation(self.child, b"pos")
        self.anim.setEasingCurve(QEasingCurve.OutInCubic)
        self.anim.setEndValue(QPoint(400, 400))
        self.anim.setDuration(1500)
        self.anim.start()
from PySide2.QtWidgets import QWidget
from PySide2.QtCore import QPropertyAnimation, QPoint, QEasingCurve

class Window(QWidget):
    def __init__(self):
        super().__init__()
        self.resize(600, 600)
        self.child = QWidget(self)
        self.child.setStyleSheet("background-color:red;border-radius:15px;")
        self.child.resize(100, 100)
        self.anim = QPropertyAnimation(self.child, b"pos")
        self.anim.setEasingCurve(QEasingCurve.OutBounce)
        self.anim.setEndValue(QPoint(400, 400))
        self.anim.setDuration(1500)
        self.anim.start()
Single InOutCubic animation of a widget.
Single OutInCubic animation of a widget.
Single OutBounce animation of a widget.
The timing of each of these animations is identical (1.5 seconds) the difference in the animations is due to recording. In a Qt app each animation will take exactly the same time.
We've only looked at the most common of the easing curves. For the complete list refer to the Qt QEasingCurve documentation and experiment! You will find several charts in the documentation to visualize their behavior.
Combining Multiple QPropertyAnimation Animations with Animation Groups
These single animation curves are useful on their own, but sometimes you may want
to combine multiple animations together to build more complex behaviors. To support this,
Qt provides QAnimationGroup, with which we can combine several animations and
control when they start and stop. There are two classes of animation group,
which group animations in specific ways --
QParallelAnimationGroupgroups animations to run at the same timeQSequentialAnimationGroupgroups animations to run sequentially in order
QAnimationGroup is an abstract class, so can't be used directly.
Below is an example moving a widget with two sequential animations. The first moves the block as before, the second expands the size of the block horizontally.
from PySide2.QtWidgets import QWidget
from PySide2.QtCore import (
    QPropertyAnimation, QSequentialAnimationGroup, QPoint, QSize)


class Window(QWidget):
    def __init__(self):
        super().__init__()
        self.resize(600, 600)
        self.child = QWidget(self)
        self.child.setStyleSheet("background-color:red;border-radius:15px;")
        self.child.resize(100, 100)
        self.anim = QPropertyAnimation(self.child, b"pos")
        self.anim.setEndValue(QPoint(200, 200))
        self.anim.setDuration(1500)
        self.anim_2 = QPropertyAnimation(self.child, b"size")
        self.anim_2.setEndValue(QSize(250, 150))
        self.anim_2.setDuration(2000)
        self.anim_group = QSequentialAnimationGroup()
        self.anim_group.addAnimation(self.anim)
        self.anim_group.addAnimation(self.anim_2)
        self.anim_group.start()
Chaining two sequential animations one after another.
Alternatively, you can run multiple animations concurrently. The following example applies two animations that run in parallel. The first moves the block as before, the second fades the block in.
from PySide2.QtWidgets import QWidget, QGraphicsOpacityEffect
from PySide2.QtCore import QPropertyAnimation, QParallelAnimationGroup, QPoint


class Window(QWidget):
    def __init__(self):
        super().__init__()
        self.resize(600, 600)
        self.child = QWidget(self)
        effect = QGraphicsOpacityEffect(self.child)
        self.child.setGraphicsEffect(effect)
        self.child.setStyleSheet("background-color:red;border-radius:15px;")
        self.child.resize(100, 100)
        self.anim = QPropertyAnimation(self.child, b"pos")
        self.anim.setEndValue(QPoint(200, 200))
        self.anim.setDuration(1500)
        self.anim_2 = QPropertyAnimation(effect, b"opacity")
        self.anim_2.setStartValue(0)
        self.anim_2.setEndValue(1)
        self.anim_2.setDuration(2500)
        self.anim_group = QParallelAnimationGroup()
        self.anim_group.addAnimation(self.anim)
        self.anim_group.addAnimation(self.anim_2)
        self.anim_group.start()
Running two concurrent animations on a single widget.
Building an Animated Toggle Switch — A Custom QCheckBox Replacement
With these simple building blocks we have everything we need to build complex UI behaviors into our custom widgets. In this next part we'll take what we've learnt and use it to construct a fully-functional custom animated toggle switch widget with smooth transitions.
The widget we're building inherits from QCheckBox and provides a drop-in
replacement for it, adding an animated toggle switch with an animated slider and
a little bit of eye candy to highlight state changes. By inheriting from
QCheckBox we get all the built-in checkbox behaviors for free, so we just
need to deal with the visual parts.
To implement our design, we --
- Define our colors (
QPenandQBrush) using arguments and store them as object attributes. This is not required, but saves us constructing them on every frame. - Override the
paintEvent(self, e)which receives aQPaintEvent. - Define
QPropertyAnimationandQAnimationGroupobjects, to control the properties we want to animate. - Select the correct signals on which to trigger the animation.
Below is the complete code for our custom animated toggle checkbox.
from PySide2.QtCore import (
    Qt, QSize, QPoint, QPointF, QRectF,
    QEasingCurve, QPropertyAnimation, QSequentialAnimationGroup,
    Slot, Property)

from PySide2.QtWidgets import QCheckBox
from PySide2.QtGui import QColor, QBrush, QPaintEvent, QPen, QPainter


class AnimatedToggle(QCheckBox):

    _transparent_pen = QPen(Qt.transparent)
    _light_grey_pen = QPen(Qt.lightGray)

    def __init__(self,
        parent=None,
        bar_color=Qt.gray,
        checked_color="#00B0FF",
        handle_color=Qt.white,
        pulse_unchecked_color="#44999999",
        pulse_checked_color="#4400B0EE"
        ):
        super().__init__(parent)

        # Save our properties on the object via self, so we can access them later
        # in the paintEvent.
        self._bar_brush = QBrush(bar_color)
        self._bar_checked_brush = QBrush(QColor(checked_color).lighter())

        self._handle_brush = QBrush(handle_color)
        self._handle_checked_brush = QBrush(QColor(checked_color))

        self._pulse_unchecked_animation = QBrush(QColor(pulse_unchecked_color))
        self._pulse_checked_animation = QBrush(QColor(pulse_checked_color))

        # Setup the rest of the widget.

        self.setContentsMargins(8, 0, 8, 0)
        self._handle_position = 0

        self._pulse_radius = 0

        self.animation = QPropertyAnimation(self, b"handle_position", self)
        self.animation.setEasingCurve(QEasingCurve.InOutCubic)
        self.animation.setDuration(200)  # time in ms

        self.pulse_anim = QPropertyAnimation(self, b"pulse_radius", self)
        self.pulse_anim.setDuration(350)  # time in ms
        self.pulse_anim.setStartValue(10)
        self.pulse_anim.setEndValue(20)

        self.animations_group = QSequentialAnimationGroup()
        self.animations_group.addAnimation(self.animation)
        self.animations_group.addAnimation(self.pulse_anim)

        self.stateChanged.connect(self.setup_animation)

    def sizeHint(self):
        return QSize(58, 45)

    def hitButton(self, pos: QPoint):
        return self.contentsRect().contains(pos)

    @Slot(int)
    def setup_animation(self, value):
        self.animations_group.stop()
        if value:
            self.animation.setEndValue(1)
        else:
            self.animation.setEndValue(0)
        self.animations_group.start()

    def paintEvent(self, e: QPaintEvent):

        contRect = self.contentsRect()
        handleRadius = round(0.24 * contRect.height())

        p = QPainter(self)
        p.setRenderHint(QPainter.Antialiasing)

        p.setPen(self._transparent_pen)
        barRect = QRectF(
            0, 0,
            contRect.width() - handleRadius, 0.40 * contRect.height()
        )
        barRect.moveCenter(contRect.center())
        rounding = barRect.height() / 2

        # the handle will move along this line
        trailLength = contRect.width() - 2 * handleRadius

        xPos = contRect.x() + handleRadius + trailLength * self._handle_position

        if self.pulse_anim.state() == QPropertyAnimation.Running:
            p.setBrush(
                self._pulse_checked_animation if
                self.isChecked() else self._pulse_unchecked_animation)
            p.drawEllipse(QPointF(xPos, barRect.center().y()),
                          self._pulse_radius, self._pulse_radius)

        if self.isChecked():
            p.setBrush(self._bar_checked_brush)
            p.drawRoundedRect(barRect, rounding, rounding)
            p.setBrush(self._handle_checked_brush)

        else:
            p.setBrush(self._bar_brush)
            p.drawRoundedRect(barRect, rounding, rounding)
            p.setPen(self._light_grey_pen)
            p.setBrush(self._handle_brush)

        p.drawEllipse(
            QPointF(xPos, barRect.center().y()),
            handleRadius, handleRadius)

        p.end()

    @Property(float)
    def handle_position(self):
        return self._handle_position

    @handle_position.setter
    def handle_position(self, pos):
        """change the property
        we need to trigger QWidget.update() method, either by:
            1- calling it here [ what we're doing ].
            2- connecting the QPropertyAnimation.valueChanged() signal to it.
        """
        self._handle_position = pos
        self.update()

    @Property(float)
    def pulse_radius(self):
        return self._pulse_radius

    @pulse_radius.setter
    def pulse_radius(self, pos):
        self._pulse_radius = pos
        self.update()
The AnimatedToggle class is quite complex. There are a few key points to notice.
- Because we're inheriting from
QCheckBoxit is essential that we overridehitButton(). This defines the clickable area of our widget, and by default aQCheckBoxis only clickable in the area of the checkable box. Here we expand the clickable region to the entire widget, usingself.contentsRect()so a click anywhere on the widget will toggle the state. - Similarly it's essential we override
sizeHint()so when we add our widget to layouts, they know an acceptable default size to use. - You must set
p.setRenderHint(QPainter.Antialiasing)to smooth the edges of things you draw, otherwise the outline will be jagged. - In this example we trigger the animation using the
self.stateChangedsignal, which is provided byQCheckBox. This fires whenever the state (checked or unchecked) of the widget changes. It is important to choose the right trigger to start the animation in order for the widget to feel intuitive. - Since we're using
stateChangedto start the animation, if you check the state of the toggle as soon as it's been clicked it will give the correct value -- even if the animation is not yet complete.
Don't try to change the logical state inside paintEvent or from a QPropertyAnimation.
Save the above code in a file named animated_toggle.py and in the same folder
save the following simple skeleton application (e.g. as app.py) which imports the AnimatedToggle class
and creates a little demo.
from PySide2.QtWidgets import QApplication, QWidget, QVBoxLayout, QLabel
from animated_toggle import AnimatedToggle

app = QApplication([])

window = QWidget()

mainToggle = AnimatedToggle()
secondaryToggle = AnimatedToggle(
        checked_color="#FFB000",
        pulse_checked_color="#44FFB000"
)
mainToggle.setFixedSize(mainToggle.sizeHint())
secondaryToggle.setFixedSize(mainToggle.sizeHint())

window.setLayout(QVBoxLayout())
window.layout().addWidget(QLabel("Main Toggle"))
window.layout().addWidget(mainToggle)

window.layout().addWidget(QLabel("Secondary Toggle"))
window.layout().addWidget(secondaryToggle)

mainToggle.stateChanged.connect(secondaryToggle.setChecked)

window.show()
app.exec_()
Running the code you should see the following demo appear in a window.
The custom animated toggle checkbox in action.
Try experimenting with the AnimatedToggle class, using alternative easing curves
and building different animation sequences. See what you can come up with!
-
well, decorators are functions too. ↩