In the previous tutorial we introduced QPainter and looked at some basic bitmap drawing operations which you can used to draw dots, lines, rectangles and circles on a QPainter surface such as a QPixmap.
This process of drawing on a surface with QPainter is in fact the basis by which all widgets in Qt are drawn. Now you know how to use QPainter you know how to draw your own custom widgets!
In this tutorial we'll take what we've learnt so far and use it to construct a completely new custom GUI widget in PySide2. For a working example we'll be building the following widget — a customizable PowerBar meter with a dial control.
Our custom PySide2 widget PowerBar in action.
This widget is actually a mix of a compound widget and custom widget in that we are using the built-in Qt QDial component for the dial, while drawing the power bar ourselves. We then assemble these two parts together into a parent widget which can be dropped into place seamlessly in any application, without needing to know how it's put together. The resulting widget provides the common QAbstractSlider interface with some additions for configuring the bar display.
After following this example you will be able to create your very own custom PySide2 widgets — whether they are compounds of built-ins or completely novel self-drawn wonders.
- Getting Started with Compound Widgets in PySide2
- Using paintEvent to Draw Custom Widgets in PySide2
- Positioning and Sizing Your Custom Widget with QSizePolicy
- Updating the Display from QDial Values
- Drawing the Power Bar with QPainter
- Customizing the Bar with Colors, Padding and Segments
- Adding the QAbstractSlider Interface
- Adding Mouse Interaction to the Custom Widget
- Complete Custom PySide2 Widget Code
Getting Started with Compound Widgets in PySide2
As we've previously seen compound widgets are simply widgets with a layout applied, which itself contains >1 other widget. The resulting "widget" can then be used as any other, with the internals hidden/exposed as you like.
The outline for our PowerBar widget is given below — we'll build our custom widget up gradually from this outline stub. Save this to a file named power_bar.py
from PySide2 import QtCore, QtGui, QtWidgets
from PySide2.QtCore import Qt

class _Bar(QtWidgets.QWidget):
    pass

class PowerBar(QtWidgets.QWidget):
    """
    Custom Qt Widget to show a power bar and dial.
    Demonstrating compound and custom-drawn widget.
    """

    def __init__(self, steps=5, *args, **kwargs):
        super().__init__(*args, **kwargs)

        layout = QtWidgets.QVBoxLayout()
        self._bar = _Bar()
        layout.addWidget(self._bar)

        self._dial = QtWidgets.QDial()
        layout.addWidget(self._dial)

        self.setLayout(layout)
This simply defines our custom power bar is defined in the _Bar object — here just unaltered subclass of QWidget. The PowerBar widget (which is the complete widget) combines this, using a QVBoxLayout with the built in QDial to display them together.
We also need a little demo application to display the widget.
from PySide2 import QtWidgets
from power_bar import PowerBar

app = QtWidgets.QApplication([])
bar = PowerBar()
bar.show()
app.exec_()
We don't need to create a QMainWindow since any widget without a parent is a window in it's own right. Our custom PowerBar widget will appear as any normal window.
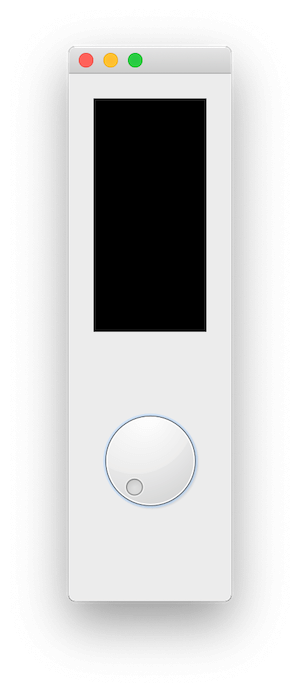
This is all you need, just save it in the same folder as the previous file, under something like demo.py. You can run this file at any time to see your widget in action. Run it now and you should see something like this:
 Our widget, a QDial with an invisible empty widget above it (trust me).
Create GUI Applications with Python & Qt6 by Martin Fitzpatrick — (PyQt6 Edition) The hands-on guide to making apps with Python — Save time and build better with this book. Over 15K copies sold.
If you stretch the window down you'll see the dial has more space above it than below — this is being taken up by our (currently invisible) _Bar widget.
Using paintEvent to Draw Custom Widgets in PySide2
The paintEvent handler is the core of all widget drawing in PySide2.
Every complete and partial re-draw of a widget is triggered through a paintEvent which the widget handles to draw itself. A paintEvent can be triggered by —
- repaint() or update() was called
- the widget was obscured and has now been uncovered
- the widget has been resized
— but it can also occur for many other reasons. What is important is that when a paintEvent is triggered your widget is able to redraw it.
If a widget is simple enough (like ours is) you can often get away with simply redrawing the entire thing any time anything happens. But for more complicated widgets this can get very inefficient. For these cases the paintEvent includes the specific region that needs to be updated. We'll make use of this in later, more complicated examples.
For now we'll do something very simple, and just fill the entire widget with a single color. This will allow us to see the area we're working with to start drawing the bar. Add the following code to the _Bar class.
    def paintEvent(self, e):
        painter = QtGui.QPainter(self)
        brush = QtGui.QBrush()
        brush.setColor(QtGui.QColor("black"))
        brush.setStyle(Qt.SolidPattern)
        rect = QtCore.QRect(
            0,
            0,
            painter.device().width(),
            painter.device().height(),
        )
        painter.fillRect(rect, brush)
Using the draw instructions we introduced in the previous part you can completely customize the style, look and feel of your custom widget.
Positioning and Sizing Your Custom Widget with QSizePolicy
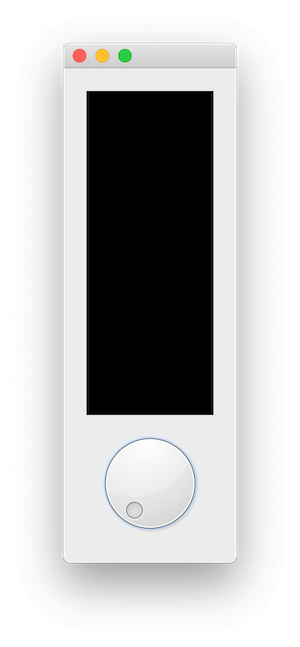
Now we can see the _Bar widget we can tweak its positioning and size. If you drag around the shape of the window you'll see the two widgets changing shape to fit the space available. This is what we want, but the QDial is also expanding vertically more than it should, and leaving empty space we could use for the bar.
 Filling the custom widget part with black.
We can use setSizePolicy on our _Bar widget to make sure it expands as far as possible. By using the QSizePolicy.MinimumExpanding the provided sizeHint will be used as a minimum, and the widget will expand as much as possible.
class _Bar(QtWidgets.QWidget):

    def __init__(self, *args, **kwargs):
        super().__init__(*args, **kwargs)

        self.setSizePolicy(
            QtWidgets.QSizePolicy.MinimumExpanding,
            QtWidgets.QSizePolicy.MinimumExpanding
        )

    def sizeHint(self):
        return QtCore.QSize(40,120)
It's still not perfect as the QDial widget resizes itself a bit awkwardly, but our bar is now expanding to fill all the available space.
 Widget with QSizePolicy.MinimumExpanding set.
With the positioning sorted we can now move on to define our paint methods to draw our PowerBar meter in the top part (currently black) of the widget.
Updating the Display from QDial Values
We now have our canvas completely filled in black, next we'll use QPainter draw commands to actually draw something on the widget.
Before we start on the bar, we've got a bit of testing to do to make sure we can update the display with the values of our dial. Replace the _Bar.paintEvent with the following code.
    def paintEvent(self, e):
        painter = QtGui.QPainter(self)

        brush = QtGui.QBrush()
        brush.setColor(QtGui.QColor("black"))
        brush.setStyle(Qt.SolidPattern)
        rect = QtCore.QRect(
            0,
            0,
            painter.device().width(),
            painter.device().height(),
        )
        painter.fillRect(rect, brush)

        # Get current state.
        dial = self.parent()._dial
        vmin, vmax = dial.minimum(), dial.maximum()
        value = dial.value()

        pen = painter.pen()
        pen.setColor(QtGui.QColor("red"))
        painter.setPen(pen)

        font = painter.font()
        font.setFamily("Times")
        font.setPointSize(18)
        painter.setFont(font)

        painter.drawText(
            25,
            25,
            "{}-->{}<--{}".format(vmin, value, vmax),
        )
        painter.end()
This draws the black background as before, then uses .parent() to access our parent PowerBar widget and through that the QDial via _dial. From there we get the current value, as well as the allowed range minimum and maximum values. Finally we draw those using the painter, just like we did in the previous part.
T> We're leaving handling of the current value, min and max values to the QDial here, but we could also store that value ourselves and use signals to/from the dial to keep things in sync.
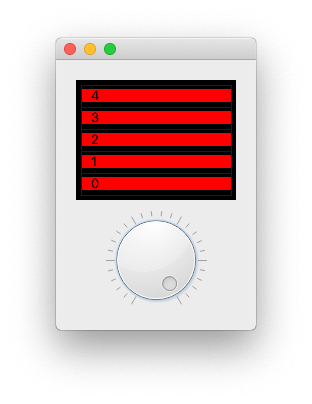
Run this, wiggle the dial around and …..nothing happens. Although we've defined the paintEvent handler we're not triggering a repaint when the dial changes.
T> You can force a refresh by resizing the window, as soon as you do this you should see the text appear. Neat, but terrible UX — "just resize your app to see your settings!"
To fix this we need to hook up our _Barwidget to repaint itself in response to changing values on the dial. We can do this using the QDial.valueChangedsignal, hooking it up to a custom slot method which calls .refresh() — triggering a full-repaint.
Add the following method to the _Bar widget.
    def _trigger_refresh(self):
        self.update()
…and add the following to the __init__ block for the parent PowerBar widget.
self._dial.valueChanged.connect(self._bar._trigger_refresh)
If you re-run the code now, you will see the display updating automatically as you turn the dial (click and drag with your mouse). The current value is displayed as text.
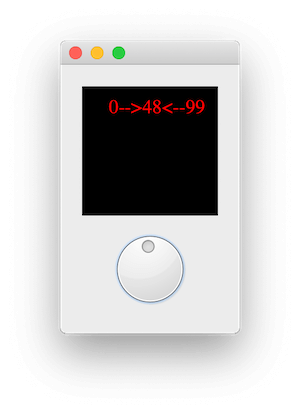 Displaying the current QDial value in text.
Drawing the Power Bar with QPainter
Now we have the display updating and displaying the current value of the dial, we can move onto drawing the actual bar display. This is a little complicated, with a bit of maths to calculate bar positions, but we'll step through it to make it clear what's going on.
The sketch below shows what we are aiming for — a series of N boxes, inset from the edges of the widget, with spaces between them.
 What we're aiming for with this widget.
Calculating what to draw
The number of boxes to draw is determined by the current value — and how far along it is between the minimum and maximum value configured for the QDial. We already have that information in the example above.
dial = self.parent()._dial
vmin, vmax = dial.minimum(), dial.maximum()
value = dial.value()
If value is half way between vmin and vmax then we want to draw half of the boxes (if we have 4 boxes total, draw 2). If value is at vmax we want to draw them all.
To do this we first convert our value into a number between 0 and 1, where 0 = vmin and 1 = vmax. We first subtract vmin from value to adjust the range of possible values to start from zero — i.e. from vmin...vmax to 0…(vmax-vmin). Dividing this value by vmax-vmin (the new maximum) then gives us a number between 0 and 1.
The trick then is to multiply this value (called pc below) by the number of steps and that gives us a number between 0 and 5 — the number of boxes to draw.
pc = (value - vmin) / (vmax - vmin)
n_steps_to_draw = int(pc * 5)
We're wrapping the result in int to convert it to a whole number (rounding down) to remove any partial boxes.
Update the drawText method in your paint event to write out this number instead.
pc = (value - vmin) / (vmax - vmin)
n_steps_to_draw = int(pc * 5)
painter.drawText(25, 25, "{}".format(n_steps_to_draw))
As you turn the dial you will now see a number between 0 and 5.
Drawing boxes with QPainter fillRect
Next we want to convert this number 0…5 to a number of bars drawn on the canvas. Start by removing the drawText and font and pen settings, as we no longer need those.
To draw accurately we need to know the size of our canvas — i.e the size of the widget. We will also add a bit of padding around the edges to give space around the edges of the blocks against the black background.
All measurements in the QPainter are in pixels.
        padding = 5

        # Define our canvas.
        d_height = painter.device().height() - (padding * 2)
        d_width = painter.device().width() - (padding * 2)
We take the height and width and subtract 2 * padding from each — it's 2x because we're padding both the left and right (and top and bottom) edges. This gives us our resulting active canvas area in d_height and d_width.
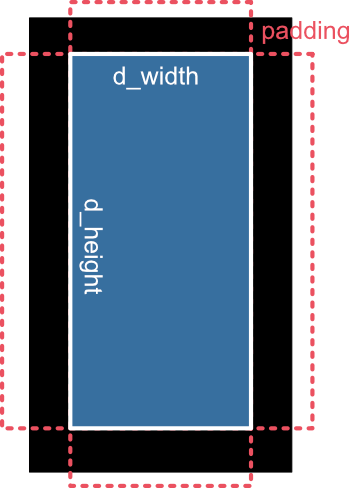 The widget canvas, padding and inner draw area.
We need to break up our d_height into 5 equal parts, one for each block — we can calculate that height simply by d_height / 5. Additionally, since we want spaces between the blocks we need to calculate how much of this step size is taken up by space (top and bottom, so halved) and how much is actual block.
step_size = d_height / 5
bar_height = step_size * 0.6
bar_spacer = step_size * 0.4 / 2
These values are all we need to draw our blocks on our canvas. To do this we count up to the number of steps-1 starting from 0 using range and then draw a fillRect over a region for each block.
brush.setColor(QtGui.QColor('red'))

for n in range(5):
    rect = QtCore.QRect(
        padding,
        int(padding + d_height - ((n + 1) * step_size) + bar_spacer),
        d_width,
        int(bar_height),
    )
    painter.fillRect(rect, brush)
The fill is set to a red brush to begin with but we will customize this later.
The box to draw with fillRect is defined as a QRect object to which we pass, in turn, the left x, top y, width and height.
The width is the full canvas width minus the padding, which we previously calculated and stored in d_width. The left x is similarly just the padding value (5px) from the left hand side of the widget.
The height of the bar bar_heightwe calculated as 0.6 times the step_size.
This leaves parameter 2 d_height - ((1 + n) * step_size) + bar_spacer which gives the top y position of the rectangle to draw. This is the only calculation that changes as we draw the blocks.
A key fact to remember here is that y coordinates in QPainter start at the top and increase down the canvas. This means that plotting at d_height will be plotting at the very bottom of the canvas. When we draw a rectangle from a point it is drawn to the right and down from the starting position.
To draw a block at the very bottom we must start drawing at d_height-step_size i.e. one block up to leave space to draw downwards.
In our bar meter we're drawing blocks, in turn, starting at the bottom and working upwards. So our very first block must be placed at d_height-step_size and the second at d_height-(step_size*2). Our loop iterates from 0 upwards, so we can achieve this with the following formula —
d_height - ((1 + n) * step_size
The final adjustment is to account for our blocks only taking up part of each step_size (currently 0.6). We add a little padding to move the block away from the edge of the box and into the middle, and finally add the padding for the bottom edge. That gives us the final formula —
padding + d_height - ((n+1) * step_size) + bar_spacer,
This produces the following layout.
In the picture below the current value of n has been printed over the box, and a blue box has been drawn around the complete step_size so you can see the padding and spacers in effect.
 Spacing between bars in the layout, and block draw order.
Putting this all together gives the following code in our power_bar.py file, which when will produce a working power-bar widget with blocks in red. You can drag the wheel back and forth and the bars will move up and down in response.
from PySide2 import QtCore, QtGui, QtWidgets
from PySide2.QtCore import Qt

class _Bar(QtWidgets.QWidget):

    def __init__(self, *args, **kwargs):
        super().__init__(*args, **kwargs)

        self.setSizePolicy(
            QtWidgets.QSizePolicy.MinimumExpanding,
            QtWidgets.QSizePolicy.MinimumExpanding,
        )

    def sizeHint(self):
        return QtCore.QSize(40, 120)

    def paintEvent(self, e):
        painter = QtGui.QPainter(self)

        brush = QtGui.QBrush()
        brush.setColor(QtGui.QColor("black"))
        brush.setStyle(Qt.SolidPattern)
        rect = QtCore.QRect(
            0,
            0,
            painter.device().width(),
            painter.device().height(),
        )
        painter.fillRect(rect, brush)

        # Get current state.
        dial = self.parent()._dial
        vmin, vmax = dial.minimum(), dial.maximum()
        value = dial.value()

        padding = 5

        # Define our canvas.
        d_height = painter.device().height() - (padding * 2)
        d_width = painter.device().width() - (padding * 2)

        # Draw the bars.
        step_size = d_height / 5
        bar_height = step_size * 0.6
        bar_spacer = step_size * 0.4 / 2

        pc = (value - vmin) / (vmax - vmin)
        n_steps_to_draw = int(pc * 5)
        brush.setColor(QtGui.QColor("red"))
        for n in range(n_steps_to_draw):
            rect = QtCore.QRect(
                padding,
                int(padding + d_height - ((n + 1) * step_size) + bar_spacer),
                d_width,
                int(bar_height),
            )
            painter.fillRect(rect, brush)

        painter.end()

    def _trigger_refresh(self):
        self.update()

class PowerBar(QtWidgets.QWidget):
    """
    Custom Qt Widget to show a power bar and dial.
    Demonstrating compound and custom-drawn widget.
    """

    def __init__(self, steps=5, *args, **kwargs):
        super().__init__(*args, **kwargs)

        layout = QtWidgets.QVBoxLayout()
        self._bar = _Bar()
        layout.addWidget(self._bar)

        self._dial = QtWidgets.QDial()
        self._dial.valueChanged.connect(self._bar._trigger_refresh)

        layout.addWidget(self._dial)
        self.setLayout(layout)
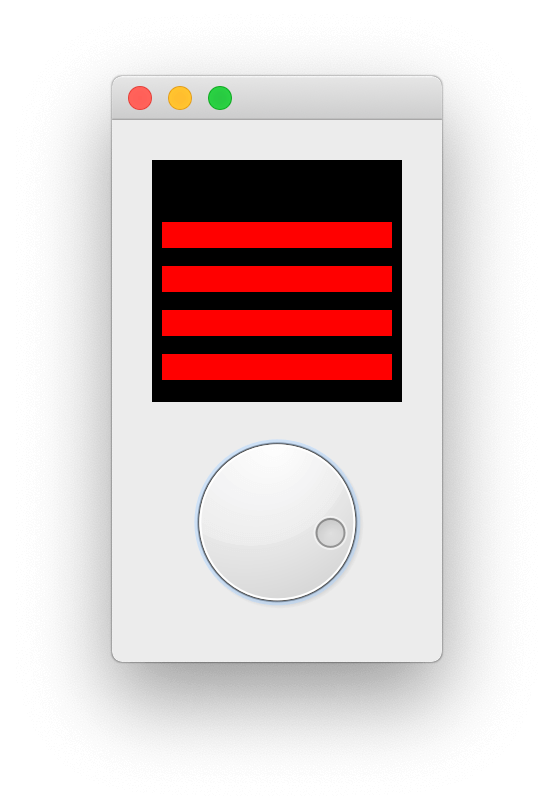 A working 1-color power bar.
That already does the job, but we can go further to provide more customization, add some UX improvements and improve the API for working with our widget.
Customizing the Bar with Colors, Padding and Segments
We now have a working power bar, controllable with a dial. But it's nice when creating custom widgets to provide options to configure the behavior and style of your widget to make it more flexible. In this part we'll add methods to set customizable numbers of segments, colors, padding and spacing.
The elements we're going to provide customization of are as follows —
| Option | Description |
|---|---|
| number of bars | How many bars are displayed on the widget |
| colors | Individual colors for each of the bars |
| background color | The color of the draw canvas (default black) |
| padding | Space around the widget edge, between bars and edge of canvas. |
| bar height / bar percent | Proportion (0…1) of the bar which is solid (the rest will be spacing between adjacent bars) |
We can store each of these as attributes on the _bar object, and use them from the paintEvent method to change its behavior.
The _Bar.__init__ is updated to accept an initial argument for either the number of bars (as an integer) or the colors of the bars (as a list of QColor, hex values or names). If a number is provided, all bars will be colored red. If the a list of colors is provided the number of bars will be determined from the length of the color list. Default values for self._bar_solid_percent, self._background_color, self._padding are also set.
class _Bar(QtWidgets.QWidget):
    clickedValue = QtCore.Signal(int)

    def __init__(self, steps, *args, **kwargs):
        super().__init__(*args, **kwargs)

        self.setSizePolicy(
            QtWidgets.QSizePolicy.MinimumExpanding,
            QtWidgets.QSizePolicy.MinimumExpanding
        )

        if isinstance(steps, list):
            # list of colors.
            self.n_steps = len(steps)
            self.steps = steps

        elif isinstance(steps, int):
            # int number of bars, defaults to red.
            self.n_steps = steps
            self.steps = ['red'] * steps

        else:
            raise TypeError('steps must be a list or int')

        self._bar_solid_percent = 0.8
        self._background_color = QtGui.QColor('black')
        self._padding = 4.0  # n-pixel gap around edge.
Likewise we update the PowerBar.__init__ to accept the steps parameter, and pass it through.
class PowerBar(QtWidgets.QWidget):
    def __init__(self, steps=5, *args, **kwargs):
        super().__init__(*args, **kwargs)

        layout = QtWidgets.QVBoxLayout()
        self._bar = _Bar(steps)

        #...continued as before.
We now have the parameters in place to update the paintEvent method. The modified code is shown below.
    def paintEvent(self, e):
        painter = QtGui.QPainter(self)

        brush = QtGui.QBrush()
        brush.setColor(self._background_color)
        brush.setStyle(Qt.SolidPattern)
        rect = QtCore.QRect(
            0,
            0,
            painter.device().width(),
            painter.device().height(),
        )
        painter.fillRect(rect, brush)

        # Get current state.
        dial = self.parent()._dial
        vmin, vmax = dial.minimum(), dial.maximum()
        value = dial.value()

        # Define our canvas.
        d_height = painter.device().height() - (self._padding * 2)
        d_width = painter.device().width() - (self._padding * 2)

        # Draw the bars.
        step_size = d_height / self.n_steps
        bar_height = step_size * self._bar_solid_percent
        bar_spacer = step_size * (1 - self._bar_solid_percent) / 2

        # Calculate the y-stop position, from the value in range.
        pc = (value - vmin) / (vmax - vmin)
        n_steps_to_draw = int(pc * self.n_steps)

        for n in range(n_steps_to_draw):
            brush.setColor(QtGui.QColor(self.steps[n]))
            rect = QtCore.QRect(
                self._padding,
                int(self._padding + d_height - ((1 + n) * step_size) + bar_spacer),
                d_width,
                int(bar_height),
            )
            painter.fillRect(rect, brush)

        painter.end()
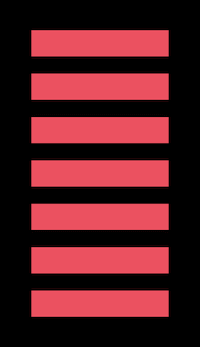
You can now experiment with passing in different values for the init to PowerBar, e.g. increasing the number of bars, or providing a color list. Some examples are shown below — a good source of hex palettes is the Bokeh source.
PowerBar(10)
PowerBar(3)
PowerBar(["#5e4fa2", "#3288bd", "#66c2a5", "#abdda4", "#e6f598", "#ffffbf", "#fee08b", "#fdae61", "#f46d43", "#d53e4f", "#9e0142"])
PowerBar(["#a63603", "#e6550d", "#fd8d3c", "#fdae6b", "#fdd0a2", "#feedde"])
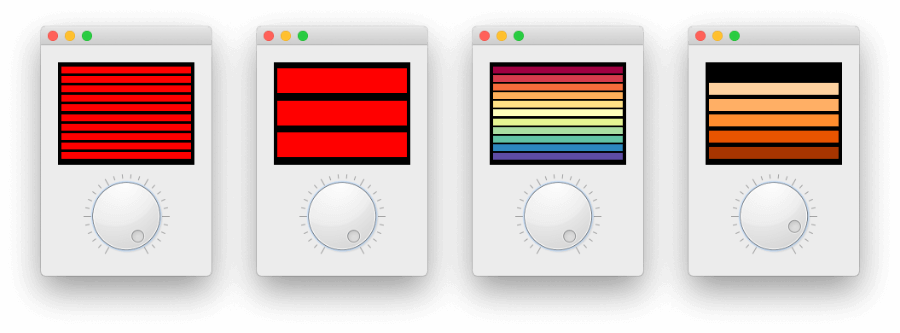 Examples of customized PowerBar widgets with different colors and segments.
You could fiddle with the padding settings through the variables e.g. self._bar_solid_percent but it'd be nicer to provide proper methods to set these.
We're following the Qt standard of camelCase method names for these external methods for consistency with the others inherited from QDial.
    def setColor(self, color):
        self._bar.steps = [color] * self._bar.n_steps
        self._bar.update()

    def setColors(self, colors):
        self._bar.n_steps = len(colors)
        self._bar.steps = colors
        self._bar.update()

    def setBarPadding(self, i):
        self._bar._padding = int(i)
        self._bar.update()

    def setBarSolidPercent(self, f):
        self._bar._bar_solid_percent = float(f)
        self._bar.update()

    def setBackgroundColor(self, color):
        self._bar._background_color = QtGui.QColor(color)
        self._bar.update()
In each case we set the private variable on the _bar object and then call _bar.update() to trigger a redraw of the widget. The method support changing the color to a single color, or updating a list of them — setting a list of colors can also be used to change the number of bars.
There is no method to set the bar count, since expanding a list of colors, but feel free to try adding this yourself!
Here's an example using 25px padding, a fully solid bar and a grey background.
bar = PowerBar(["#49006a", "#7a0177", "#ae017e", "#dd3497", "#f768a1", "#fa9fb5", "#fcc5c0", "#fde0dd", "#fff7f3"])
bar.setBarPadding(2)
bar.setBarSolidPercent(0.9)
bar.setBackgroundColor('gray')
With these settings you get the following result.
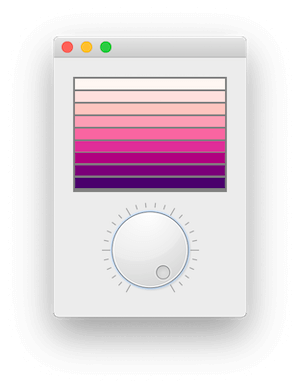 Bar padding 2, solid percent 0.9 and grey background.
Adding the QAbstractSlider Interface
We've added methods to configure the behavior of the power bar. But we currently provide no way to configure the standard QDial methods — for example, setting the min, max or step size — from our widget. We could work through and add wrapper methods for all of these, but it would get very tedious very quickly.
# Example of a single wrapper, we'd need 30+ of these.
def setNotchesVisible(self, b):
    return self._dial.setNotchesVisible(b)
Instead we can add a little handler onto our outer widget to automatically look for methods (or attributes) on the QDial instance, if they don't exist on our class directly. This way we can implement our own methods, yet still get all the QAbstractSlider goodness for free.
The wrapper is shown below, implemented as a custom __getattr__ method.
def __getattr__(self, name):
    if name in self.__dict__:
        return self[name]

    try:
        return getattr(self._dial, name)
    except AttributeError:
        raise AttributeError(
          "'{}' object has no attribute '{}'".format(self.__class__.__name__, name)
        )
When accessing a property (or method) — e.g. when when call PowerBar.setNotchesVisible(true) Python internally uses __getattr__ to get the property from the current object. This handler does this through the object dictionary self.__dict__. We've overridden this method to provide our custom handling logic.
Now, when we call PowerBar.setNotchesVisible(true), this handler first looks on our current object (a PowerBar instance) to see if .setNotchesVisible exists and if it does uses it. If not it then calls getattr() on self._dial instead returning what it finds there. This gives us access to all the methods of QDial from our custom PowerBarwidget.
If QDial doesn't have the attribute either, and raises an AttributeError we catch it and raise it again from our custom widget, where it belongs.
This works for any properties or methods, including signals. So the standard QDial signals such as .valueChanged are available too.
Adding Mouse Interaction to the Custom Widget
Currently you can update the current value of the PowerBar meter by twiddling with the dial. But it would be nicer UX if you could also update the value by clicking a position on the power bar, or by dragging you mouse up and down. To do this we can update our _Bar widget to handle mouse events.
class _Bar(QtWidgets.QWidget):

    clickedValue = QtCore.Signal(int)

    # ... existing code ...

    def _calculate_clicked_value(self, e):
        parent = self.parent()
        vmin, vmax = parent.minimum(), parent.maximum()
        d_height = self.size().height() + (self._padding * 2)
        step_size = d_height / self.n_steps
        click_y = e.y() - self._padding - step_size / 2

        pc = (d_height - click_y) / d_height
        value = vmin + pc * (vmax - vmin)
        self.clickedValue.emit(value)

    def mouseMoveEvent(self, e):
        self._calculate_clicked_value(e)

    def mousePressEvent(self, e):
        self._calculate_clicked_value(e)
In the __init__ block for the PowerBar widget we can connect to the _Bar.clickedValue signal and send the values to self._dial.setValue to set the current value on the dial.
# Take feedback from click events on the meter.
self._bar.clickedValue.connect(self._dial.setValue)
If you run the widget now, you'll be able to click around in the bar area and the value will update, and the dial rotate in sync.
Drag to update the custom PowerBar widget value.
Complete Custom PySide2 Widget Code
Below is the complete final code for our custom PySide2 PowerBar meter widget. You can save this over the previous file (e.g. named power_bar.py) and then use it in any of your own projects, or customize it further to your own requirements.
from PySide2 import QtCore, QtGui, QtWidgets
from PySide2.QtCore import Qt

class _Bar(QtWidgets.QWidget):

    clickedValue = QtCore.Signal(int)

    def __init__(self, steps, *args, **kwargs):
        super().__init__(*args, **kwargs)

        self.setSizePolicy(
            QtWidgets.QSizePolicy.MinimumExpanding,
            QtWidgets.QSizePolicy.MinimumExpanding
        )

        if isinstance(steps, list):
            # list of colors.
            self.n_steps = len(steps)
            self.steps = steps

        elif isinstance(steps, int):
            # int number of bars, defaults to red.
            self.n_steps = steps
            self.steps = ['red'] * steps

        else:
            raise TypeError('steps must be a list or int')

        self._bar_solid_percent = 0.8
        self._background_color = QtGui.QColor('black')
        self._padding = 4.0  # n-pixel gap around edge.

    def paintEvent(self, e):
        painter = QtGui.QPainter(self)

        brush = QtGui.QBrush()
        brush.setColor(self._background_color)
        brush.setStyle(Qt.SolidPattern)
        rect = QtCore.QRect(
            0,
            0,
            painter.device().width(),
            painter.device().height(),
        )
        painter.fillRect(rect, brush)

        # Get current state.
        parent = self.parent()
        vmin, vmax = parent.minimum(), parent.maximum()
        value = parent.value()

        # Define our canvas.
        d_height = painter.device().height() - (self._padding * 2)
        d_width = painter.device().width() - (self._padding * 2)

        # Draw the bars.
        step_size = d_height / self.n_steps
        bar_height = step_size * self._bar_solid_percent
        bar_spacer = step_size * (1 - self._bar_solid_percent) / 2

        # Calculate the y-stop position, from the value in range.
        pc = (value - vmin) / (vmax - vmin)
        n_steps_to_draw = int(pc * self.n_steps)

        for n in range(n_steps_to_draw):
            brush.setColor(QtGui.QColor(self.steps[n]))
            rect = QtCore.QRect(
                self._padding,
                self._padding + d_height - ((1 + n) * step_size) + bar_spacer,
                d_width,
                bar_height
            )
            painter.fillRect(rect, brush)

        painter.end()

    def sizeHint(self):
        return QtCore.QSize(40, 120)

    def _trigger_refresh(self):
        self.update()

    def _calculate_clicked_value(self, e):
        parent = self.parent()
        vmin, vmax = parent.minimum(), parent.maximum()
        d_height = self.size().height() + (self._padding * 2)
        step_size = d_height / self.n_steps
        click_y = e.y() - self._padding - step_size / 2

        pc = (d_height - click_y) / d_height
        value = vmin + pc * (vmax - vmin)
        self.clickedValue.emit(value)

    def mouseMoveEvent(self, e):
        self._calculate_clicked_value(e)

    def mousePressEvent(self, e):
        self._calculate_clicked_value(e)


class PowerBar(QtWidgets.QWidget):
    """
    Custom Qt Widget to show a power bar and dial.
    Demonstrating compound and custom-drawn widget.

    Left-clicking the button shows the color-chooser, while
    right-clicking resets the color to None (no-color).
    """

    colorChanged = QtCore.Signal()

    def __init__(self, steps=5, *args, **kwargs):
        super().__init__(*args, **kwargs)

        layout = QtWidgets.QVBoxLayout()
        self._bar = _Bar(steps)
        layout.addWidget(self._bar)

        # Create the QDial widget and set up defaults.
        # - we provide accessors on this class to override.
        self._dial = QtWidgets.QDial()
        self._dial.setNotchesVisible(True)
        self._dial.setWrapping(False)
        self._dial.valueChanged.connect(self._bar._trigger_refresh)

        # Take feedback from click events on the meter.
        self._bar.clickedValue.connect(self._dial.setValue)

        layout.addWidget(self._dial)
        self.setLayout(layout)

    def __getattr__(self, name):
        if name in self.__dict__:
            return self[name]

        return getattr(self._dial, name)

    def setColor(self, color):
        self._bar.steps = [color] * self._bar.n_steps
        self._bar.update()

    def setColors(self, colors):
        self._bar.n_steps = len(colors)
        self._bar.steps = colors
        self._bar.update()

    def setBarPadding(self, i):
        self._bar._padding = int(i)
        self._bar.update()

    def setBarSolidPercent(self, f):
        self._bar._bar_solid_percent = float(f)
        self._bar.update()

    def setBackgroundColor(self, color):
        self._bar._background_color = QtGui.QColor(color)
        self._bar.update()
You should be able to use these techniques to create your very own custom PySide2 widgets for any Python GUI application.
Want to see some more examples of custom widgets? Check out our Widget library which has a number of PySide2 compatible widgets for you to drop into your own Python projects.