When we create graphical user interfaces (GUIs) in Python with Tkinter, we need a way to arrange widgets on the window. Placing widgets on a window using their absolute position can be cumbersome and hard to achieve correctly. We'd need to compute each widget's position relative to other widgets to build the GUI. Unfortunately, the position will have to be calculated again every time we resize the window.
In Tkinter, we can gracefully solve this issue using a geometry manager. Tkinter has three built-in geometry managers: pack, place, and grid. Each of them lets us arrange widgets in a different way.
To find out more about the differences between the three methods, please check out the When To Use Pack, Place Or Grid In Tkinter tutorial.
In this tutorial, we'll learn the basics of using the Tkinter pack geometry manager to create functional GUIs. You'll understand how pack() works, explore its key options like side, fill, expand, and anchor, and build real-world layouts including a sign-in form.
You can download the source code for all our articles.
The code for this article is in the folder tkinter/tutorials/create-ui-with-tkinter-pack-layout-manager
What Is the pack Geometry Manager in Tkinter?
The pack geometry manager turns each individual widget into a rectangular area known as a parcel. Each widget has its own size, and pack lets you arrange them all together either vertically or horizontally.
Each widget has its own size, which you can change to better suit your needs. Once you determine the desired size of a widget, the pack manager arranges it in the window.
The Tkinter pack geometry manager stacks widgets on top of each other vertically by default. You can also achieve a horizontal layout by changing the side parameter to "left", "right", or the equivalent constants tkinter.LEFT and tkinter.RIGHT. You can also change a widget's height, width, and location.
Key pack() Options and Arguments
Some of the pack manager's more useful arguments are listed below:
side: specifies the general location of the widget in the window. Its possible values are"top"(default),"bottom","left", and"right".fill: defines which directions you want the widget to fill in the parent window. It can be either the"x"or"y"directions or"both".padx,pady: represent the number of pixels surrounding the widget as external padding.ipadx,ipady: defines the horizontal or vertical padding inside the widget (internal padding).expand: if set toTrue, the widget stretches to fill any remaining space when the parent window expands.anchor: defines where the widget is placed in the parent widget. It can be"n"(North),"s"(South),"e"(East),"w"(West), or some combination of them. The default is"center".
Building a Demo GUI With pack()
The Tkinter pack geometry manager is useful for different types of GUIs. Below is a quick example of how to create a Tkinter GUI and arrange widgets in the window with pack:
import tkinter as tk

root = tk.Tk()
root.title("The Pack Geometry Manager")
root.geometry("340x100")

tk.Button(root, text="Top Button!").pack()

tk.Label(root, text="Hello, Left!").pack(side="left")
tk.Label(root, text="Hello, Right!").pack(side="right")

tk.Checkbutton(
    root,
    text="An option at the bottom!",
).pack(side=tk.BOTTOM)

root.mainloop()
In this example, we first import tkinter as tk. Then, we build an app with a main window with a title and fixed size (340x100).
Next, we use the pack geometry manager to arrange widgets in specified positions. A button with the text "Top Button!" appears at the top by default, followed by two labels: "Hello, Left!" aligned to the left and "Hello, Right!" aligned to the right.
Comprehensive code review • Bugfixes & improvements • Maintainability advice and architecture improvements • Design and usability assessment • Suggestions and tips to expand your knowledge • Packaging and distribution help for Windows, Mac & Linux • Find out more.
At the bottom of the window, we have a check button labeled "An option at the bottom!" placed using side=tk.BOTTOM. The program runs with mainloop() and looks like shown below:
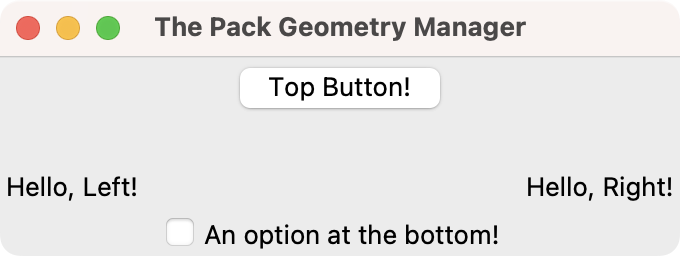 Demo GUI using the pack geometry manager in Tkinter.
Creating a Sign-in Form With Tkinter pack
Now it's time for a more realistic example. Say that you need to create a login dialog using Tkinter. The dialog's GUI should look something like the following:
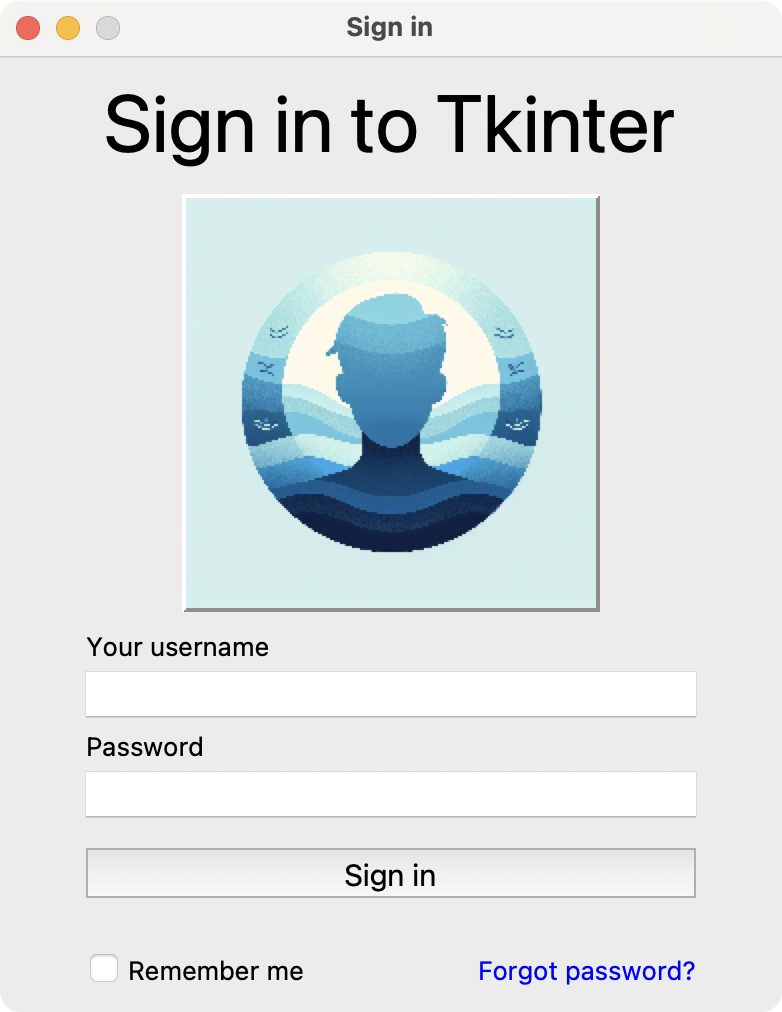 Login form built with Tkinter's pack geometry manager
Now let's get to the code for the login UI:
import tkinter as tk
from tkinter import messagebox

root = tk.Tk()
root.title("Sign in")
root.resizable(False, False)

tk.Label(
    root,
    text="Sign in to Tkinter",
    font=("Font", 30),
).pack(ipady=5, fill="x")

image = tk.PhotoImage(file="profile.png").subsample(5, 5)
tk.Label(
    root,
    image=image,
    relief=tk.RAISED,
).pack(pady=5)

def check_input():
    secret_username = "username"
    secret_password = "password"
    username = username_entry.get()
    password = password_entry.get()
    if username == secret_username and password == secret_password:
        messagebox.showinfo("Info", "Used logged in!")
    else:
        messagebox.showerror("Error", "Invalid username or password")

# Username and password
tk.Label(root, text="Your username").pack(anchor="w", padx=30)
username_entry = tk.Entry(root)
username_entry.pack(padx=30, fill="x")
tk.Label(root, text="Password").pack(anchor="w", padx=30)
password_entry = tk.Entry(root)
password_entry.pack(padx=30, fill="x")

# Sign in button
tk.Button(
    root,
    text="Sign in",
    command=check_input,
    width=18,
).pack(pady=10, padx=30, fill="x")

# Remember me and forgot password
tk.Checkbutton(
    root,
    text="Remember me",
    command=lambda: print("The check button works."),
).pack(side="left", padx=30, pady=5)
tk.Label(
    root,
    text="Forgot password?",
    fg="blue",
    cursor="hand2",
).pack(side="right", padx=30, pady=5)

root.mainloop()
In this example, you create a graphical user interface for a sign-in form. The pack geometry manager is used to organize widgets. It arranges widgets in the window relative to their order of creation.
Using fill and ipady for the Header Label
In the first Label widget, the pack method uses the ipady and fill arguments to add vertical internal padding and stretch the widget horizontally (fill="x"). Similarly, a second Label widget displays a profile picture, where pady=5 adds vertical spacing around it.
Arranging Input Fields With anchor and padx
For the username and password fields, pack arranges labels and entry widgets in a straightforward vertical stack. Each label is aligned to the left with anchor="w" and padx=30, which adds horizontal padding from the left edge of the window. The corresponding Entry widgets are packed directly below their labels with the same padding as the labels and horizontally stretched.
Positioning the Sign-in Button With fill and Padding
The Sign in button is packed with pady=10 and padx=30 to add spacing, while fill="x" ensures it stretches horizontally to match the window's width.
Horizontal Layout With side="left" and side="right"
The bottom section contains a Checkbutton ("Remember me") and a Label ("Forgot password?"). The pack geometry manager uses side="left" and side="right" to position these widgets on opposite sides of the window horizontally.
The overall layout relies on the sequential and relative placement of widgets through the pack geometry manager, resulting in a clean, well-organized sign-in interface.
Summary
In this tutorial, we learned how to use the Tkinter pack geometry manager to arrange widgets in Python GUIs.
First, we explored the key pack() arguments — side, fill, expand, padx, pady, and anchor — that help control widget layout. Then, we built a simple demo GUI to practice the concepts of geometry management with pack in Tkinter.
Finally, we created a complete sign-in form using the pack geometry manager, demonstrating how to combine multiple pack() options to build a practical, well-structured user interface. To explore other ways of arranging widgets, check out the Tkinter grid geometry manager or learn more about Tkinter development.
Packaging Python Applications with PyInstaller by Martin Fitzpatrick — This step-by-step guide walks you through packaging your own Python applications from simple examples to complete installers and signed executables.