Ever wanted to build a GUI with Tkinter and Python? Have you ever wondered when you should use pack, place or grid in Tkinter? Or thought, "Which layout manager would make my UI easier to code?" How about, "Which manager would make my UI look better?" Well, today I got you covered with this tutorial!
This time we will discuss the three types of layout managers in Tkinter -- pack, place, and grid. Selecting the right layout manager in your project is useful for making it easier to organize the widgets in your GUI. We won't go over all of the details for each manager. If you already know which layout manager you want to use, check out these other posts that cover each manager separately -- pack, place, grid.
Today, we are going to take a look at how we can recreate a mock photo editor using the different layout managers, and see how they affect the look of the GUI. We'll also update the photo editor to include Button widgets rather than simply labels.
Missed the earlier tutorial? Find out more about Buttons.
By the end of this tutorial, you will have a fundamental understanding of how to use the different layout managers in Tkinter and be able to compare them to decide which is better in your own projects.
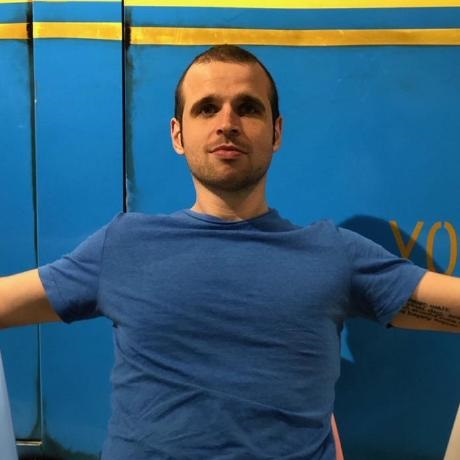
 Photo editor created previously using the grid layout manager in Tkinter.
Things to Remember When Designing a Tkinter User Interface
Let's take a brief moment to think about what designing a good UI means. Obviously from the coding side, you want to be able write concise and well-organized code. But when designing UI, it is also important to consider your intended user. Users should be able to flow around the window you create intuitively, without having to search everywhere for a certain button in a sea of other widgets. We have all become accustomed to seeing and using good (and bad) UI everyday on our phones or when surfing the web. If you are still not sure, doing a quick Google search of bad UI vs. good UI will turn up loads of examples to help you.
When you use the layout managers in Tkinter -- grid, place, or pack -- think about how simple or complex of a UI you need to design. There are certain situations where using one manager might make your window appear easier to understand, look better, or even make coding the UI simpler.
Tkinter Grid Layout Manager
The grid layout manager organizes widgets in a 2-dimensional table-like structure (think of an Excel spreadsheet), where each cell can hold a widget. You don't have to specify the size of the widgets in your window as the manager already handles that for you.
Placing widgets in the window is as simple as specifying the row and column values. The top left corner has values row=0 and column=0, and increase by 1 as you move right or down in the grid. If you want more control over arranging widgets or resizing them, it is also possible to span across multiple rows. However, I found that when one widget spans across multiple rows or columns and another widget does not, the manager has to adjust for this difference.
Below are a few of the parameters for grid that we will be using in this tutorial.
row,column-- the row and column values for the location of the widget. Both start from 0.padx,pady-- the number of pixels surrounding the widget to create a padding between other widgets, for horizontal or vertical padding.ipadx,ipady-- how many pixels to use for padding inside the widget, also for horizontal or vertical padding.sticky-- specify a value of's','n','e','w', or a combination of them, e.g.'nw','ne','sw', or'se'. The parameter tells which side of the 'cell' the widget will 'stick' to . If you use'w'+'e'+'n'+'s', then the widget will fill up the 'cell'. Default is to center the widget within the 'cell'.
Using Grid in Tkinter
Below is the code for the photo editor using Tkinter and the grid layout manager.
'''Example of how to use the grid() method to create a GUI layout'''
from tkinter import *

root  =  Tk()  # create root window
root.title("Basic GUI Layout with Grid")
root.maxsize(900,  600)  # width x height
root.config(bg="skyblue")

# Create left and right frames
left_frame  =  Frame(root,  width=200,  height=  400,  bg='grey')
left_frame.grid(row=0,  column=0,  padx=10,  pady=5)

right_frame  =  Frame(root,  width=650,  height=400,  bg='grey')
right_frame.grid(row=0,  column=1,  padx=10,  pady=5)

# Create frames and labels in left_frame
Label(left_frame,  text="Original Image",  relief=RAISED).grid(row=0,  column=0,  padx=5,  pady=5)
image  =  PhotoImage(file="rain.gif")  # edit the file name to use a different image
original_image  =  image.subsample(3,3)

Label(left_frame,  image=original_image).grid(row=1,  column=0,  padx=5,  pady=5)
Label(right_frame,  image=image,  bg='grey').grid(row=0,  column=0,  padx=5,  pady=5)

tool_bar  =  Frame(left_frame,  width=180,  height=185,  bg='grey')
tool_bar.grid(row=2,  column=0,  padx=5,  pady=5)

def clicked():
    '''if button is clicked, display message'''
    print("Clicked.")

# Example labels that serve as placeholders for other widgets
Label(tool_bar,  text="Tools",  relief=RAISED).grid(row=0,  column=0,  padx=5,  pady=3,  ipadx=10)
Label(tool_bar,  text="Filters",  relief=RAISED).grid(row=0,  column=1,  padx=5,  pady=3,  ipadx=10)

# For now, when the buttons are clicked, they only call the clicked() method. We will add functionality later.
Button(tool_bar,  text="Select",  command=clicked).grid(row=1,  column=0,  padx=5,  pady=5,  sticky='w'+'e'+'n'+'s')
Button(tool_bar,  text="Crop",  command=clicked).grid(row=2,  column=0,  padx=5,  pady=5,  sticky='w'+'e'+'n'+'s')
Button(tool_bar,  text="Rotate & Flip",  command=clicked).grid(row=3,  column=0,  padx=5,  pady=5,  sticky='w'+'e'+'n'+'s')
Button(tool_bar,  text="Resize",  command=clicked).grid(row=4,  column=0,  padx=5,  pady=5,  sticky='w'+'e'+'n'+'s')
Button(tool_bar,  text="Black & White",  command=clicked).grid(row=1,  column=1,  padx=5,  pady=5,  sticky='w'+'e'+'n'+'s')
root.mainloop()
In line 2, import the Tkinter module and all of its functions. We create the root window, give the window a title, specify the max size it can expand to, and choose a background color in lines 4-7. The left and right frames that are used to hold our photo editing tools and image are created in lines 10-14. Check out another post for more details about how to create Frame widgets or how to place Frames inside of other Frames. In line 11, we call the left_frame and use the grid method to arrange the widget in the window. The row and column values are set to 0 and 0, placing the frame in the top left corner. Then we use padx and pady to create some padding between the root window and the left_frame. This creates a much nicer appearance.
Purchasing Power Parity
Developers in [[ country ]] get [[ discount.discount_pc ]]% OFF on all books & courses with code [[ discount.coupon_code ]]After that, we do something similar for the right_frame, but change the column value to 1 to place the right_frame next to the left_frame. We use a similar process for other widgets. For the buttons in lines 36-40, set the sticky parameter to 'w'+'e'+'n'+'s' to stretch the buttons within their respective frames.
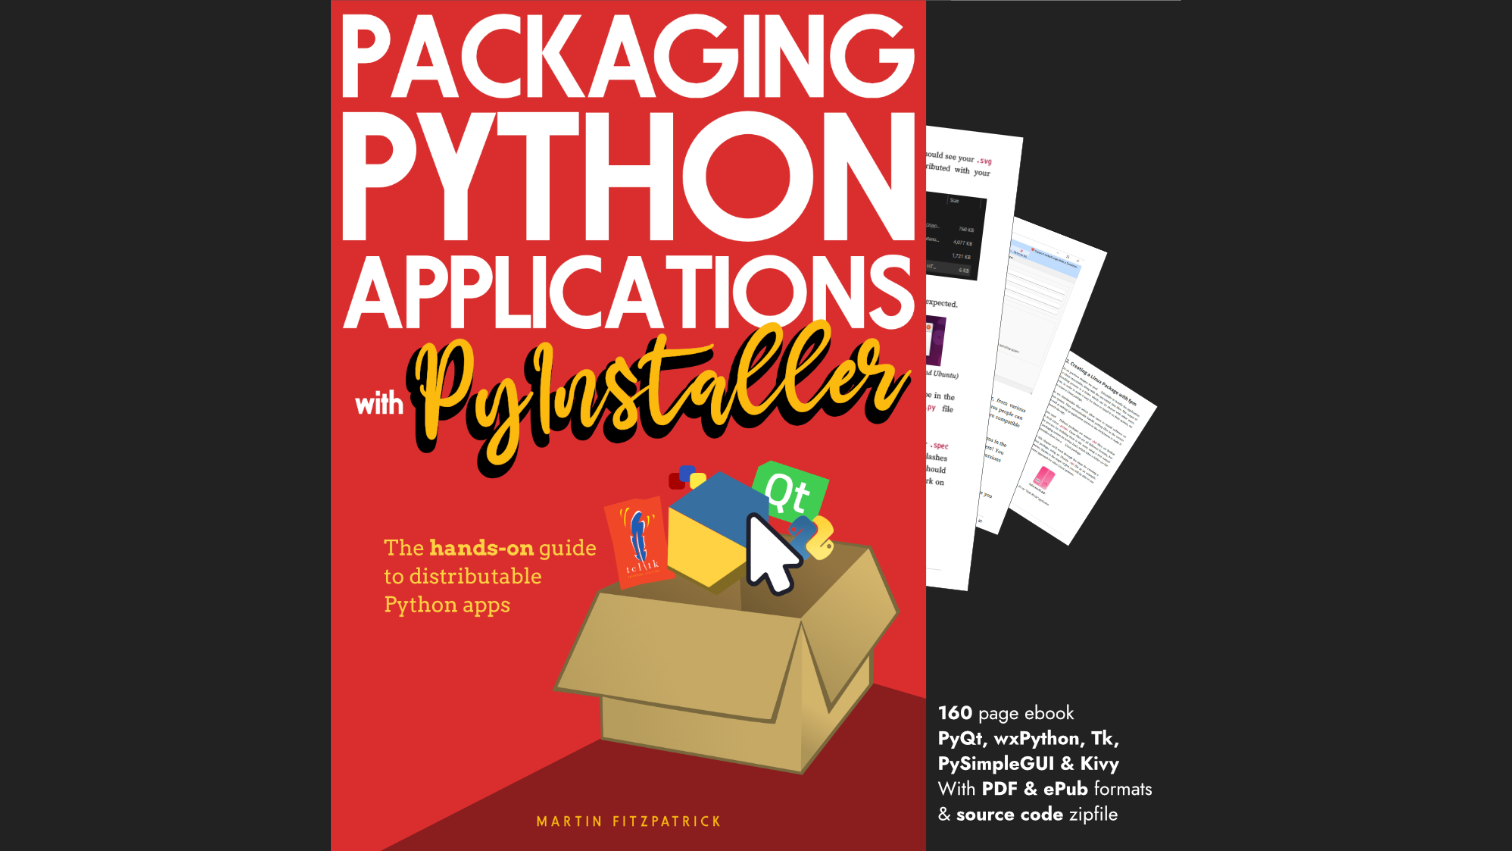
 Updated photo editor created using the grid layout manager.
I found grid is great for both general projects, and even complex ones. With grid, you can create less frames and organize widgets much more easily. One thing to note, if a widget you want to use spans over a number of rows or columns, it will affect nearby widgets' locations relative to that widget.
Tkinter Pack Layout Manager
The pack() layout manager is much simpler to use for organizing widgets, especially if you simply want Tkinter to figure out exactly where the widget in your GUI should be. Knowing the general location of a widget in the main window relative to its surrounding widgets is typically all that is needed.
Widgets are organized into blocks and placed into the parent window depending upon specified parameters. But unlike grid, you don't need to specify the row and column values. Widgets can be placed vertically or horizontally depending upon the values for the side parameter. For more complex layouts, combine pack with Frame widgets.
Don't mix grid() and pack() methods in the same parent container. The application will freeze trying to figure out how to make these two managers work together.
side-- specifies the general location of the widget in the window, arguments are'top','bottom','left','right'(default is'top').fill-- which directions you want the widget to fill in the parent window, can choose'x','y'directions, or'both'.padx,pady-- the number of pixels surrounding the widget to create a padding between other widgets, for horizontal or vertical padding.ipadx,ipady-- how many pixels to use for padding inside the widget, also for horizontal or vertical paddingexpand-- set toTrueif you want the widget to stretch if the parent window expands. Default isFalse.anchor-- where the widget is placed in the parent widget, specified by'n','s','e','w', or some combination of them. Default is'center'.
Using Pack in Tkinter
Let's take a look at the code for the photo editor using the pack() method. The entire code is given here for your reference.
'''Example of how to use the pack() method to create a GUI layout'''
from tkinter import *
root  =  Tk()  # create root window
root.title("Basic GUI Layout with Pack")
root.maxsize(900,  600)
root.config(bg="skyblue")

# Create left and right frames
left_frame  =  Frame(root,  width=200,  height=400,  bg='grey')
left_frame.pack(side='left',  fill='both',  padx=10,  pady=5,  expand=True)

right_frame  =  Frame(root,  width=650,  height=400,  bg='grey')
right_frame.pack(side='right',  fill='both',  padx=10,  pady=5,  expand=True)

# Create frames and labels in left_frame
Label(left_frame,  text="Original Image").pack(side='top',  padx=5,  pady=5)
image  =  PhotoImage(file="tree.gif")
original_image  =  image.subsample(3,3)
Label(left_frame,  image=original_image).pack(fill='both',  padx=5,  pady=5)

#large_image = original_image.subsample(2,2)
Label(right_frame,  image=image).pack(fill='both',  padx=5,  pady=5)
tool_bar  =  Frame(left_frame,  width=90,  height=185,  bg='lightgrey')
tool_bar.pack(side='left',  fill='both',  padx=5,  pady=5,  expand=True)

filter_bar  =  Frame(left_frame,  width=90,  height=185,  bg='lightgrey')
filter_bar.pack(side='right',  fill='both',  padx=5,  pady=5,  expand=True)

def clicked():
    '''if button is clicked, display message'''
    print("Clicked.")

# Example labels that serve as placeholders for other widgets
Label(tool_bar,  text="Tools",  relief=RAISED).pack(anchor='n',  padx=5,  pady=3,  ipadx=10)
Label(filter_bar,  text="Filters",  relief=RAISED).pack(anchor='n',  padx=5,  pady=3,  ipadx=10)

# For now, when the buttons are clicked, they only call the clicked() method. We will add functionality later.
Button(tool_bar,  text="Select",  command=clicked).pack(padx=5,  pady=5)
Button(tool_bar,  text="Crop",  command=clicked).pack(padx=5,  pady=5)
Button(tool_bar,  text="Rotate & Flip",  command=clicked).pack(padx=5,  pady=5)
Button(tool_bar,  text="Resize",  command=clicked).pack(padx=5,  pady=5)
Button(filter_bar,  text="Black & White",  command=clicked).pack(padx=5,  pady=5)

root.mainloop()
Since we are just using different layout managers to see how they affect the look of our GUI, much of the code is similar. In lines 11 and 14, you can see we are placing the frames in the root window using pack().
One thing worth noting is, unlike the grid manager, we create two separate Frame objects to hold all of our "Tools" and "Filters" buttons. You can see this in lines 26-30.
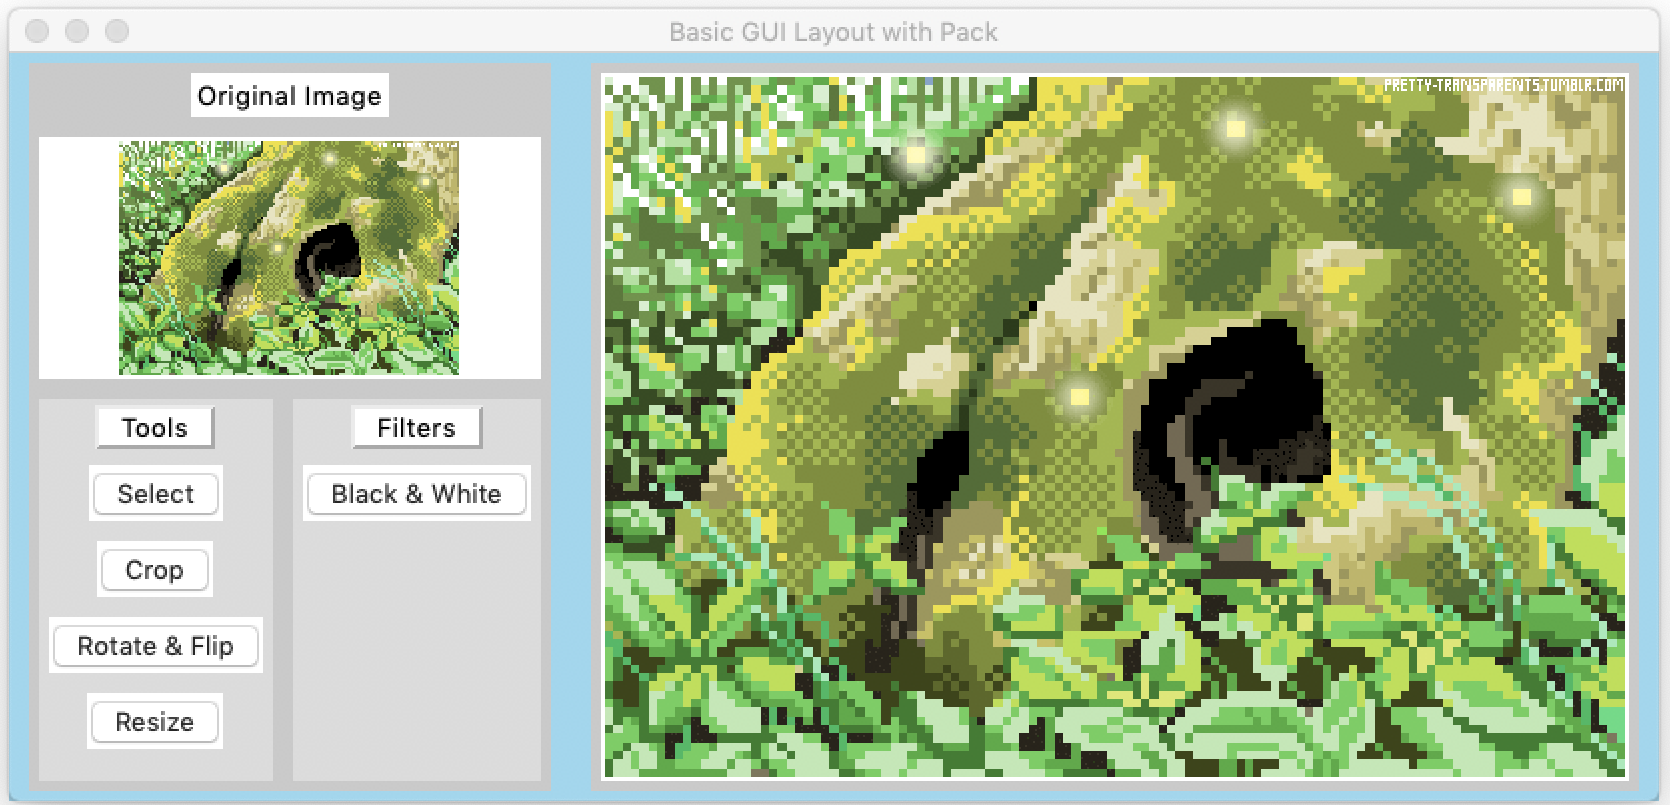 Photo editor created using the pack layout manager.
I found pack better suited for simpler layouts and more complicated for creating complex UIs. It feels a little bit limited compared to grid. However, it is a bit easier to use for simpler UIs as the algorithm helps you to arrange the widgets.
Tkinter Place Layout Manager
The third layout manager, place, allows you to organize widgets by specifying both the position and size of each widget relative to other widgets. This method allows for a bit more control in designing your UI than pack or grid, if you are willing to play around with the various x and y values.
Each of the three layout managers -- place, pack, and grid -- should never be used in conjunction with each other in the same parent container.
in_-- specifies the master window for the widget.x,y-- specifies the specific x and y values of the widget in the parent window.relx,rely-- horizontal and vertical offset relative to the size of the parent widget, values between 0.0 and 1.0.relwidth,relheight-- sets height and width of widget relative to the size of the parent widget, values between 0.0 and 1.0.anchor-- where the widget is placed in the parent widget, specified by'n','s','e','w', or some combination of them. Default is'center'.
Using Place in Tkinter
Below is the code for the photo editor using the place layout manager.
'''Example of how to use the place() method to create a GUI layout'''
from tkinter import *

root  =  Tk()  # create root window
root.title("Basic GUI Layout with Place")
root.geometry("900x550")  # Set the starting size of the window
root.maxsize(900,  600)  # width x height
root.config(bg="skyblue")

# Create left and right frames
left_frame  =  Frame(root,  width=250,  height=500,  bg='grey')
left_frame.place(x=10,  y=10,  relx=0.01,  rely=0.01)

right_frame  =  Frame(root,  width=600,  height=500,  bg='grey')
right_frame.place(x=270,  y=10,  relx=0.01,  rely=0.01)

# Create frames and labels in left_frame
Label(left_frame,  text="Original Image").place(relx=0.5,  rely=0.05,  anchor=N)

image  =  PhotoImage(file="clouds.gif")
original_image  =  image.subsample(3,3)

Label(left_frame,  image=original_image,  bg='grey').place(rely=0.15,  relwidth=1)
Label(right_frame,  image=image,  bg='grey').place(y=5,  relwidth=1,  relheight=1)

tool_bar  =  Frame(left_frame,  width=115,  height=185,  bg='lightgrey')
tool_bar.place(x=5,  rely=0.5)

filter_bar  =  Frame(left_frame,  width=115,  height=185,  bg='lightgrey')
filter_bar.place(x=130,  rely=0.5)

def clicked():
    '''if button is clicked, display message'''
    print("Clicked.")

# Example labels that serve as placeholders for other widgets
Label(tool_bar,  text="Tools",  relief=RAISED).place(in_=tool_bar,  relx=0.5,  anchor=N)
Label(filter_bar,  text="Filters",  relief=RAISED).place(in_=filter_bar,  relx=0.5,  anchor=N)

# For now, when the buttons are clicked, they only call the clicked() method. We will add functionality later.
Button(tool_bar,  text="Select",  ;command=clicked).place(in_=tool_bar,  relx=0.5,  rely=0.20,  anchor=CENTER)
Button(tool_bar,  text="Crop",  command=clicked).place(in_=tool_bar,  relx=0.5,  rely=0.35,  anchor=CENTER)
Button(tool_bar,  text="Rotate & Flip",  command=clicked).place(in_=tool_bar,  relx=0.5,  rely=0.50,  anchor=CENTER)
Button(tool_bar,  text="Resize",  command=clicked).place(in_=tool_bar,  relx=0.5,  rely=0.65,  anchor=CENTER)
Button(filter_bar,  text="Black & White",  command=clicked).place(in_=filter_bar,  relx=0.5,  rely=0.20,  anchor=CENTER)

root.mainloop()
For this version of the photo editor, a similar method to pack was used. Two separate frames were created in lines 26-30 to hold all of the button widgets.
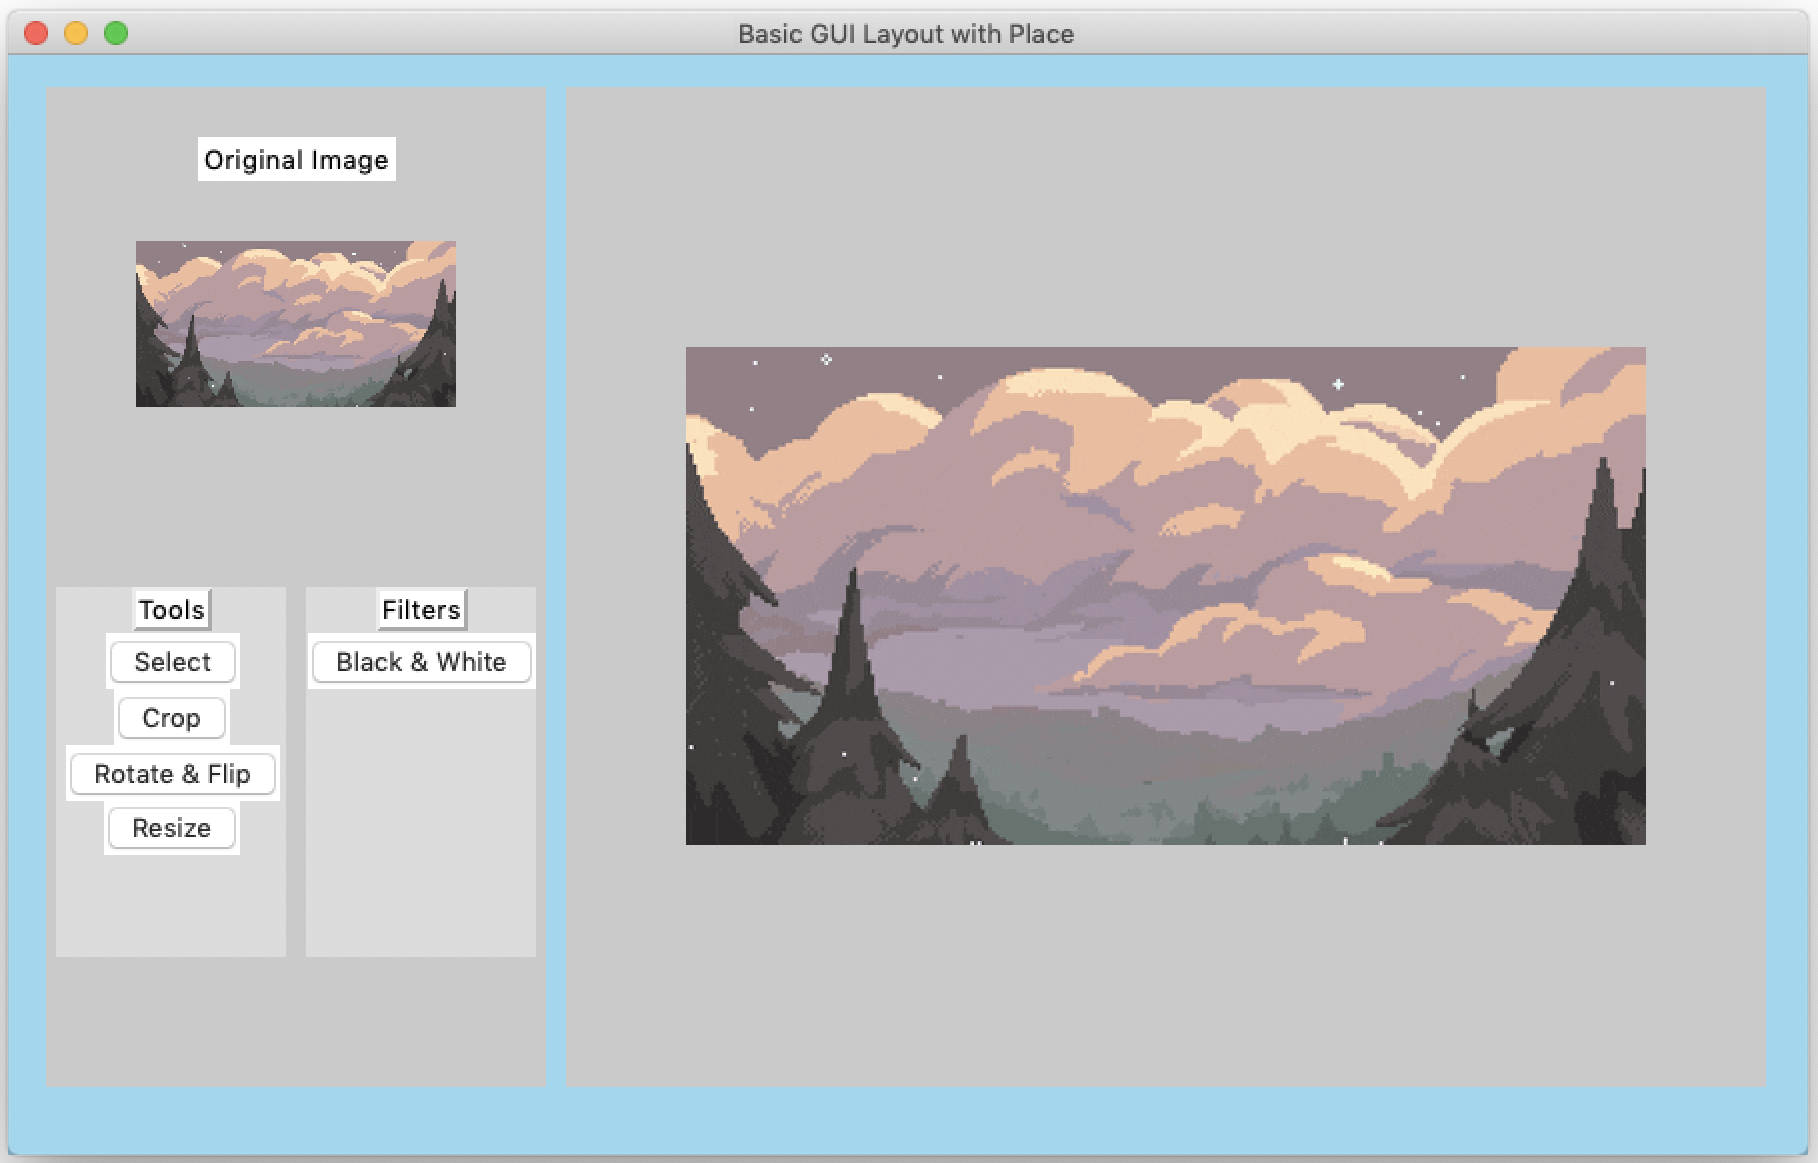 Photo editor created using the place layout manager.
I found the concept of the place layout manager the simplest to understand, but also a little bit harder to use. Since I am able to specify the x and y values of the widget, it allows for more control. However, I also found it took more time for me to use place. First, I needed to consider the size of all the other widgets. Then, I had to think and plan their locations relative to other widgets. I began to make adjustments, but then other widgets began to overlap as I experimented with relx and rely.
Pack vs Grid vs Place: Which Tkinter Layout Manager Should You Use?
In this tutorial, we saw how to create the same UI with Tkinter's three different layout managers. Here's a quick comparison to help you choose:
- Grid is the most versatile layout manager and works well for both simple and complex UIs. Use
gridwhen your interface has a table-like structure or you need precise row/column control. - Pack is the simplest to use and ideal for straightforward layouts where widgets are stacked vertically or horizontally. Use
packfor quick prototypes or simple interfaces. - Place gives you the most control with exact pixel positioning, but requires more effort and planning. Use
placewhen you need precise absolute or relative positioning.
Remember: never mix different layout managers within the same parent container -- Tkinter cannot resolve conflicts between pack, grid, and place when used together in a single frame or window.
I definitely recommend experimenting with the different parameters of each layout manager. Find out which one can create the best combination of functionality, usability, and visual appeal for your projects.
Create GUI Applications with Python & Qt6 by Martin Fitzpatrick — (PyQt6 Edition) The hands-on guide to making apps with Python — Save time and build better with this book. Over 15K copies sold.