In this tutorial, we will look at how Tkinter's place geometry managers help you lay out your GUI application interface.
In previous tutorials we've introduced Tkinter's pack and grid geometry managers and shown how you can use those to layout most user interfaces. In this tutorial we'll look at the final geometry manager that Tkinter offers: place.
If you're confused about which layout manager to use, you can see our guide to the differences between pack, place and grid.
You can download the source code for all our articles.
The code for this article is in the folder tkinter/tutorials/create-ui-with-tkinter-place-layout-manager
The place Geometry Manager
The place geometry manager allows you to have absolute control over the arrangement of your widgets. With place, you can specify the size of the widget, as well as the exact x and y coordinates to arrange it within the parent window. The place manager is useful for arranging buttons or other smaller widgets together within a simple dialog window.
A few of the parameters you can play around with are listed below:
in_: specifies the master window for the widgetx,y: specifies the specific x and y values of the widget in the parent windowrelx,rely: horizontal and vertical offset relative to the size of the parent widget, values between0.0and1.0relwidth,relheight: set the height and width of widgets relative to the size of the parent widget, values between0.0and1.0anchor: defines where the widget is placed in the parent widget, specified by'n','s','e','w', or some combination of them. The default is'center'
A Demo GUI With place
Let's take a look at a quick example that shows how to lay out widgets on a dialog using the place geometry manager. Below, we create an app that asks the user a question and allows them to select an option from a Listbox:
import tkinter as tk

root = tk.Tk()
root.title("Place layout Example")
root.geometry("300x300+50+100")

def display_selection(event):
    selection = cities_listbox.curselection()
    print(cities_listbox.get(selection))

# Label to display the question
tk.Label(
    root,
    text="Which of the following cities would you like to travel to?",
    wraplength=200,
).place(x=50, y=20)

# Listbox to display the cities
cities_listbox = tk.Listbox(root, selectmode=tk.BROWSE, width=24)
cities_listbox.place(x=40, y=65)
cities = ["Beijing", "Singapore", "Tokyo", "Dubai", "New York"]
for city in cities:
    cities_listbox.insert(tk.END, city)

# Bind the listbox's selection
cities_listbox.bind("<<ListboxSelect>>", display_selection)

# Button to close the app
end_button = tk.Button(root, text="End", command=quit)
end_button.place(x=125, y=250)

root.mainloop()
The code above will produce the following GUI:
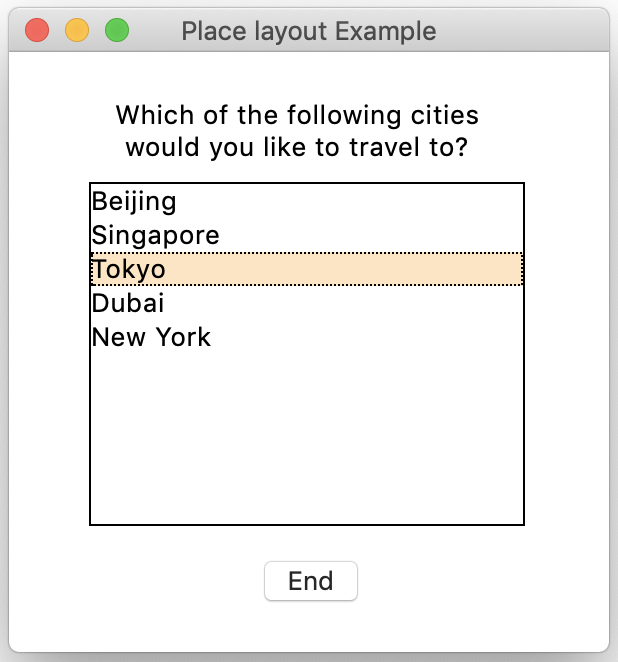 Tkinter GUI window using place geometry manager
The GUI application itself is very minimal, consisting of a label, a listbox, and a button. The example above shows how to use absolute positioning by using the x and y arguments with the place geometry manager.
While place may seem like an easier way to create the layout of your UI, it also means that you need to manually tweak positions as your UI grows and changes. For that reason, use it with caution. For complex UIs it's usually better to use automatic pack and grid layouts instead.
PyQt/PySide Office Hours 1:1 with Martin Fitzpatrick — Save yourself time and frustration. Get one on one help with your projects. Bring issues, bugs and questions about usability to architecture and maintainability, and leave with solutions.
Summary
In this article, you learned the basics of using place for geometry management in a Tkinter-based GUI application. While this geometry manager can get fiddly with complex UIs, it is useful when you want more control over the exact position of your widgets in your windows, or simple dialogs.