When creating a GUI app, the layout or arrangement of widgets is important. Laying out an app involves determining a good disposition for widgets on a window to build an intuitive and user-friendly GUI. In this tutorial, you will learn how to create a well-structured layout using Tkinter's Frame widget in Python.
You can download the source code for all our articles.
The code for this article is in the folder tkinter/tutorials/use-tkinter-to-design-gui-layout
Planning an App's GUI Layout
When you start a new GUI project with Tkinter, the best thing you can do is have a good plan for organizing the graphical components on the app's windows. In this tutorial, you'll create a Tkinter app for managing images. To lay out its GUI, you will use the Frame widget and the grid geometry manager.
Below, you have a diagram that sketches the GUI layout:
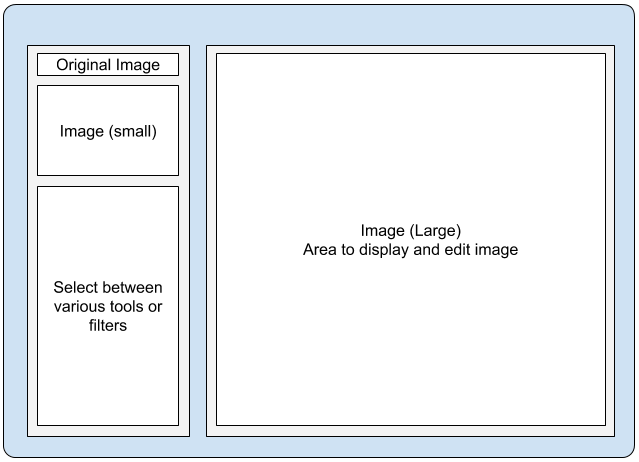 Planned GUI design sketch for the image editor
The large area on the right will display the target image. On the upper-left side of the GUI, a small label will let you keep track of what the original image looked like for reference. Underneath that, you have some basic options for editing the image.
Getting to Know the Frame Widget
Tkinter's Frame widget allows you to organize the GUI quickly. Frames are like boxes or mini-windows within the parent window. To arrange a frame in a Tkinter window, you can use any of the available geometry managers, pack, grid, or place, depending on your needs.
Here's a quick example where you place a frame on a window with a blue background so that you can distinguish the frame:
import tkinter as tk

root = tk.Tk()
root.title("Frame Demo")
root.config(bg="skyblue")

# Create Frame widget
frame = tk.Frame(root, width=200, height=200)
frame.pack(padx=10, pady=10)

root.mainloop()
Here, we import tkinter as tk and set up the root window. Then, we create an instance of Frame. To do this, we specify the width and height to 200 pixels. The root window has a sky-blue background, which allows you to see the new frame in white. You can also change the color of the Frame widget to whatever color you need.
Packaging Python Applications with PyInstaller by Martin Fitzpatrick — This step-by-step guide walks you through packaging your own Python applications from simple examples to complete installers and signed executables.
Next, we place frame in the main window using the pack geometry manager with a padding of 10 pixels in both directions, x and y.
Go ahead and run this demo app. You'll get a window that looks something like the following:
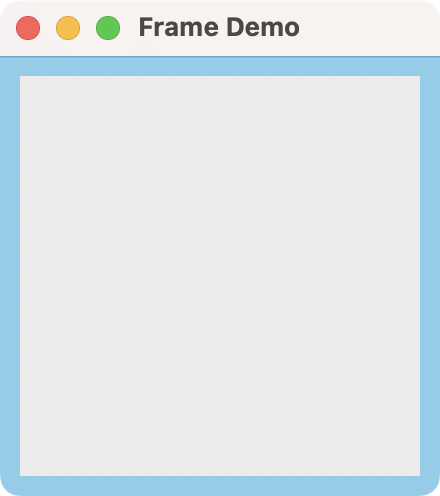 A Tkinter window with a blue background and a frame in white
That's it! You have created and added an empty frame to a Tkinter app using the pack geometry manager.
Creating Nested Frames
Now, let's take a quick look at adding a frame within another frame:
import tkinter as tk

root = tk.Tk()
root.title("Nested Frames")
root.config(bg="skyblue")

frame = tk.Frame(root, width=200, height=200)
frame.pack(padx=10, pady=10)

nested_frame = tk.Frame(frame, width=190, height=190, bg="red")
nested_frame.pack(padx=10, pady=10)

root.mainloop()
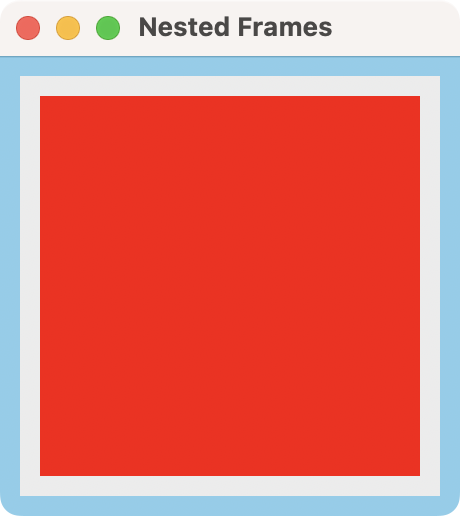 A Tkinter frame nested within another frame
To nest a frame within another frame, you need to set the outer frame as the parent or master widget of the inner frame. In this example, you set the inner frame background color to red so that you can differentiate it from the outer frame in white.
Create a GUI Layout With Frame
In this section, we'll use the Frame class to create a more elaborate GUI layout. We'll create a GUI for a basic image editor app. The app's GUI will look something like this:
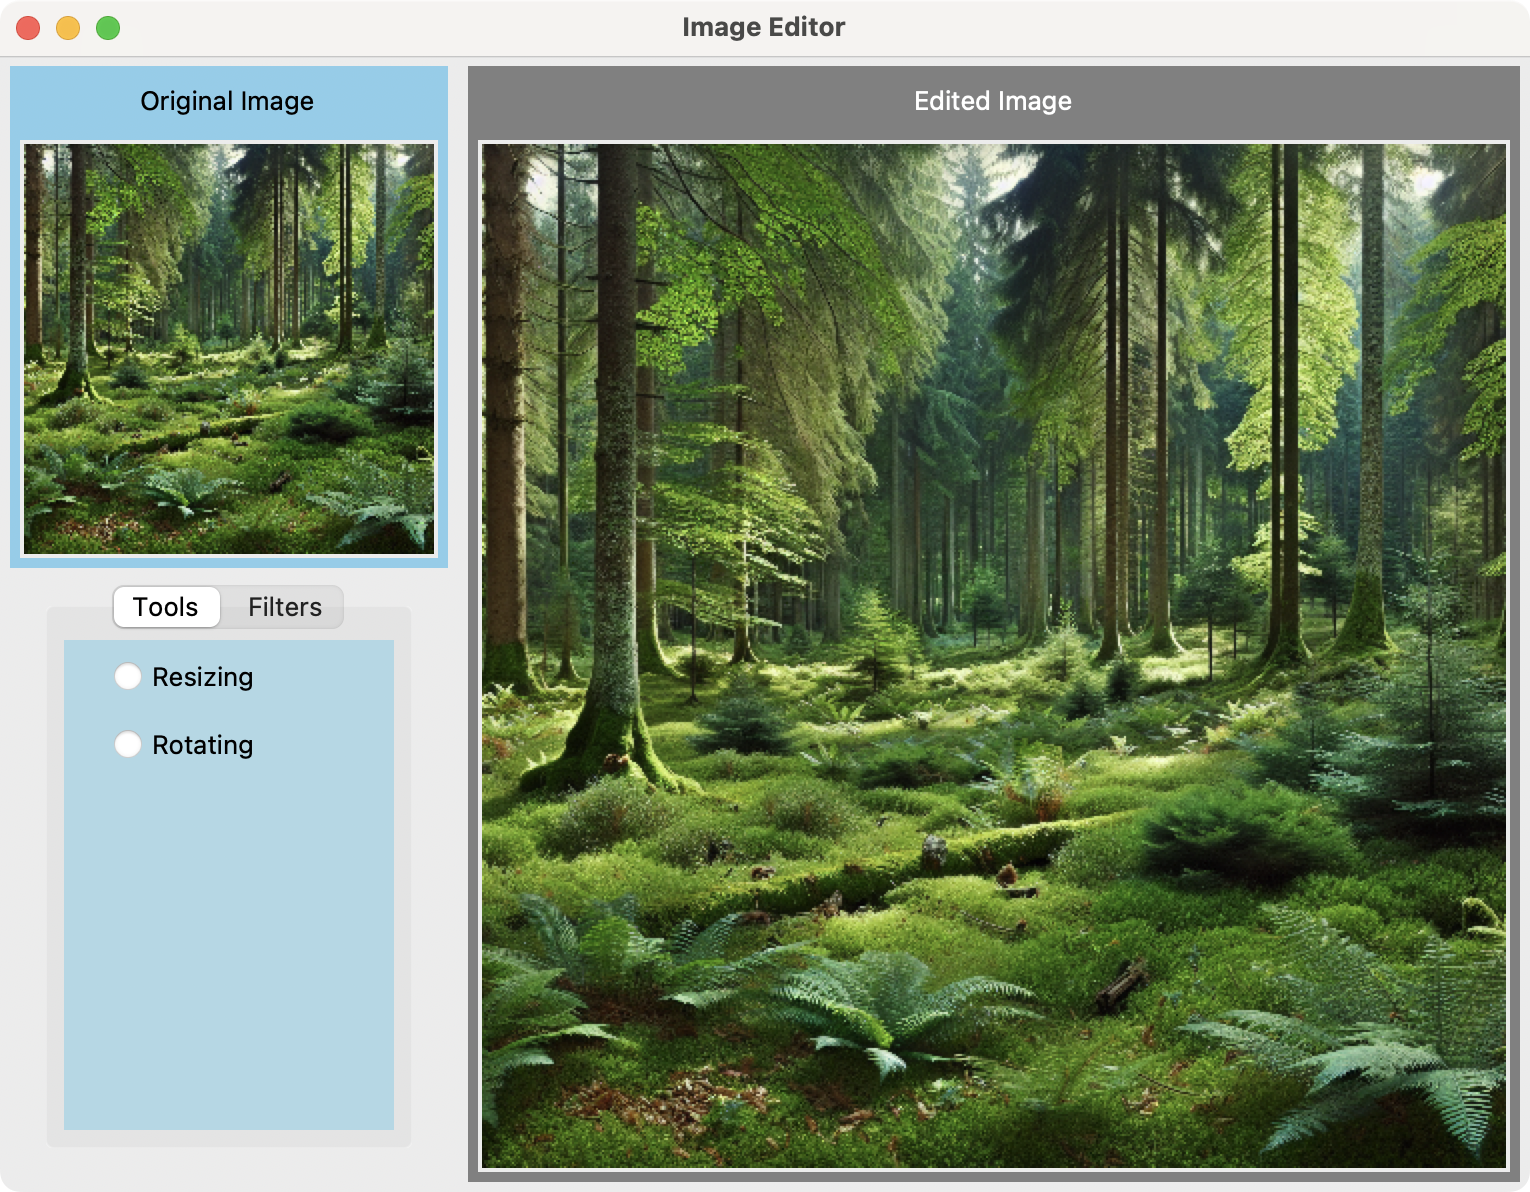 An Image Editor with a GUI layout based on Tkinter frames
Here's the code that implements this layout using Frame in Tkinter:
import tkinter as tk
from tkinter import ttk

root = tk.Tk()
root.title("Image Editor")

image = tk.PhotoImage(file="forest.png")

# Tools frame
tools_frame = tk.Frame(root, width=200, height=400, bg="skyblue")
tools_frame.pack(padx=5, pady=5, side=tk.LEFT, fill=tk.Y)
tk.Label(
    tools_frame,
    text="Original Image",
    bg="skyblue",
).pack(padx=5, pady=5)
thumbnail_image = image.subsample(5, 5)
tk.Label(tools_frame, image=thumbnail_image).pack(padx=5, pady=5)

# Tools and Filters tabs
notebook = ttk.Notebook(tools_frame)
notebook.pack(expand=True, fill="both")

tools_tab = tk.Frame(notebook, bg="lightblue")
tools_var = tk.StringVar(value="None")
for tool in ["Resizing", "Rotating"]:
    tk.Radiobutton(
        tools_tab,
        text=tool,
        variable=tools_var,
        value=tool,
        bg="lightblue",
    ).pack(anchor="w", padx=20, pady=5)

filters_tab = tk.Frame(notebook, bg="lightgreen")
filters_var = tk.StringVar(value="None")
for filter in ["Blurring", "Sharpening"]:
    tk.Radiobutton(
        filters_tab,
        text=filter,
        variable=filters_var,
        value=filter,
        bg="lightgreen",
    ).pack(anchor="w", padx=20, pady=5)

notebook.add(tools_tab, text="Tools")
notebook.add(filters_tab, text="Filters")

# Image frame
image_frame = tk.Frame(root, width=400, height=400, bg="grey")
image_frame.pack(padx=5, pady=5, side=tk.RIGHT)
display_image = image.subsample(2, 2)
tk.Label(
    image_frame,
    text="Edited Image",
    bg="grey",
    fg="white",
).pack(padx=5, pady=5)
tk.Label(image_frame, image=display_image).pack(padx=5, pady=5)

root.mainloop()
In this example, we create a GUI for a basic image editor using Tkinter. The code leverages the Frame widget to lay out the GUI into two main sections. The tools_frame section holds the image editing tools and filters. The image_frame section displays the edited image.
The tools_frame frame on the left side of the window (side=tk.LEFT) serves as a vertical container for tools and filters. It includes a label to display the original image and a Notebook widget for tabbed options. Inside the notebook, you use two additional Frame widgets, tools_tab, and filters_tab, to group related radio buttons. The tools tab contains options like "Resizing" and "Rotating", while the filters tab includes "Blurring" and "Sharpening".
The image_frame frame on the right (side=tk.RIGHT) displays the edited image. It contains a label for a generic title and another label for the target image.
By placing this frame adjacent to the tools_frame frame, the layout visually separates the workspace into two areas: one for interacting with tools and filters and the other for viewing the image.
Summary
We've learned that using the Frame widget is a great way to define a functional layout for a GUI app. When creating the layout, we should decide which geometry manager to use. In Tkinter, we have the pack, grid, or place geometry managers. You can also combine them according to your needs.
The Frame widget acts as a container that lets us group related widgets together and provide control over their arrangement. It's a great tool for creating well-organized GUIs in Tkinter.
Comprehensive code review • Bugfixes & improvements • Maintainability advice and architecture improvements • Design and usability assessment • Suggestions and tips to expand your knowledge • Packaging and distribution help for Windows, Mac & Linux • Find out more.