In this tutorial, we are going to take a look at how to arrange widgets with the grid geometry manager in Tkinter.
In similar tutorials, we talked about designing GUI layouts with other geometry managers. Check out the following tutorials to learn more:
So for this tutorial, we will jump right into more examples of designing GUIs with Tkinter and the grid geometry manager.
You can download the source code for all our articles.
The code for this article is in the folder tkinter/tutorials/create-ui-with-tkinter-grid-layout-manager
The grid Geometry Manager
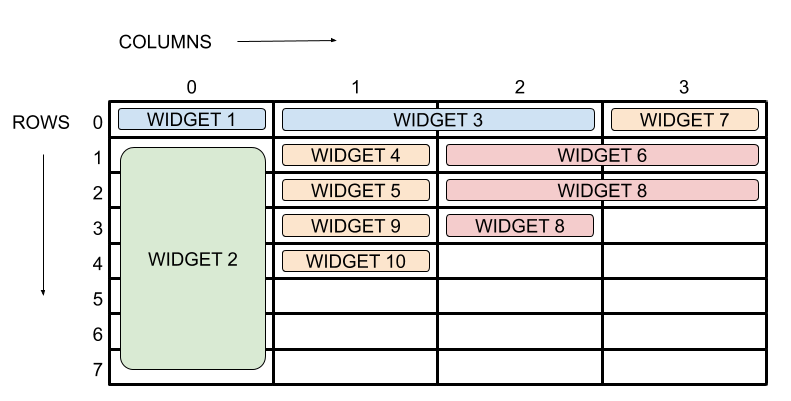
Using the grid geometry manager works like a matrix, with rows and columns. The upper left corner cell has a row index of 0 and a column index of 0. If you move to the right, you'll have cells (0, 1), (0, 2), and so on. If you move down, you'll have cells (1, 0), (2, 0), and so on.
Check out the diagram below for a visual example:
 The grid geometry manager in Tkinter
You can place widgets within cells by specifying their row and column indices. Now, let's examine some of the main arguments that can help you arrange widgets using the grid geometry manager:
row,column: specify the row and column indices to place a given widgetcolumnspan,rowspan: specify how many columns or rows a widget will occupypadx,pady: define the number of pixels for horizontal or vertical paddingipadx,ipady: specify how many pixels to use for internal paddingsticky: specifies which side of the cell the widget will stick to.
The sticky argument can take the values S, N, E, or W for south, north, east, and west. It can also be a combination of them NW, NE, SW, or SE. If you use W+E+N+S, then the widget will fill the cell. The default behavior is to center the widget within the cell.
A Demo GUI With grid
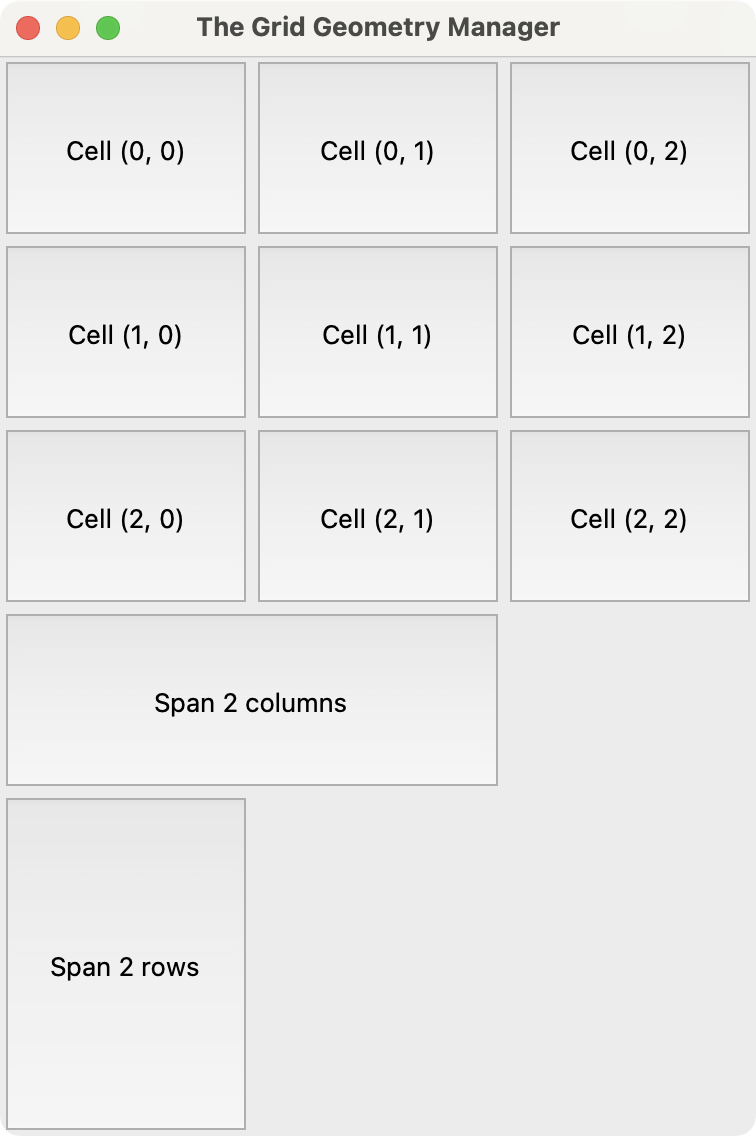
The following is just a quick example of how to lay out a window using the grid geometry manager in Tkinter. In the following GUI, we combine Button widgets to showcase some features of grid:
 Demo GUI using the grid geometry manager in Tkinter
Let's see what the code looks like:
import tkinter as tk

root = tk.Tk()
root.title("The Grid Geometry Manager")

for row in range(3):
    for col in range(3):
        tk.Button(
            root,
            text=f"Cell ({row}, {col})",
            width=10,
            height=5,
        ).grid(row=row, column=col)

tk.Button(root, text="Span 2 columns", height=5).grid(
    row=3,
    column=0,
    columnspan=2,
    sticky="ew",
)
tk.Button(root, text="Span 2 rows", width=10, height=10).grid(
    row=4,
    column=0,
    rowspan=2,
    sticky="ns",
)

root.mainloop()
In this example, we first run loops to create a 3 by 3 grid of buttons. The external loop defines the row indices, while the inner loop defines the column indices.
Next, we create a button that spans two columns and another button that spans two rows. To do this, we use the columnspan and rowspan arguments respectively.
A Profile Form With grid
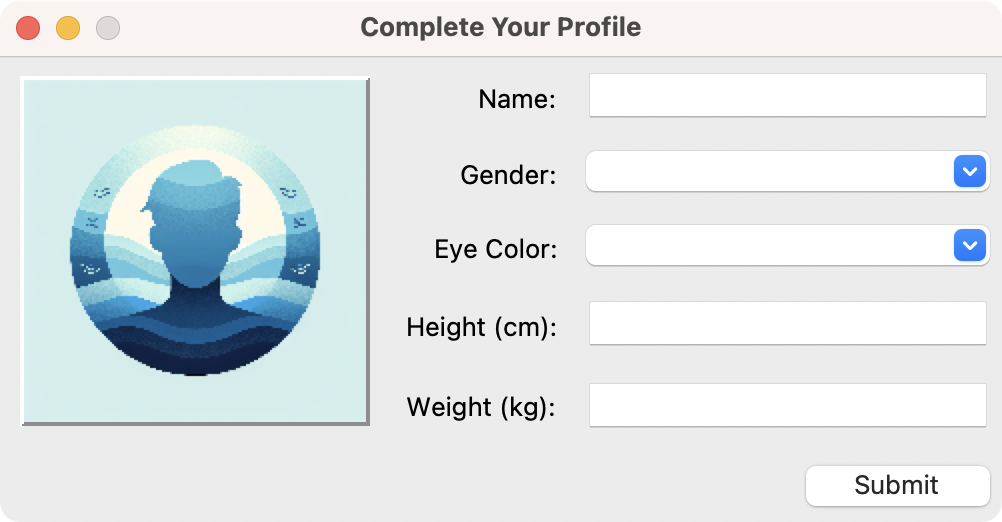
Now it's time for a more realistic example. Say that you need to create a dialog to collect personal information from the users registered in a given system. The dialog's GUI should look something like the following:
 A Profile form using the grid geometry manager in Tkinter
This GUI uses Label, Entry, and Menu widgets. To arrange the widgets and build the form layout, you'll use the grid geometry manager:
import tkinter as tk
from tkinter import ttk

root = tk.Tk()
root.title("Complete Your Profile")
root.resizable(False, False)

# Profile image
image = tk.PhotoImage(file="profile.png").subsample(6, 6)
tk.Label(
    root,
    image=image,
    relief=tk.RAISED,
).grid(row=0, column=0, rowspan=5, padx=10, pady=10)

# Name field
tk.Label(
    root,
    text="Name:",
).grid(row=0, column=1, padx=5, pady=5, sticky=tk.E)
name = ttk.Entry(root)
name.grid(row=0, column=2, padx=5, pady=5, ipadx=5)

# Gender field
tk.Label(
    root,
    text="Gender:",
).grid(row=1, column=1, padx=5, pady=5, sticky=tk.E)
gender = ttk.Combobox(
    root,
    values=["Male", "Female", "Other"],
    state="readonly",
)
gender.grid(row=1, column=2, padx=5, pady=5)

# Eye color field
tk.Label(
    root,
    text="Eye Color:",
).grid(row=2, column=1, padx=5, pady=5, sticky=tk.E)
eye_color = ttk.Combobox(
    root,
    values=["Brown", "Green", "Blue", "Black", "Other"],
    state="readonly",
)
eye_color.grid(row=2, column=2, padx=5, pady=5)

# Height field
tk.Label(
    root,
    text="Height (cm):",
).grid(row=3, column=1, padx=5, pady=5, sticky=tk.E)
height = ttk.Entry(root)
height.grid(row=3, column=2, padx=5, pady=5, ipadx=5)

# Weight field
tk.Label(
    root,
    text="Weight (kg):",
).grid(row=4, column=1, padx=5, pady=5, sticky=tk.E)
weight = ttk.Entry(root)
weight.grid(row=4, column=2, padx=5, pady=5, ipadx=5)

# Submit button
submit = ttk.Button(
    root,
    text="Submit",
)
submit.grid(row=5, column=2, padx=5, pady=5, sticky=tk.E)

root.mainloop()
In this code, we create a basic GUI for a profile form that allows the user to input their name, gender, eye color, height, and weight.
The first widget in this code is a label with a placeholder profile picture. To create the image, we use the tk.PhotoImage, which loads the image file named profile.png. Then, we position this label in the first row (row=0) and first column (column=0) of the grid. The label spans 5 rows to accommodate the rest of the form elements on its right side.
Next, we create a label with the text "Name:" in the first row and second column, aligning it to the right by setting sticky to tk.E. The name entry provides an input field for the user's name. We place the name entry field in the first row, third column of the grid.
Then, in the second row, we have a label for "Gender". To the right of this label, we have a combo box, which provides a dropdown list of gender options. The grid geometry manager positions the gender dropdown in the second row and third column.
We create similar combinations of widgets for the Eye Color, Height, and Weight fields. We use the grid geometry manager to position each widget in the correct cell.
Finally, we add a Submit button, which we place in the sixth row, third column, aligning it to the right with sticky=tk.E.
Summary
In this tutorial, we learned how to use the grid geometry manager to arrange widgets in Tkinter-based GUIs.
First, we looked at a few arguments to grid() that can help us manipulate the geometry or layout of our GUIs. Then, we built a generic GUI to help us practice the concepts of geometry management with grid in Tkinter.
Finally, we create a more realistic form using the grid geometry manager for arranging widgets and building the GUI.
PyQt/PySide 1:1 Coaching with Martin Fitzpatrick
Save yourself time and frustration. Get one on one help with your Python GUI projects. Working together with you I'll identify issues and suggest fixes, from bugs and usability to architecture and maintainability.