I have a QTableView with a custom QAbstractTableModel, and I want to add a column of checkboxes. Should I create a custom delegate class for the checkbox, or is there a simpler way to do this?
You can use a custom delegate to draw a checkbox widget, but you don't have to. Qt provides a built-in mechanism for this: Qt.CheckStateRole. By returning Qt.Checked or Qt.Unchecked from your model's data() method, Qt will render a checkbox automatically — no delegate required.
Let's walk through how this works, starting with a simple display and then adding some interactivity.
Displaying checkboxes using Qt.CheckStateRole
The simplest way to add checkboxes to a QTableView is to handle Qt.CheckStateRole in your model's data() method. When Qt asks your model for data with this role, returning Qt.Checked or Qt.Unchecked tells Qt to draw a checkbox in that cell.
Here's a minimal example that shows a checked checkbox in every cell:
def data(self, index, role):
    if role == Qt.DisplayRole:
        value = self._data[index.row()][index.column()]
        return str(value)

    if role == Qt.CheckStateRole:
        return Qt.Checked
This produces a table where every cell has both text and a checked checkbox:
In a real application, you would return Qt.Checked or Qt.Unchecked based on actual boolean values in your data. You might also restrict checkboxes to a specific column — for example, one that holds True/False values — rather than showing them everywhere.
Making checkboxes toggleable
Displaying checkboxes is a good start, but users will expect to be able to click them. To make checkboxes interactive, you need three things:
- A data store for the check state — a list (or column) that tracks which items are checked.
Qt.ItemIsUserCheckablereturned fromflags()— this tells Qt that the cell supports toggling.- A
setData()implementation forQt.CheckStateRole— this stores the updated state when the user clicks a checkbox.
Let's put all of this together in a complete example.

Purchasing Power Parity
Developers in [[ country ]] get [[ discount.discount_pc ]]% OFF on all books & courses with code [[ discount.coupon_code ]]import sys
from PyQt6 import QtCore, QtGui, QtWidgets
from PyQt6.QtCore import Qt
class TableModel(QtCore.QAbstractTableModel):
def __init__(self, data, checked):
super().__init__()
self._data = data
self._checked = checked
def data(self, index, role):
if role == Qt.ItemDataRole.DisplayRole:
value = self._data[index.row()][index.column()]
return str(value)
if role == Qt.ItemDataRole.CheckStateRole:
    checked = self._checked[index.row()][index.column()]
    if checked:
        return Qt.CheckState.Checked
    return Qt.CheckState.Unchecked
def setData(self, index, value, role):
if role == Qt.ItemDataRole.CheckStateRole:
checked = value == Qt.CheckState.Checked.value
self._checked[index.row()][index.column()] = checked
self.dataChanged.emit(index, index, [role])
return True
return False
def rowCount(self, index):
return len(self._data)
def columnCount(self, index):
return len(self._data[0])
def flags(self, index):
return (
Qt.ItemFlag.ItemIsSelectable
| Qt.ItemFlag.ItemIsEnabled
| Qt.ItemFlag.ItemIsUserCheckable
)
class MainWindow(QtWidgets.QMainWindow):
def __init__(self):
super().__init__()
self.table = QtWidgets.QTableView()
data = [
[1, 9, 2],
[1, 0, -1],
[3, 5, 2],
[3, 3, 2],
[5, 8, 9],
]
checked = [
[True, True, True],
[False, False, False],
[True, False, False],
[True, False, True],
[False, True, True],
]
self.model = TableModel(data, checked)
self.table.setModel(self.model)
self.setCentralWidget(self.table)
app = QtWidgets.QApplication(sys.argv)
window = MainWindow()
window.show()
app.exec()
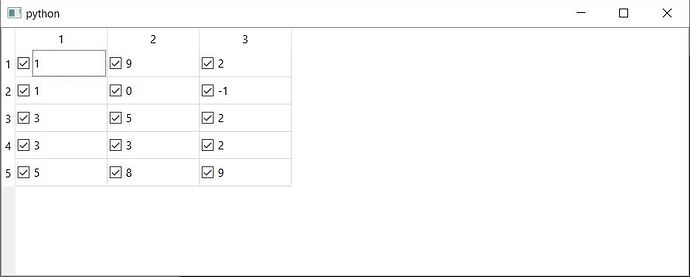
Run this and you'll see a table with checkboxes next to every value. Clicking any checkbox toggles it on and off, and the underlying checked list is updated accordingly.
Storing check state separately
The checked list mirrors the structure of the data list — each cell has a corresponding True or False value. This keeps the boolean check state separate from the data.
You could store it in the same data structure, as a [bool, data_value] nested list, or tuple if you like.
Returning the check state in data()
When Qt asks for Qt.ItemDataRole.CheckStateRole, we look up the boolean value for that cell and return either Qt.CheckState.Checked or Qt.CheckState.Unchecked:
if role == Qt.ItemDataRole.CheckStateRole:
checked = self._checked[index.row()][index.column()]
if checked:
return Qt.CheckState.Checked
return Qt.CheckState.Unchecked
For these return X if True, otherwise return Y type returns you can also use and X if bool else Y expression.
if role == Qt.ItemDataRole.CheckStateRole:
    checked = self._checked[index.row()][index.column()]
    return Qt.CheckState.Checked if checked else Qt.CheckState.Unchecked
Handling user clicks in setData()
When the user clicks a checkbox, Qt calls setData() with the new value and the Qt.ItemDataRole.CheckStateRole role. We compare the incoming value to Qt.CheckState.Checked.value to determine whether the box was checked or unchecked, then store the result:
def setData(self, index, value, role):
    if role == Qt.ItemDataRole.CheckStateRole:
        checked = value == Qt.CheckState.Checked.value
        self._checked[index.row()][index.column()] = checked
        self.dataChanged.emit(index, index, [role])
        return True
    return False
Notice the self.dataChanged.emit(...) call — this notifies the view that the data has changed so it can redraw the cell. Always emit this signal when you modify data in setData().
Enabling user interaction with flags()
The flags() method tells Qt what the user can do with each cell. Including Qt.ItemFlag.ItemIsUserCheckable is what makes the checkbox clickable:
def flags(self, index):
    return (
        Qt.ItemFlag.ItemIsSelectable
        | Qt.ItemFlag.ItemIsEnabled
        | Qt.ItemFlag.ItemIsUserCheckable
    )
Without this flag, the checkbox will still appear (because you're returning data for CheckStateRole), but the user won't be able to toggle it.
Showing checkboxes in only one column
In many applications, you only want checkboxes in a specific column. You can achieve this by checking index.column() in your data() and flags() methods. For example, to show checkboxes only in column 2:
def data(self, index, role):
    if role == Qt.ItemDataRole.DisplayRole:
        value = self._data[index.row()][index.column()]
        return str(value)

    if role == Qt.ItemDataRole.CheckStateRole:
        if index.column() == 2:
            checked = self._checked[index.row()]
            if checked:
                return Qt.CheckState.Checked
            return Qt.CheckState.Unchecked

def flags(self, index):
    flags = Qt.ItemFlag.ItemIsSelectable | Qt.ItemFlag.ItemIsEnabled
    if index.column() == 2:
        flags |= Qt.ItemFlag.ItemIsUserCheckable
    return flags
In this case, self._checked would be a simple one-dimensional list (one boolean per row) rather than a 2D list.
Summary
To add checkboxes to a QTableView with a custom QAbstractTableModel:
- Handle
Qt.ItemDataRole.CheckStateRoleindata()to display checkboxes based on boolean values. - Return
Qt.ItemFlag.ItemIsUserCheckablefromflags()to make checkboxes interactive. - Implement
setData()forQt.ItemDataRole.CheckStateRoleto store the updated state when the user clicks, and emitdataChangedto keep the view in sync.
This approach works natively with Qt's model/view architecture and avoids the complexity of writing a custom delegate. For a more complete guide to displaying data in table views — including using numpy and pandas data sources — see our QTableView with ModelViews tutorial. If you want to show only an icon without text in specific cells, see how to show only an icon in a QTableView cell. You can also learn how to create your own custom widgets for more advanced UI needs.
Create GUI Applications with Python & Qt6 by Martin Fitzpatrick — (PySide6 Edition) The hands-on guide to making apps with Python — Save time and build better with this book. Over 15K copies sold.
