Kivy is an open-source Python library for building graphical user interfaces (GUIs). It supports cross-platform development for the desktop as well as the creation of multi-touch apps for mobile devices.
Kivy apps can run across several platforms, including Windows, Linux, macOS, Android, and iOS. One place where Kivy particularly shines is in game development. By combining Kivy's 2D physics capabilities with a simple physics engine, you can create impressive 2D simulations and games.
In this tutorial, you'll learn how to build Python GUI applications with Kivy. We'll cover installing Kivy, creating a simple app, working with widgets and layouts, drawing 2D shapes on the Kivy canvas, and styling your interfaces with the Kv language.
To get the most out of this tutorial, you should have basic knowledge of Python. Previous knowledge of general concepts of GUI programming, such as event loops, widgets, layouts, and forms, is also a plus.
There are many different Python GUI libraries available, and choosing one for your project can be a really tough and confusing decision to make. For advice see our guide Which Python GUI Library to Choose for your Project.
Let's get started. We'll first take a few moments to install and set up Kivy on your computer.
You can download the source code for all our articles.
The code for this article is in the folder kivy/tutorials/getting-started-kivy
How to Install Kivy for Python
Before using a third-party library like Kivy, we must install it in our working environment. Installing Kivy is as quick as running the python -m pip install kivy command on your terminal or command line. This command will install the library from the Python package index (PyPI).
Note that as of the time of writing this tutorial, Kivy only officially supports Python versions up to 3.10. For detailed information about installing Kivy, visit the official installation guide.
However, when working with third-party libraries, it's good practice to create a Python virtual environment, which is a self-contained Python installation for a particular version of Python that you can use to isolate the dependencies of a given project.
To create a virtual environment, you'll typically use Python's venv module from the standard library. Fire up a command-line window and type in the following command in your working directory.
$ python -m venv kivy_env
This command will create a folder called kivy_env containing a Python virtual environment. The Python version in this environment is the same as you get when you run python --version on your command line.
Next, we need to activate the virtual environment. Use the appropriate command, depending on whether you're on Windows, macOS, or Linux:
- Windows
- macOS
- Linux
C:/> .\kivy_env\Scripts\activate
$ source kivy_env/bin/activate
$ source kivy_env/bin/activate
Once that's confirmed to be working, you can then install Kivy within the virtual environment you just created by running the following:
Packaging Python Applications with PyInstaller by Martin Fitzpatrick — This step-by-step guide walks you through packaging your own Python applications from simple examples to complete installers and signed executables.
(kivy_env) $ python -m pip install kivy
With this command, you'll install Kivy in your active Python virtual environment, so you're now ready to go.
You can also install Kivy by downloading its source code directly from GitHub and doing a manual installation on the command line. For more information on following this installation path, check out the section about installing Kivy from source in the documentation.
Writing Your First Kivy GUI App in Python
Without further ado, let's get right into creating our first app with Kivy and Python. For this app, we will use a Label object to display the traditional "Hello, World!" message on our screen. To write a minimal Kivy GUI app, we need to run a few steps:
- Subclassing the
Appclass - Implementing its
build()method, which returns aWidgetinstance - Instantiating this class and calling its
run()method
Let's start by importing the required classes. For our example, we only need the App and Label classes. Create a Python file called app.py and add the following imports:
from kivy.app import App
from kivy.uix.label import Label
The App class provides the base functionality required to create GUI apps with Kivy, such as managing the event loop. Meanwhile, the Label class will work as the root visual element or widget for our GUI.
Next, we can create our subclass of App. We have called it MainApp here. However, you can call it whatever you like:
from kivy.app import App
from kivy.uix.label import Label

class MainApp(App):
    def build(self):
        return Label(text="Hello, World!")
This subclass uses the concept of inheritance in object-oriented programming (OOP) in Python. All the attributes and methods defined in the superclass, App, are automatically inherited by the subclass, MainApp.
In order for our app to create a UI, we need to define a build() method. In build(), we create and return either a widget or layout, which will be the root object in our UI structure.
The build() method is the entry point to whatever will be drawn on the screen. In our example, it creates and returns a label with the "Hello, World!" text on it.
Finally, we need to create an instance of MainApp and call its run() method:
from kivy.app import App
from kivy.uix.label import Label

class MainApp(App):
    def build(self):
        return Label(text="Hello, World!")

MainApp().run()
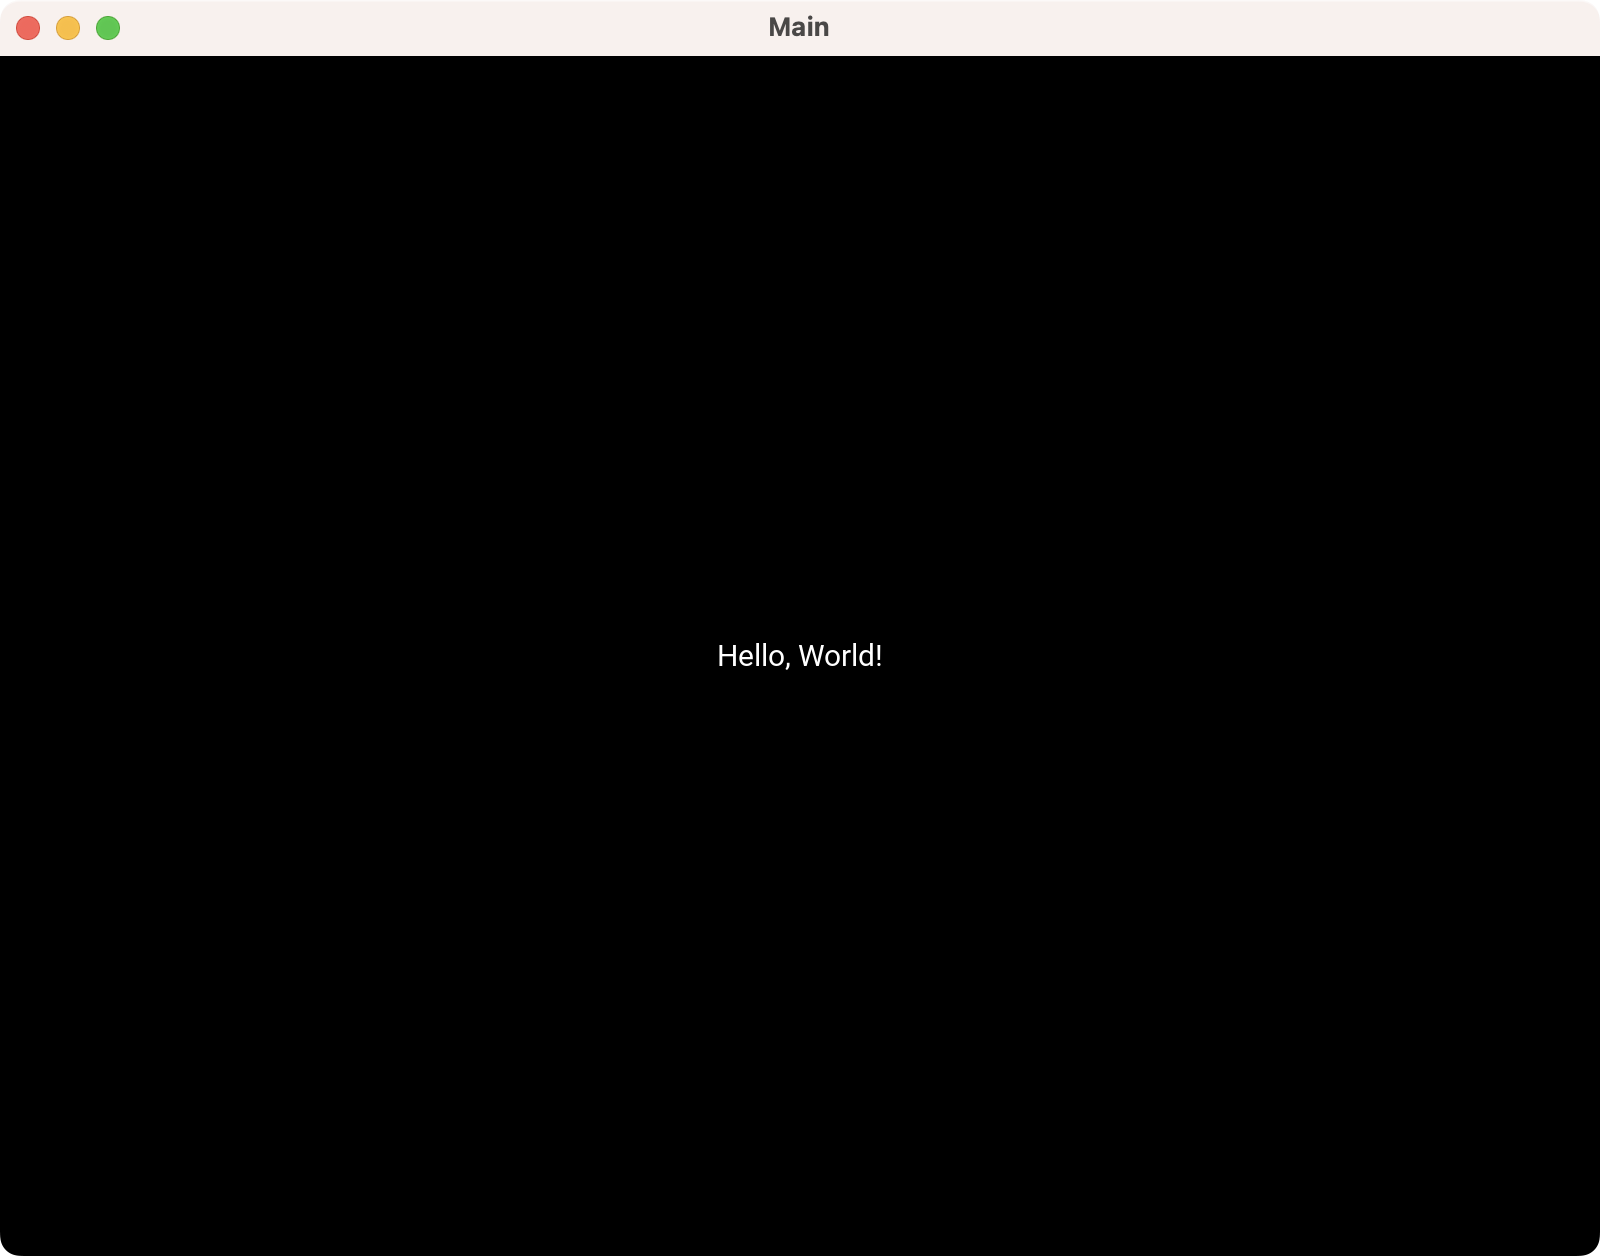
In the final line, we create an instance of MainApp and call its run() method. This method launches the application and runs its main loop. That's it! We're ready to run our first Kivy app. Open your command line and run the following command:
$ python app.py
You'll see the following window on your screen:
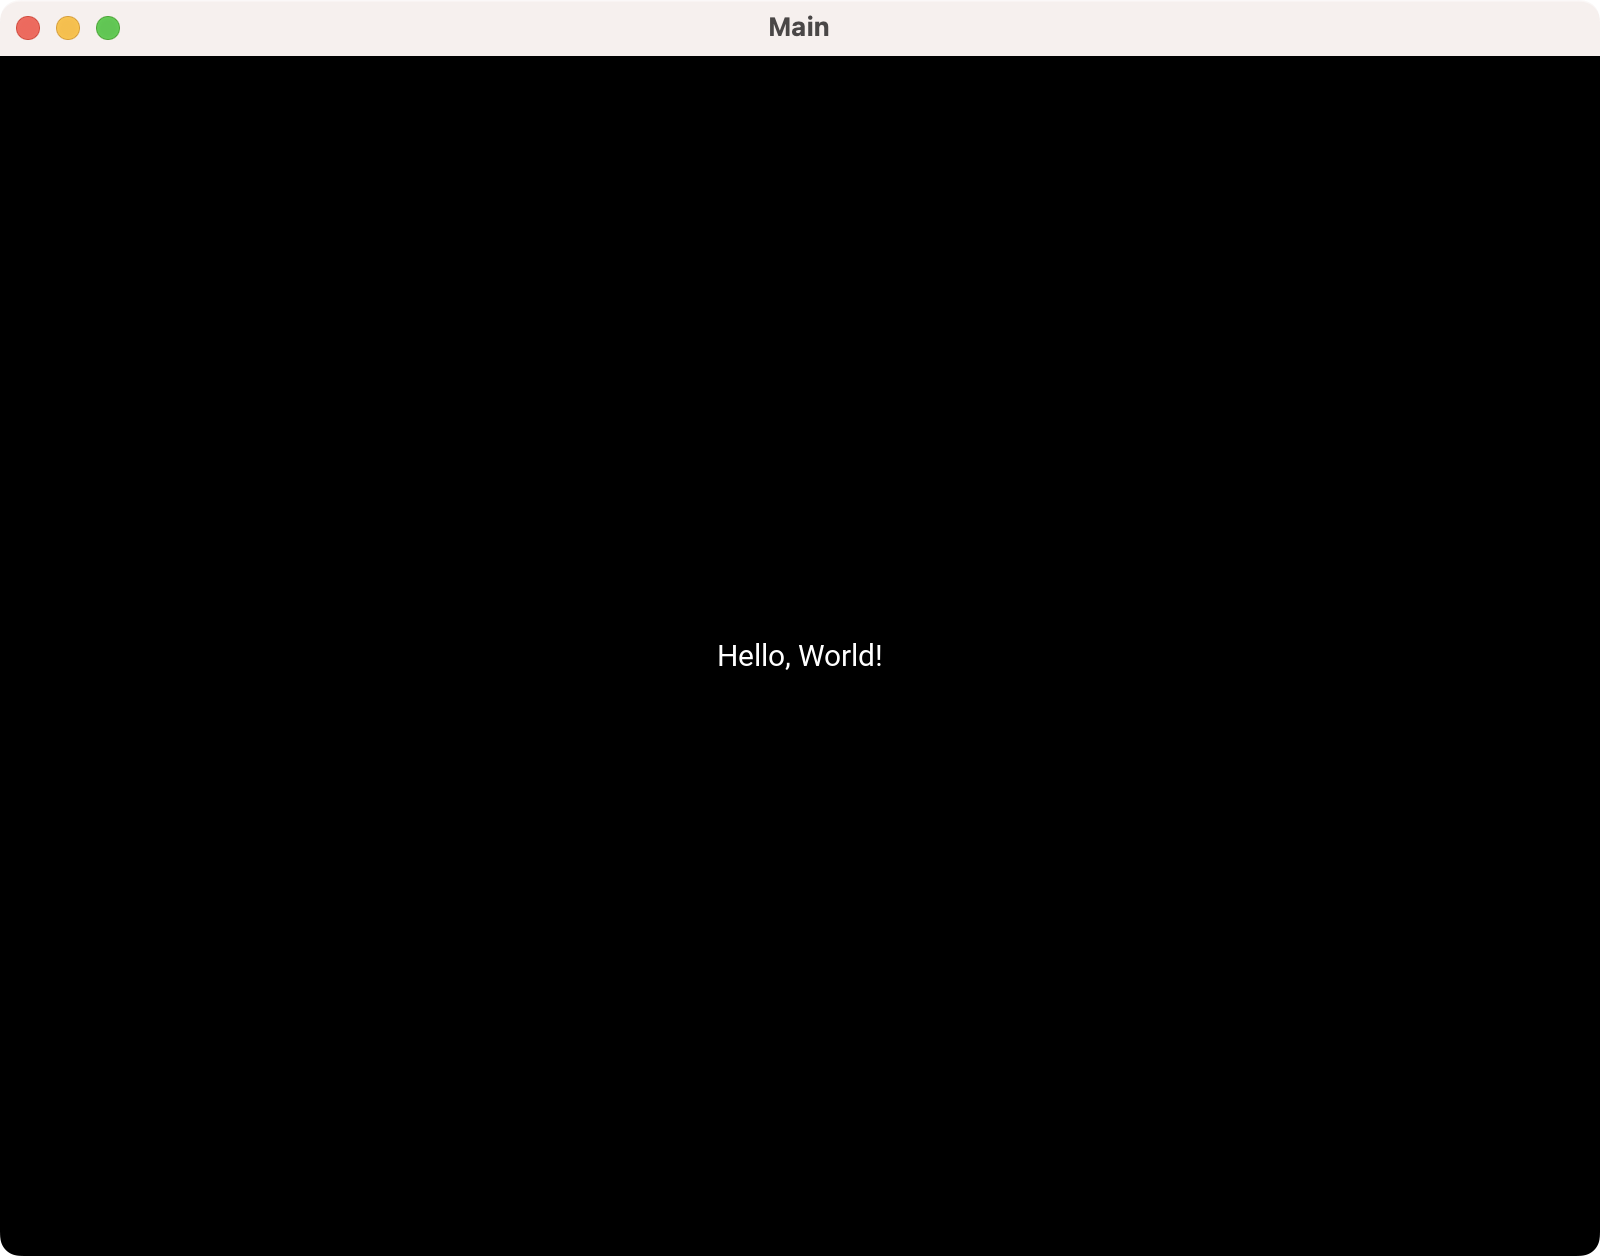 First Kivy GUI Application
Great! You've just written your first Kivy GUI app using Python. It shows a black window with the message "Hello, World!" In its center. Note that the window's title bar shows the title Main, which comes from the name of your App subclass.
The next step is to explore some other essential features of Kivy that will allow you to write fully-functional GUI apps with this library.
Exploring Kivy Widgets and Layouts
In the previous section, we mentioned widgets and layouts a few times -- you may be wondering what they are! A widget is an element of a GUI that displays information or provides a specific function. They allow your users to interact with your app's GUI.
A layout, on the other hand, provides a way of arranging widgets into a particular structure in your application's windows. A layout can also give certain behaviors to widgets that belong to it, like the ScatterLayout, which enables multi-touch resizing of a child widget.
In Kivy, you'll find widget and layout classes in their corresponding module under the kivy.uix module. For example, to import the Button class, we can use:
from kivy.uix.button import Button
In Kivy, widgets and layout classes are usually located in modules named after the class itself. However, the class uses CamelCase, and the containing module uses lower casing.
For example, take the following imports:
# Widgets
from kivy.uix.label import Label
from kivy.uix.image import Image

# Layouts
from kivy.uix.boxlayout import BoxLayout
from kivy.uix.floatlayout import FloatLayout
You'll find some exceptions to this naming convention. For example:
from kivy.uix.image import AsyncImage
from kivy.uix.screenmanager import FadeTransition
This commonly happens with modules that define multiple and closely related classes, such as Image and AsyncImage.
Common Kivy Widgets
Widgets are the building blocks of Kivy-based GUIs. Some of the most commonly used GUI widgets in Kivy apps include the following:
Widgetis the base class required for creating widgets.Labelis used for rendering text on windows and dialogs.TextInputprovides a box for editable plain text.Buttontriggers actions when the user presses it.CheckBoxprovides a two-state button that can be either checked or unchecked.Imageis used to display an image on your GUIs.ProgressBarvisualizes the progress of some tasks.DropDownprovides a versatile drop-down list that can list different widgets.
With these widgets and some others that Kivy provides, you can build complex and user-friendly interfaces for your applications.
Kivy Layout Classes
Kivy also has a rich set of layout classes that allows you to arrange your widgets coherently and functionally to build up GUIs. Some examples of common layouts include:
BoxLayoutarranges widgets sequentially in either a vertical or horizontal fashion.FloatLayoutarranges widgets in a specific position on the containing window.RelativeLayoutarranges child widgets according to relative positions.GridLayoutarranges widgets in a grid defined by the rows and columns.PageLayoutcreates multi-page layouts in a way that allows flipping from one page to another.ScatterLayoutpositions its child widgets similarly to aRelativeLayout.StackLayoutstacks in a left-to-right and then top-to-bottom order, or top-to-bottom then left-to-right order.
You can combine and nest layouts together to build complex user interfaces.
Using Kivy Widgets and Layouts: A Practical Example
As an example of how to use widgets and layouts in Kivy, let's look at a commonly used layout class: the GridLayout. With this class, we can create a grid of rows and columns. Each cell of the grid has a unique pair of zero-based coordinates. Consider the following example:
from kivy.app import App
from kivy.uix.button import Button
from kivy.uix.gridlayout import GridLayout

ROWS = COLS = 3

class GridApp(App):
    def build(self):
        root = GridLayout(rows=ROWS, cols=COLS)
        for i in range(ROWS):
            for j in range(COLS):
                root.add_widget(Button(text=f"({i}, {j})"))
        return root

GridApp().run()
In the build() method, we instantiate the GridLayout with three rows and three columns. Then use a for loop to add button widgets to the layout using the add_widget() method.
When we run this app, we get the window that is shown below:
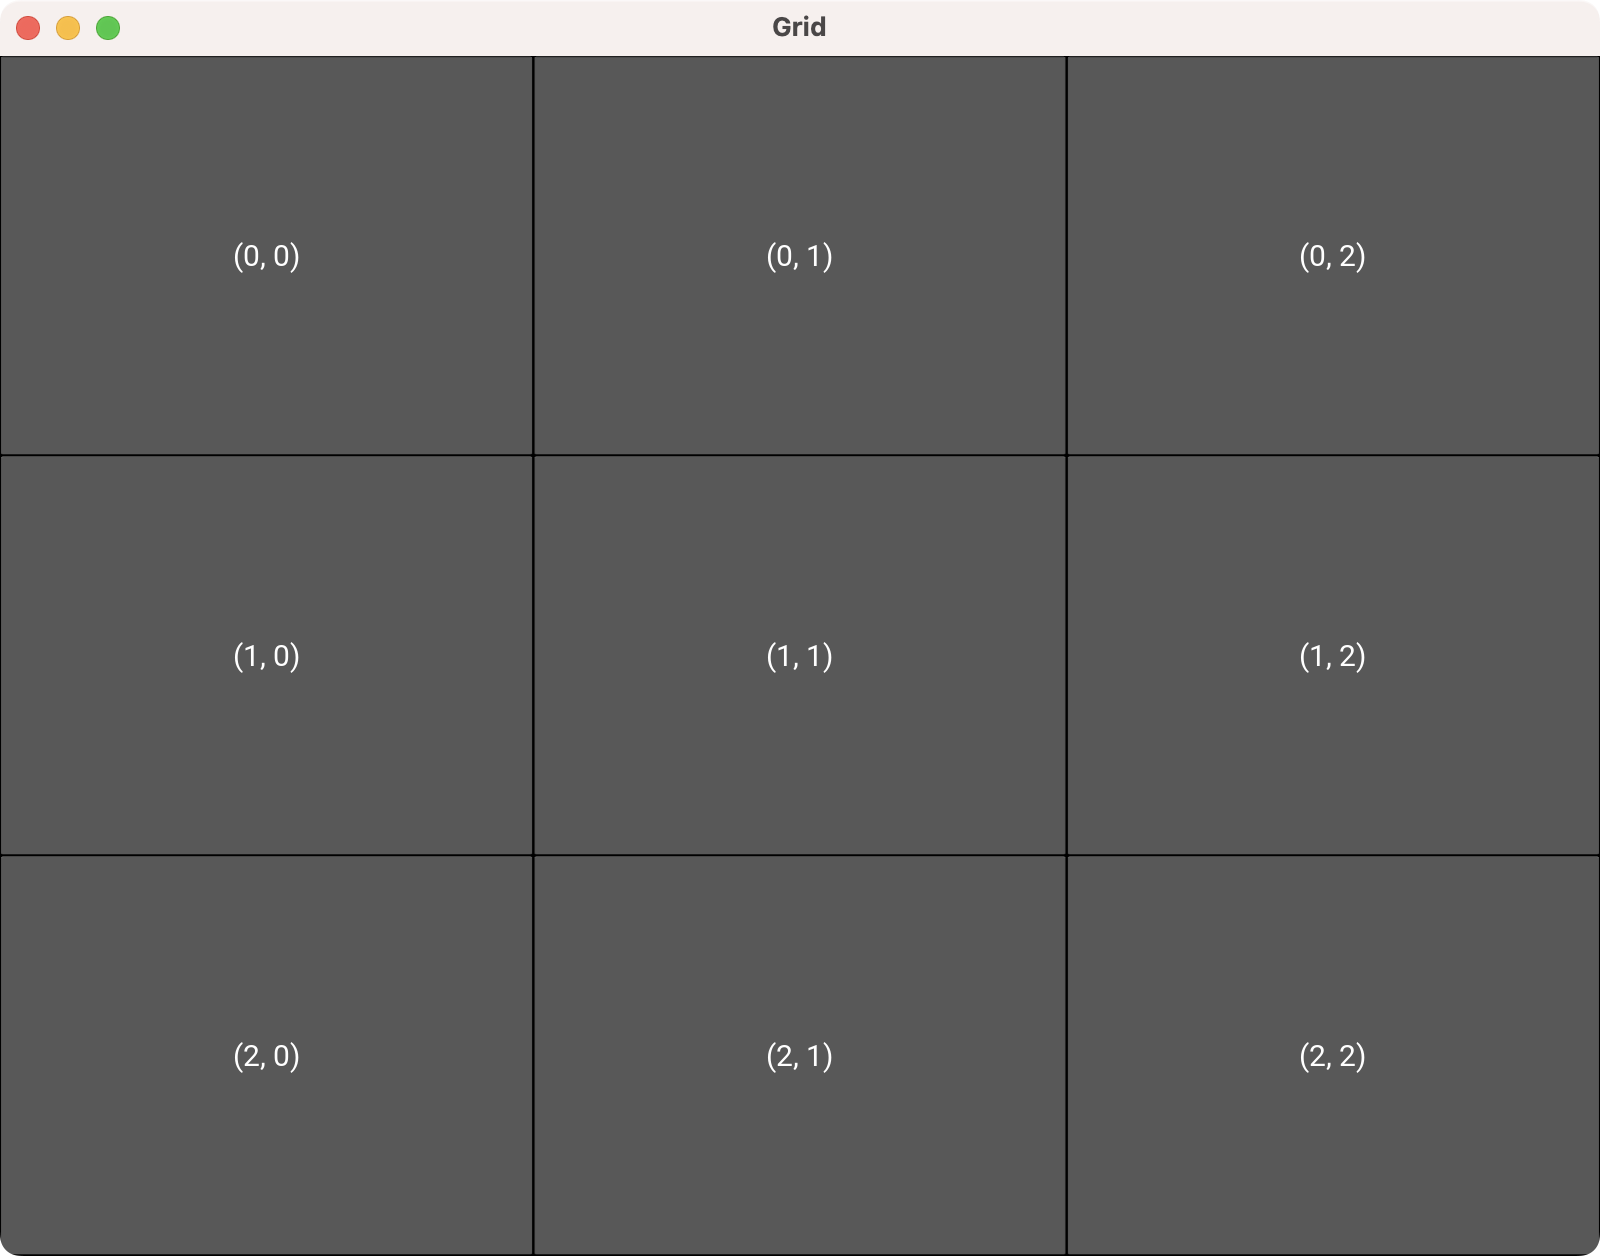 Grid Layout in Kivy
Each button on the grid shows its corresponding pair of coordinates. The first coordinate represents the row, while the second represents the column. Like the rest of the layout classes, GridLayout can take several arguments that you can use to fine-tune its behavior.
Drawing 2D Shapes in Kivy With the canvas Property
To deeply customize a GUI or design a 2D video game, we may need to draw 2D shapes, such as a rectangle, circle, ellipse, or triangle. Doing this is straightforward in Kivy. The library provides a rich set of shape classes that you can find in the kivy.graphics package. Some of these classes include:
To draw a shape on the screen with Kivy, we need to use the canvas property of a Widget object. This property holds an instance of the Canvas class, which lives in the kivy.graphics package.
Let's see how this works with an example of a white square drawn on the screen:
from kivy.app import App
from kivy.core.window import Window
from kivy.graphics import Rectangle
from kivy.uix.widget import Widget

class CanvasApp(App):
    def build(self):
        root = Widget()
        size = 200
        width, height = Window.size
        pos_x = 1/2 * (width - size)
        pos_y = 1/2 * (height - size)
        with root.canvas:
            Rectangle(size=[size, size], pos=[pos_x, pos_y])
        return root

CanvasApp().run()
Inside build(), we create the root widget and define the size of our shape. It'll be a square shape, so each side is equal.
Next, we compute the coordinates to center our shape on the window. The coordinates passed when creating the shape are for the top left corner of the window.
To calculate the correct values, we take the width and height of our main window, halving these values to get the center. We then subtract half of the width or height of our shape to position the center of our shape in the middle of the window. This can be simplified to 1/2 * (width - size) or 1/2 * (height - size). We store the resulting top left coordinates in pos_x and pos_y.
Next, we use the canvas property of our root window to draw the shape. This property supports the with statement, which provides the appropriate context for creating our shapes. Inside the with block, we define our Rectangle instance with the size and pos arguments.
Finally, we return the root widget as expected. The final line of code creates the app instance and calls its run() method. If you run this app from your command line, then you'll get the following window on the screen:
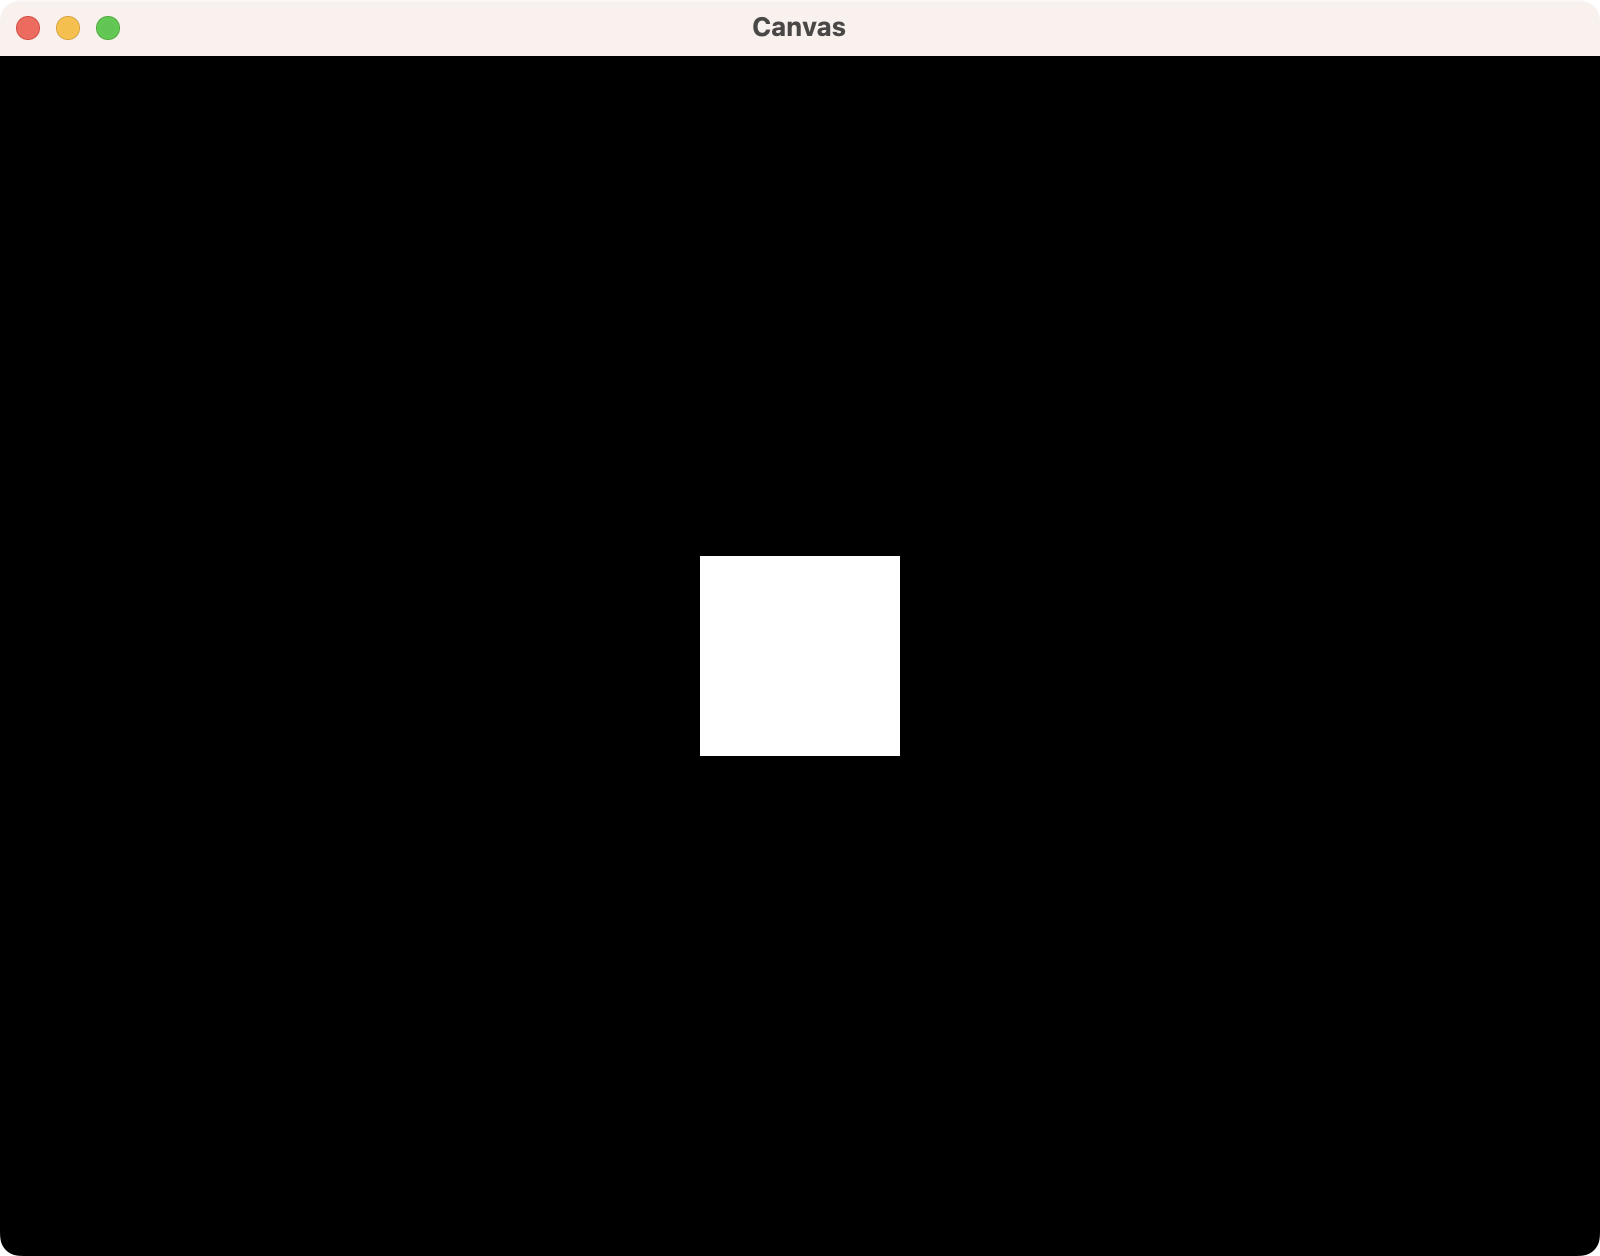 Drawing Shapes in Kivy With Canvas
Cool! You've drawn a square on your Kivy app. The computed coordinates place the square in the center of the window. The default color is white. However, we can change it:
# ...
from kivy.graphics import Color, Rectangle
from kivy.uix.widget import Widget
# ...

class CanvasApp(App):
    def build(self):
        # ...
        with root.canvas:
            Color(1, 1, 0, 1)
            Rectangle(size=[size, size], pos=[pos_x, pos_y])
 # ...
In this code snippet, we have added an import for the Color class from the graphics package. The Color class accepts four numeric arguments between 0 and 1 representing the red, green, blue, and transparency components of our target color.
For example, the values (1, 0, 0, 1) represent an entirely red and fully opaque color. The value (0, 1, 0, 0.5) is fully green, half opaque, and half transparent. Consequently, the value (1, 1, 0, 1) gives a fully opaque yellow color. So, if you run the app, then you'll get the following output:
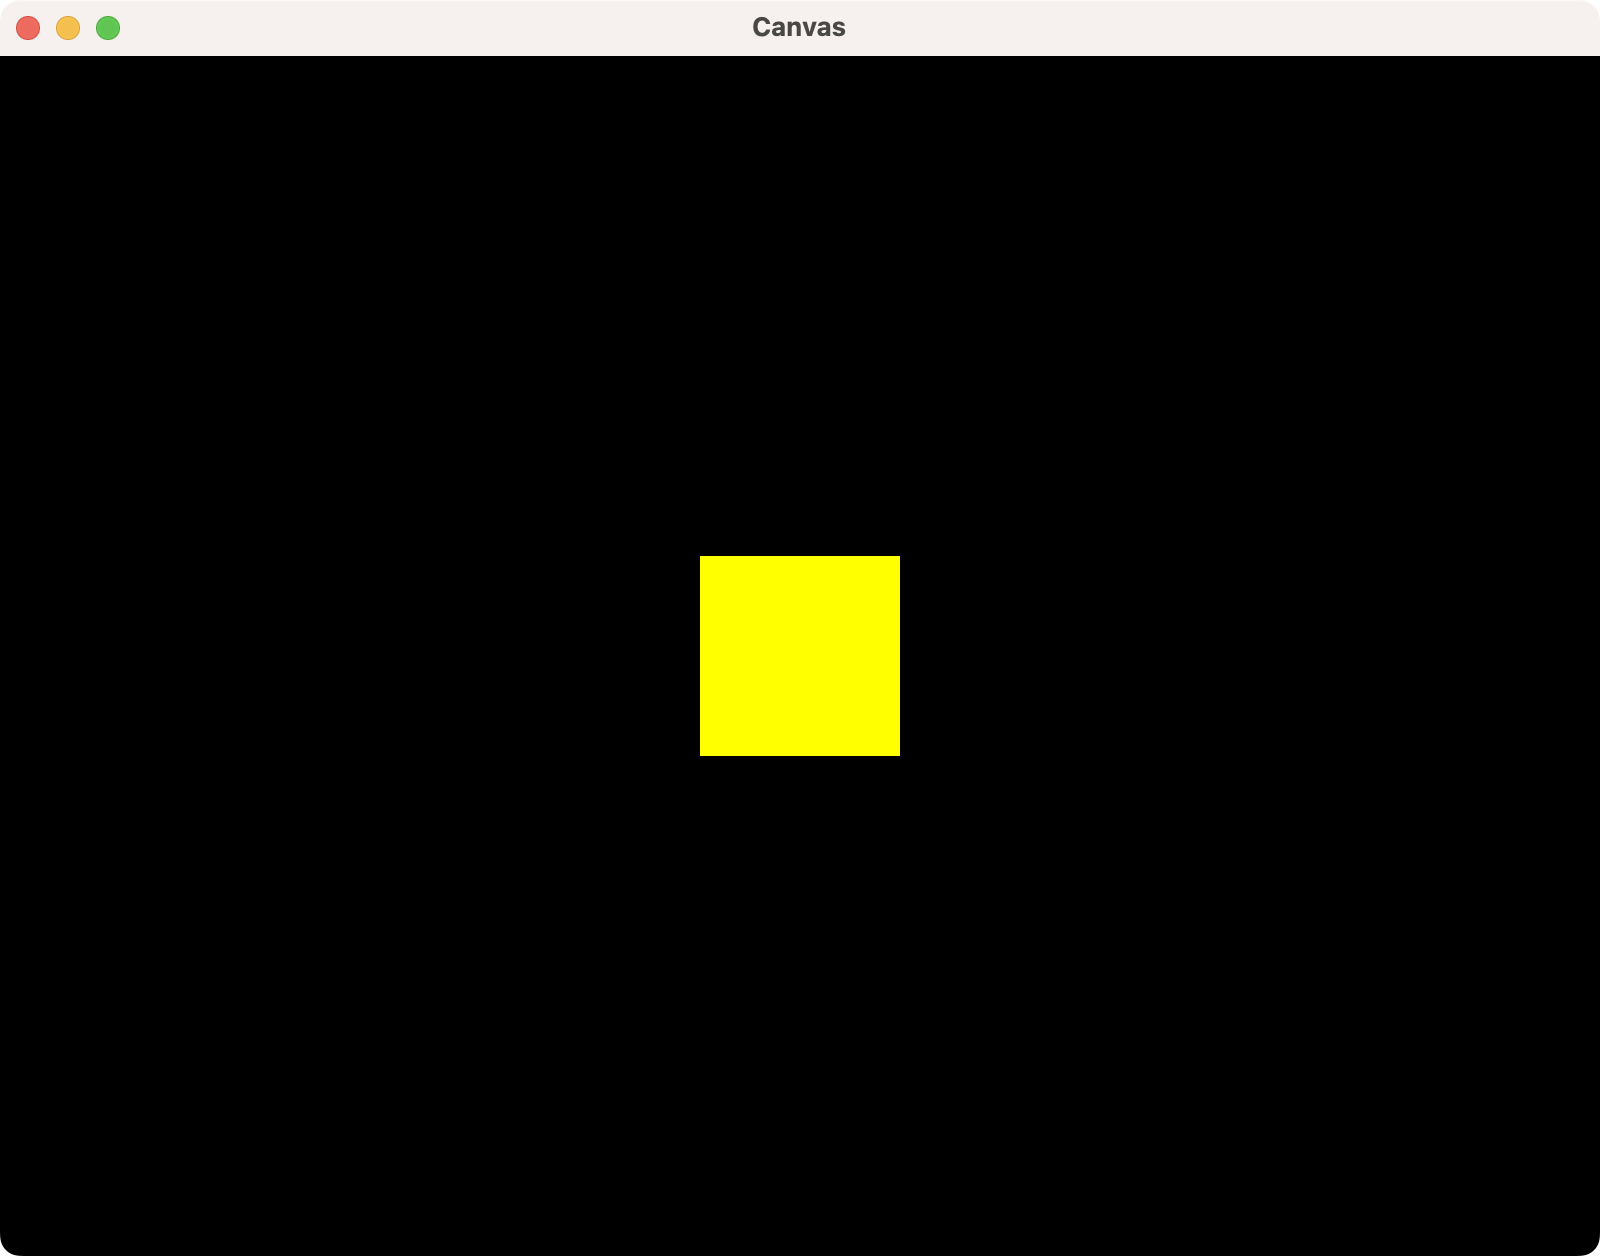 Drawing Shapes in Color With Kivy
We can experiment with different color values and also with different shape classes, which is cool.
Finally, note that to see the effect of the Color() on the drawn rectangle, the Color class must be instantiated before the Rectangle class. You can think of this as dipping your paintbrush on a palette before using it to paint on your canvas! Interestingly, any drawing that comes after the Color instance is painted accordingly so long as a different color has not been applied.
Using the with statement is pretty convenient and facilitates working with shapes. Alternatively, we can use the canvas.add() method:
root.canvas.add(Color(1, 1, 0, 1))
root.canvas.add(
    Rectangle(size=[side, side], pos=[pos_x, pos_y])
)
These statements are equivalent to the statements we have in the with block. Go ahead and give it a try yourself.
Styling Kivy GUIs With the Kv Language
Kivy also provides a declarative language known as the Kv language, which aims at separating your application's GUI design and business logic. In this tutorial, we will not go deep into using the Kv language. However, we will highlight some of its main features and strengths.
With Kv language, you can declare and style the widgets and graphical components of your GUI apps. You will put your Kv code in files with the .kv extension. Then you can load the content of these files into your app to build the GUI. You'll have at least two ways to load the content of a .kv file:
- Relying on the automatic loading mechanism
- Using the
Builderclass for manual loading
In the following sections, you'll learn the basics of these two ways of using the Kv language to build the GUI of your Kivy apps.
Relying on Automatic Widget Loading
As stated earlier, the Kv language helps you separate business logic from GUI design. Let's illustrate this possibility with an updated version of our "Hello, World!" app:
from kivy.app import App
from kivy.uix.label import Label

class CustomLabel(Label):
    pass

class MainApp(App):
    def build(self):
        root = CustomLabel()
        return root

MainApp().run()
As you can see we have subclassed the Label class to create a new CustomLabel haven't made any modifications to the subclass, so it functions exactly like the Label class but with a different name. We add a pass statement, which is a Python placeholder statement which makes the code syntactically valid.
Next, create a file called main.kv alongside your app's file. Define a label using the following code:
<CustomLabel>:
    text: "Hello, World!"
Note that your label must have the same name as your custom Python class in the app's file. Additionally, the .kv file must have the same name as your subclass of App, but without the App suffix and in lowercase. In this example, your subclass is named MainApp, so your .kv file must be main.kv.
Now you can run the app from your command line. You'll get the following window on your screen:
 Kivy Application Using the Kv Language
The Kv language, also known as kivy language or just kvlang, allows us to create widget trees in a declarative way. It also lets you bind widget properties to each other or to callbacks.
Loading Widgets Through the Builder Class
When your Kivy project grows, your .kv file will grow as well. So, it is recommended that you split up the file into different files for readability. In such cases, you will end up with multiple .kv files, and the automatic loading mechanism will not be sufficient. You'll have to use the Builder class from kivy.lang.Builder.
To explore how to use Builder, let's build a sample GUI consisting of a label and button in a BoxLayout. The label will be provided in the labels.kv file, while the buttons will live in the buttons.kv file.
Here's the Python code for this app:
from kivy.app import App
from kivy.lang import Builder
from kivy.uix.boxlayout import BoxLayout
from kivy.uix.button import Button
from kivy.uix.label import Label

Builder.load_file("labels.kv")
Builder.load_file("buttons.kv")

class CustomLabel(Label):
    pass

class CustomButton(Button):
    pass

class MainApp(App):
    def build(self):
        root = BoxLayout(orientation="vertical")
        root.add_widget(CustomLabel())
        root.add_widget(CustomButton())
        return root

MainApp().run()
After importing the required classes, we call the load_file() method. This method takes the filename of a .kv file as an argument and loads it into your app.
Next, you create the custom label and button following the pattern used in the previous section. Inside build(), you create a BoxLayout and add the two widgets to it. Now you need to provide the required .kv files.
Go ahead and create a labels.kv file with the following content:
<CustomLabel>:
    text: "This is a custom label!"
    font_size: 50
    bold: True
This file provides a label with the text "This is a custom label!". Its font will have a size of 50 pixels and will be bold.
The buttons.kv will have the following code:
<CustomButton>:
    text: "Click me!"
Your custom button will be quite minimal. It'll only have the text "Click me!" on it. Go ahead and run the app from your command line. You'll get the following window on your screen:
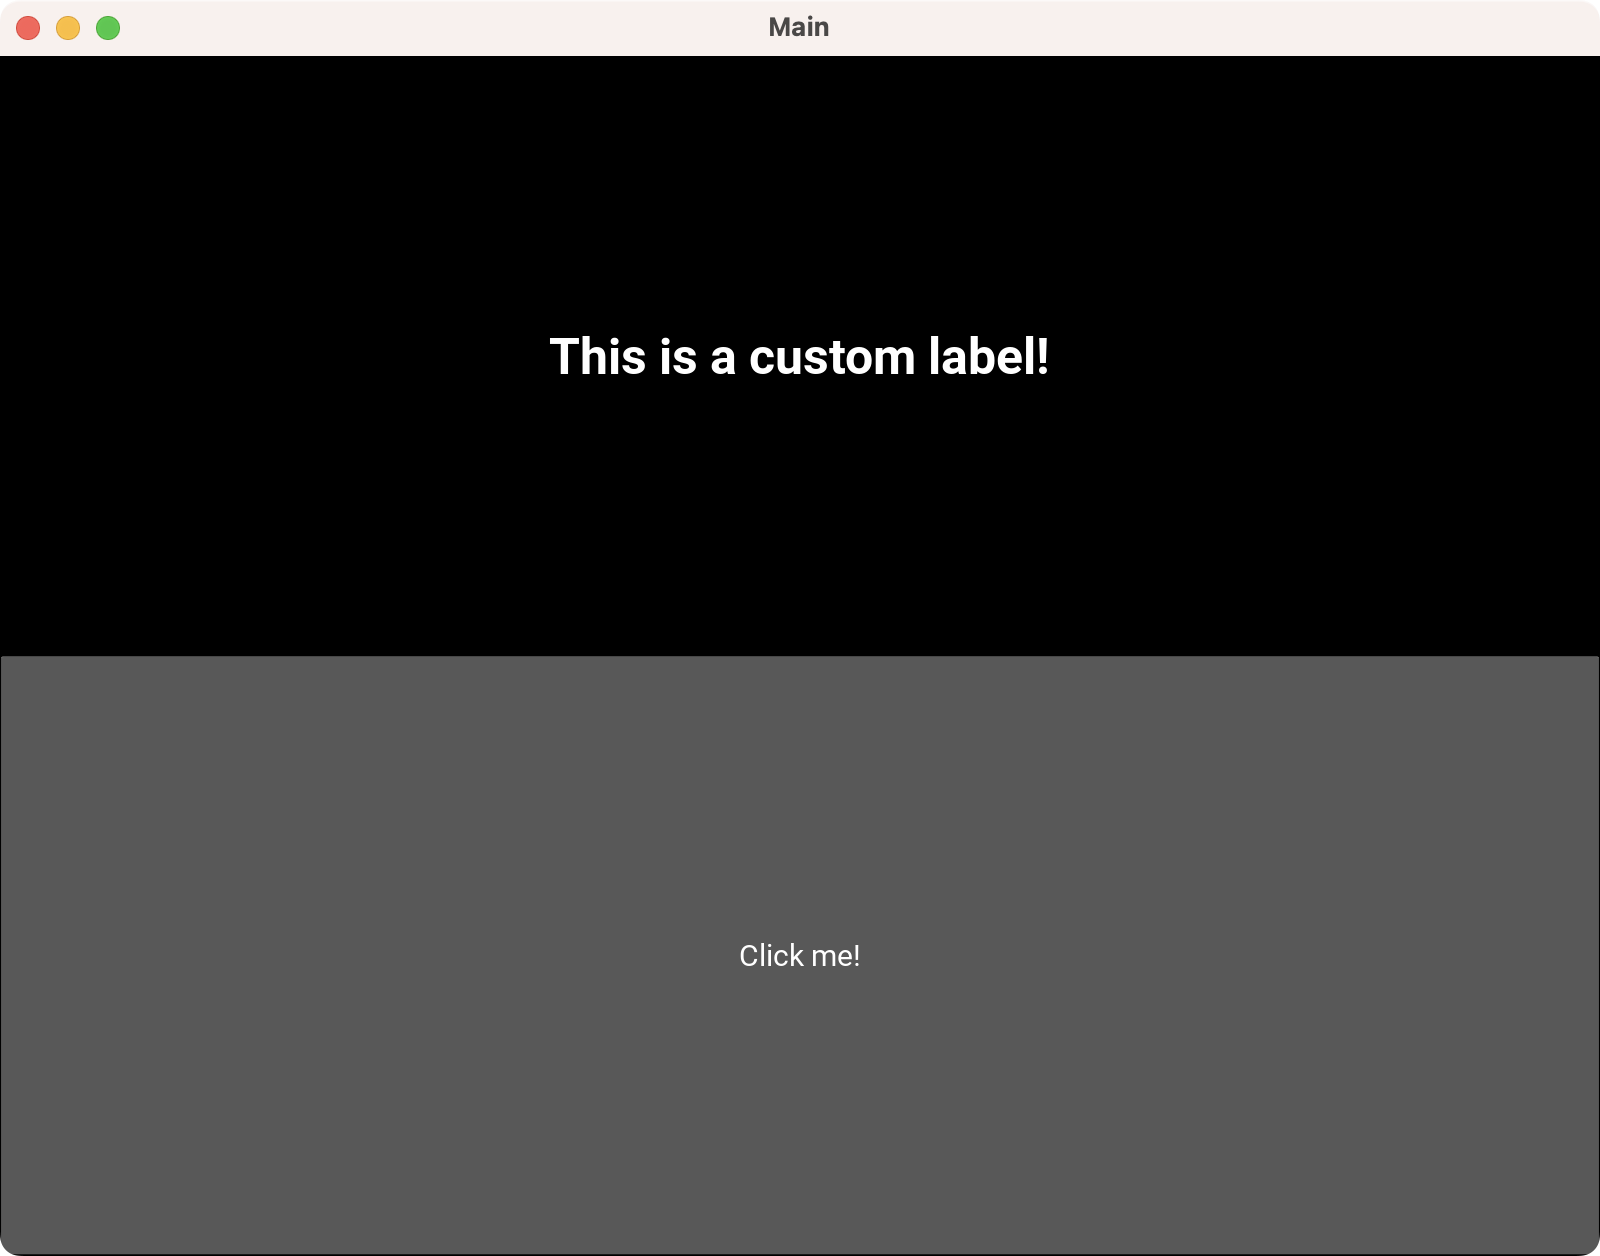 Kivy Application Using the Kv Language With Multiple kv Files
In addition to using the load_file() to build Kv language files, you can also parse and load Kv language directly in a multi-line string in your Python file:
Builder.load_string("""
<CustomLabel>:
    text: "This is a custom label!"
    font_size: 50
    bold: True
""")
Builder.load_string("""
<CustomButton>:
    text: "Click me!"
""")
These calls to load_string() are completely equivalent to the corresponding calls to load_file() in our original code example.
Drawing Shapes With the Kv Language
Let's take a look at a final example of using the Kv language. This time we'll use the language to draw shapes. Create a rectangle.py file with the following content:
from kivy.app import App
from kivy.uix.widget import Widget

class CustomRectangle(Widget):
    pass

class MainApp(App):
    def build(self):
        return CustomRectangle()

MainApp().run()
Now go ahead and create another file in the same directory and save it as main.kv. Then add the following content:
<CustomRectangle>:
  canvas:
    Color:
      rgba: 1, 1, 0, 1
    Rectangle:
      size: 200, 200
      pos: 0, 0
If you run the rectangle.py file, then you will see a 200×200 pixels rectangle ---square in this case--- at the lower left corner of your window! For more guidelines on using Kv Language, check out its official documentation.
More Kivy Resources and Next Steps
For some more examples of what you can do with Kivy, take a look at the Kivy examples section in the documentation. Depending on your interest, you can also explore the other resources below:
- If you're interested in 3D rendering, then the Kivy 3D demo gives a good demonstration of the framework's rendering abilities.
- If you're interested in using Kivy to develop for mobile, you can write functional Android apps (APKs) with Python and pack them using tools like Buildozer and Python-For-Android without learning Java.
- If you want a complete vision of where you can use Kivy, then check out the gallery of examples provided by the Kivy community.
Conclusion
What you've learned in this tutorial is just the tip of the Kivy iceberg. There's so much more to Kivy than what meets the eye. It's a powerful Python GUI library that provides a well-structured hierarchy of classes and objects that you can use to create modern and cross-platform graphical user interfaces for your desktop and mobile applications.
Bring Your PyQt/PySide Application to Market — Specialized launch support for scientific and engineering software built using Python & Qt.