Image noise is a random variation of brightness or color in images, which can make it harder to discern finer details in a photo. Noise is an artefact of how the image is captured. In digital photography, sensor electronic noise causes random fuzziness over the true image. It is more noticeable in low light, where the lower signal from the sensor is amplified, amplifying the noise with it. Similar noisy artifacts are also present in analog photos and film, but there it is caused by the film grain. Finally, you can also see noise-like artifacts introduced by lossy compression algorithms such as JPEG.
Noise reduction or denoising improves the visual appearance of a photo and can be an important step in a larger image analysis pipeline. Eliminating noise can make it easier to identify features algorithmically. However, we need to ensure that the denoised image is still an accurate representation of the original capture.
Denoising is a complex topic. Fortunately, several different algorithms are available. In this tutorial, we'll use algorithms from OpenCV and build them into a Streamlit app. The app will allow a user to upload images, choose from the common noise reduction algorithms, such as Gaussian Blur, Median Blur, Minimum Blur, and Maximum Blur, and adjust the strength of the noise reduction using a slider. The user can then download the resulting noise-reduced image.
By the end of this tutorial, you will --
- Learn how to build interactive web applications with Streamlit.
- Understand how to work with images using the Python libraries OpenCV and Pillow.
- Be able to apply noise reduction algorithms to images and allow users to download the processed images in different formats.
There's quite a lot to this example, so we'll break it down into small steps to make sure we understand how everything works.
- Setting Up the Working Environment
- Building the Application Outline
- Uploading an Image with Streamlit
- How Streamlit Works
- Configuring the Noise Reduction Algorithm
- Performing the Noise Reduction
- Non-Local Means Denoising
- Improving the Layout
- Downloading the Denoised Image
- Improving the Code Structure
- Conclusion
Setting Up the Working Environment
In this tutorial, we'll use the Streamlit library to build the noise reduction app's GUI.
To perform the denoising, we'll be using OpenCV. Don't worry if you're not familiar with this library, we'll be including working examples you can copy for everything we do.
With that in mind, let's create a virtual environment and install our requirements into it. To do this, you can run the following commands:
- macOS
- Windows
- Linux
$ mkdir denoise/
$ cd denoise
$ python -m venv venv
$ source venv/bin/activate
(venv)$ pip install streamlit opencv-python pillow numpy
> mkdir denoise/
> cd denoise
> python -m venv venv
> venv\Scripts\activate.bat
(venv)> pip install streamlit opencv-python pillow numpy
$ mkdir denoise/
$ cd denoise
$ python -m venv venv
$ source venv/bin/activate
(venv)$ pip install streamlit opencv-python pillow numpy
With these commands, you create a denoise/ folder for storing your project. Inside that folder, you create a new virtual environment, activate it, and install Streamlit, OpenCV, Pillow & numpy.
For platform-specific troublshooting, check the Working With Python Virtual Environments tutorial.
Building the Application Outline
We'll start by constructing a simple Streamlit application and then expand it from there.
import streamlit as st

# Set the title of our app.
st.title("Noise Reduction App")
Save this file as app.py and use the following command to run it:
streamlit run app.py
Streamlit will start up and will launch the application in your default web browser.
 The Streamlit application title displayed in the browser.
If it doesn't launch by itself, you can see the web address to open in the console.
 The Streamlit application launch message showing the local server address where the app can be viewed.
Now that we have the app working, we can step through and build up our app.
Uploading an Image with Streamlit
First we need a way to upload an image to denoise. Streamlit provides a simple .file_uploader method which can be used to upload an image from your computer.
This is a generic file upload handler, but you can provide both a message to display (to specify what to upload) and constrain the file types that are supported.
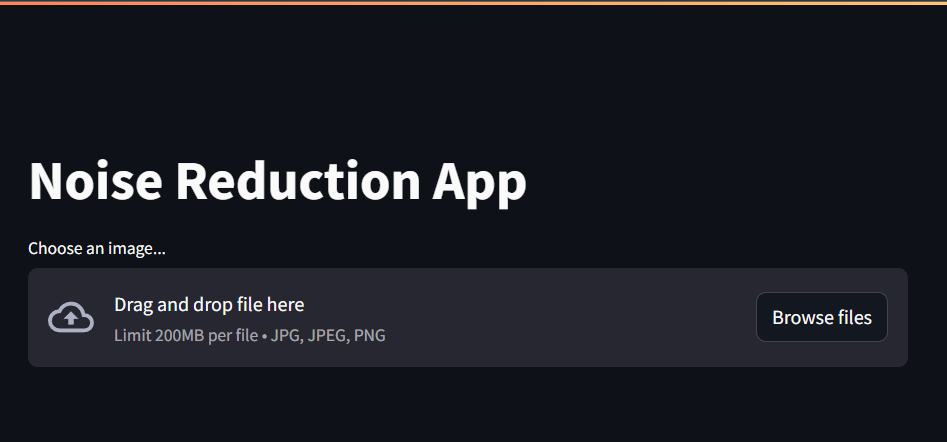
Below we define a file_uploader which shows a message "Choose an image..." and accepts JPEG and PNG images.
import streamlit as st

# Set the title of our app.
st.title("Noise Reduction App")

uploaded_file = st.file_uploader("Choose an image...", type=["jpg", "jpeg", "png"])

print(uploaded_file)
For historic reasons, JPEG images can have both .jpg or .jpeg extensions, so we include both in the list.
Run the code and you'll see the file upload box in the app. Try uploading a file.
 Streamlit application with a file-upload widget.
The uploaded image is stored in the variable uploaded_file. Before a file is uploaded, the value of uploaded_file will be None. Once the user uploads an image, this variable will contain an UploadedFile object.
None
UploadedFile(file_id='73fd9a97-9939-4c02-b9e8-80bd2749ff76', name='headcake.jpg', type='image/jpeg', size=652805, _file_urls=file_id: "73fd9a97-9939-4c02-b9e8-80bd2749ff76"
upload_url: "/_stcore/upload_file/7c881339-82e4-4d64-ba20-a073a11f7b60/73fd9a97-9939-4c02-b9e8-80bd2749ff76"
delete_url: "/_stcore/upload_file/7c881339-82e4-4d64-ba20-a073a11f7b60/73fd9a97-9939-4c02-b9e8-80bd2749ff76"
)
We can use this UploadedFile object to load and display the image in the browser.
How Streamlit Works
If you're used to writing Python scripts the behavior of the script and file upload box might be a confusing. Normally a script would execute from top to bottom, but here the value of uploaded_file is changing and the print statement is being re-run as the state changes.
There's a lot of clever stuff going on under the hood here, but in simple terms the Streamlit script is being re-evaluated in response to changes. On each change the script runs again, from top to bottom. But importantly, the state of widgets is not reset on each run.
When we upload a file, that file gets stored in the state of the file upload widget and this triggers the script to re-start. When it gets to the st.file_uploader call, that UploadedFile object will be returned immediately from the stored state. It can then affect the flow of the code after it.
The following code allows you to see these re-runs more clearly, by displaying the current timestamp in the header. Every time the code is re-executed this number will update.
from time import time

import streamlit as st

# Set the title of our app.
st.title(f"Noise Reduction App {int(time())}")

uploaded_file = st.file_uploader("Choose an image...", type=["jpg", "jpeg", "png"])
Try uploading an image and then removing it. You'll see the timestamp in the title change each time. This is the script being re-evaluated in response to changes in the widget state.
Loading and Displaying the Uploaded Image
While we can upload an image, we can't see it yet. Let's implement that now.
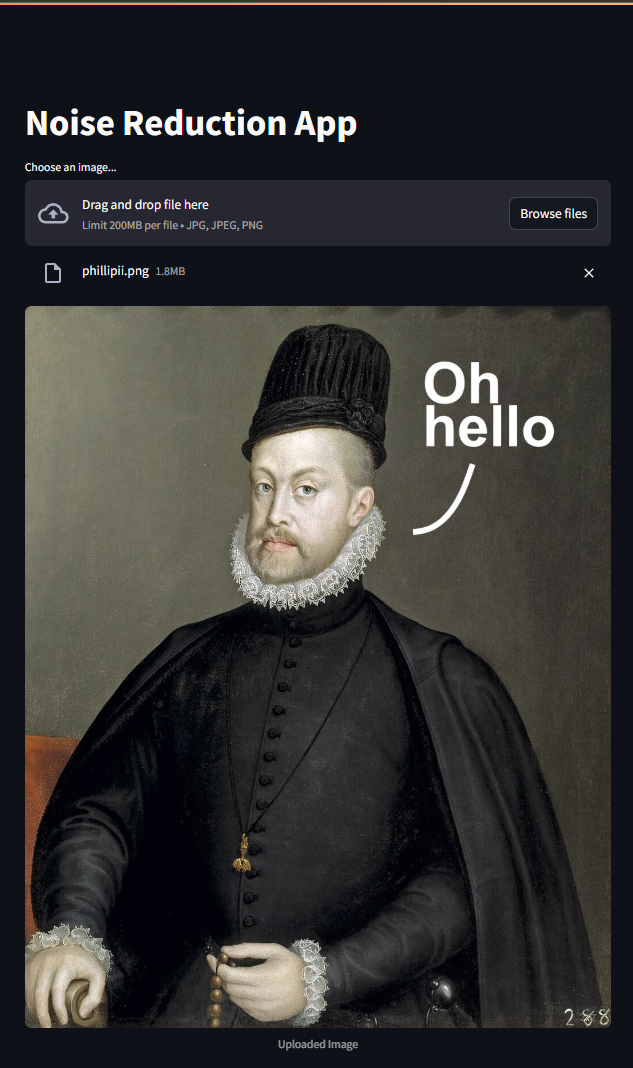
As mentioned, the uploaded file is available as an UploadedFile object in the uploaded_file variable. This object can be passed directly to st.image to display the image back in the browser. You can also add a caption and auto resize the image to the width of the application.
import numpy as np
import streamlit as st
from PIL import Image

st.title("Noise Reduction App")

uploaded_file = st.file_uploader("Choose an image...", type=["jpg", "jpeg", "png"])


if uploaded_file is not None:
    # Convert the uploaded file to a PIL image.
    image = Image.open(uploaded_file)

    st.image(image, caption="Uploaded Image", use_container_width=True)
Run this and upload an image. You'll see the image appear under the file upload widget.
 Streamlit application showing an uploaded image.
Converting the Image for Processing
While the above works fine for displaying the image in the browser, we want to process the image through the OpenCV noise reduction algorithms. For that we need to get the image into a format which OpenCV recognizes. We can do that using Pillow & NumPy.
The updated code to handle this conversion is shown below.
import numpy as np
import streamlit as st
from PIL import Image

st.title("Noise Reduction App")

uploaded_file = st.file_uploader("Choose an image...", type=["jpg", "jpeg", "png"])


if uploaded_file is not None:
    # Convert the uploaded file to a PIL image.
    image = Image.open(uploaded_file)

    # Convert the image to an RGB NumPy array for processing.
    image = image.convert("RGB")
    image = np.array(image)

    # Displaying the RGB image.
    st.image(image, caption="Uploaded Image", use_container_width=True)
In this code, the uploaded file is opened using Pillow's Image.open() method, which reads the image into a PIL image format. The image is then converted into Pillows RGB format, for consistency (discarding transparent for example). This regular format is then converted into a NumPy array which OpenCV requires for processing.
Helpfully, Streamlit's st.image method also understands the NumPy RGB image format, so we can pass the image array directly to it. This will be useful when we want to display the processed image, since we won't need to convert it before doing that.
If you run the above it will work exactly as before. But now we have our uploaded image available as an RGB array in the image variable. We'll use that to do our processing next.
Configuring the Noise Reduction Algorithm
The correct noise reduction strategy depends on the image and type of noise present. For a given image you may want to try different algorithms and adjust the extent of the noise reduction. To accommodate that, we're going to add two new controls to our application -- an algorithm drop down, and a kernel size slider.
The first presents a select box from which the user can choose which algorithm to use. The second allows the user to configure the behavior of the given algorithm -- specifically the size of the area being considered by each algorithm when performing noise reduction.
import numpy as np
import streamlit as st
from PIL import Image

st.title("Noise Reduction App")

uploaded_file = st.file_uploader("Choose an image...", type=["jpg", "jpeg", "png"])

algorithm = st.selectbox(
    "Select noise reduction algorithm",
    (
        "Gaussian Blur Filter",
        "Median Blur Filter",
        "Minimum Blur Filter",
        "Maximum Blur Filter",
        "Non-local Means Filter",
    ),
)

kernel_size = st.slider("Select kernel size", 1, 10, step=2)


if uploaded_file is not None:
    # Convert the uploaded file to a PIL image.
    image = Image.open(uploaded_file)

    # Convert the image to an RGB NumPy array for processing.
    image = image.convert("RGB")
    image = np.array(image)

    # Displaying the RGB image.
    st.image(image, caption="Uploaded Image", use_container_width=True)
When you run this you'll see the new widgets in the UI. The uploaded image is displayed last since it is the last thing to be added.
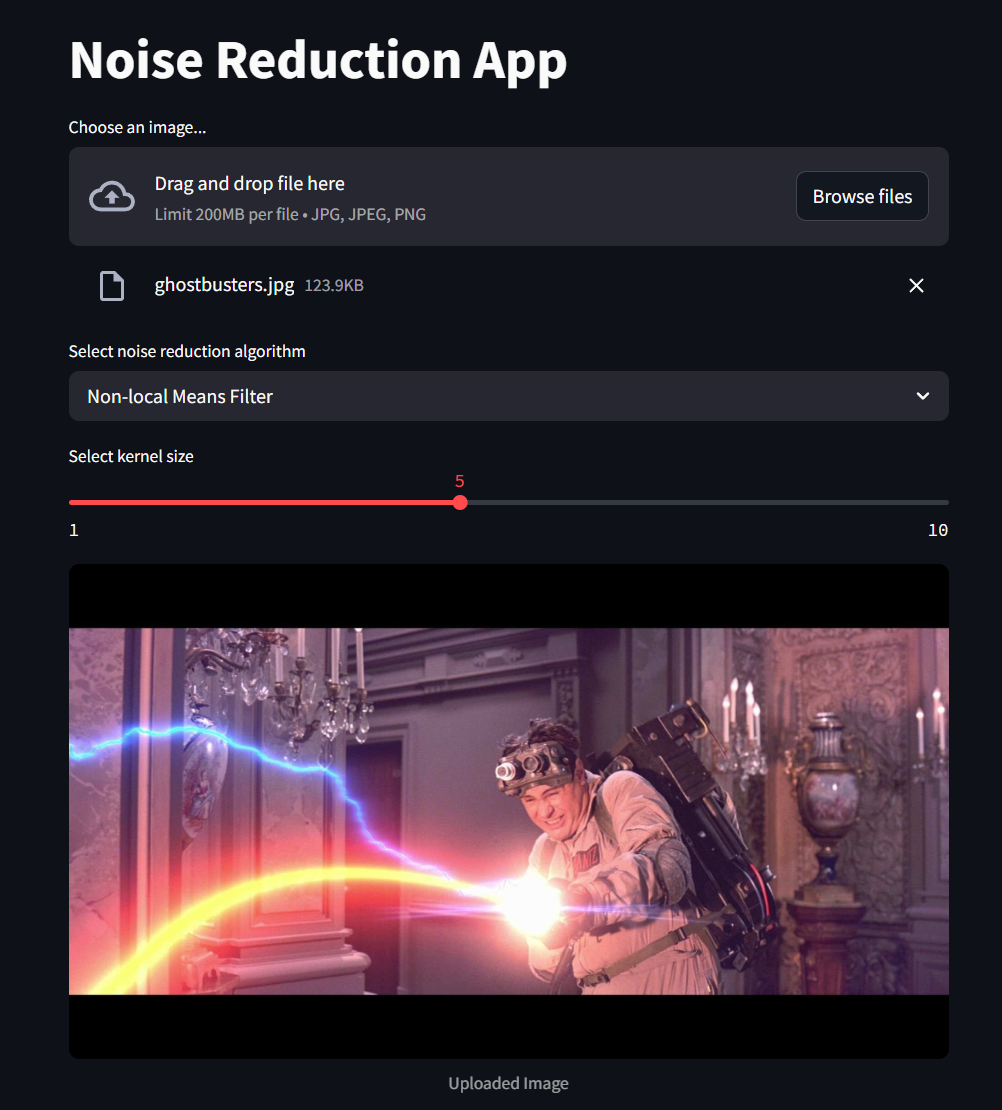 The algorithm selection and configuration widgets shown in the app.
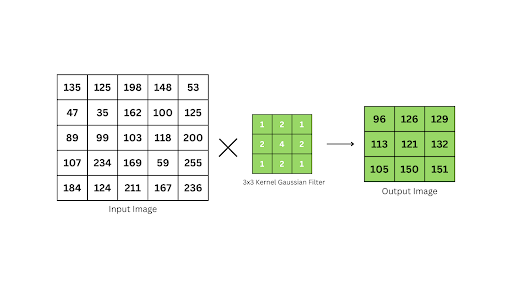
The slider for the kernel size allows the user to adjust the kernel size, which determines the strength of the noise reduction effect. The kernel is a small matrix used in convolution to blur or process the image for noise removal. The larger the kernel size, the stronger the effect will be but also the more blurring or distortion you will see in the image.
The removal of noise is always a balancing act between noise and accuracy of the image.
The slider ranges from 1 to 10, with a step of 2 (i.e., possible kernel sizes are 1, 3, 5, 7, and 9).
The kernel size must be an odd number to maintain symmetry in the image processing algorithms.
Performing the Noise Reduction
Now we have all the parts in place to actually perform noise reduction on the image. The final step is to add the calls to OpenCV's noise reduction algorithms and show the resulting, noise-reduced image back in the UI.
import cv2
import numpy as np
import streamlit as st
from PIL import Image

st.title("Noise Reduction App")

uploaded_file = st.file_uploader("Choose an image...", type=["jpg", "jpeg", "png"])

algorithm = st.selectbox(
    "Select noise reduction algorithm",
    (
        "Gaussian Blur Filter",
        "Median Blur Filter",
        "Minimum Blur Filter",
        "Maximum Blur Filter",
        "Non-local Means Filter",
    ),
)

kernel_size = st.slider("Select kernel size", 1, 10, step=2)


if uploaded_file is not None:
    # Convert the uploaded file to a PIL image.
    image = Image.open(uploaded_file)

    # Convert the image to an RGB NumPy array for processing.
    image = image.convert("RGB")
    image = np.array(image)

    # Displaying the RGB image.
    st.image(image, caption="Uploaded Image", use_container_width=True)

    # Applying the selected noise reduction algorithm based on user selection
    if algorithm == "Gaussian Blur Filter":
        denoised_image = cv2.GaussianBlur(image, (kernel_size, kernel_size), 0)
    elif algorithm == "Median Blur Filter":
        denoised_image = cv2.medianBlur(image, kernel_size)
    elif algorithm == "Minimum Blur Filter":
        kernel = np.ones((kernel_size, kernel_size), np.uint8)
        denoised_image = cv2.erode(image, kernel, iterations=1)
    elif algorithm == "Maximum Blur Filter":
        kernel = np.ones((kernel_size, kernel_size), np.uint8)
        denoised_image = cv2.dilate(image, kernel, iterations=1)
    elif algorithm == "Non-local Means Filter":
        denoised_image = cv2.fastNlMeansDenoisingColored(
            image, None, kernel_size, kernel_size, 7, 15
        )

    # Displaying the denoised image in RGB format
    st.image(denoised_image, caption="Denoised Image", use_container_width=True)
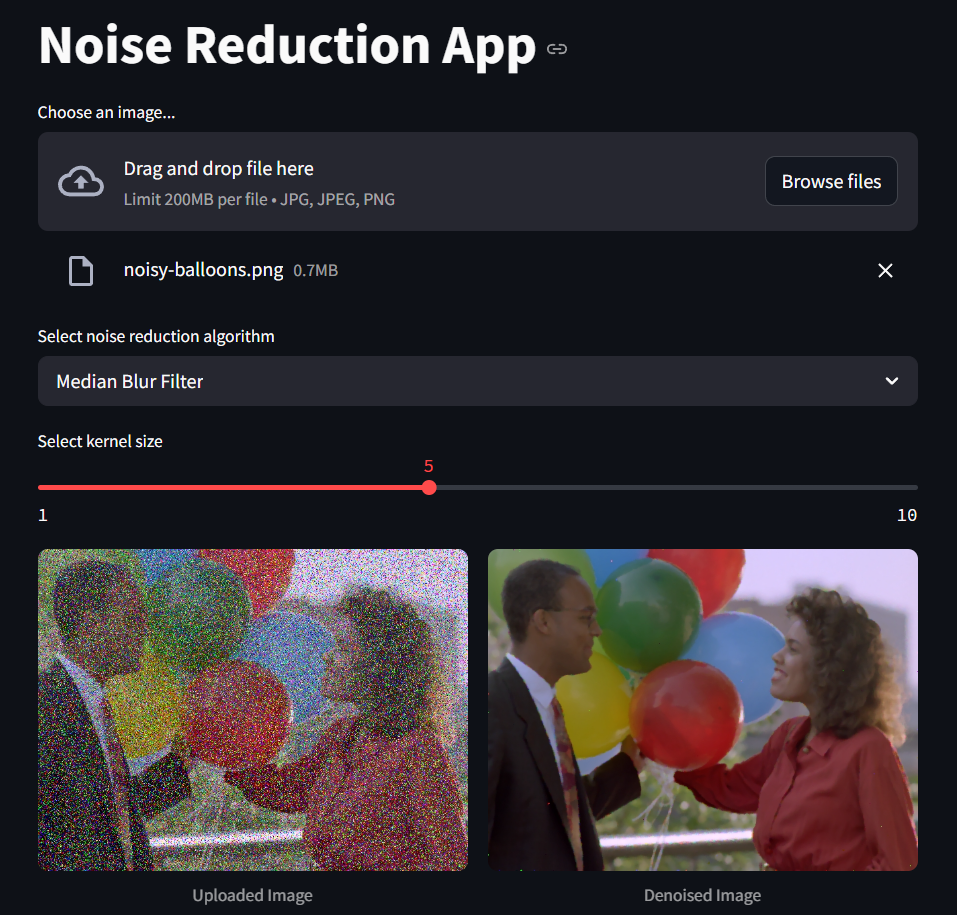
If you run this you can now upload your images and apply denoising to them. Try changing the algorithm and adjusting the kernel size parameter to see the effect it has on the noise reduction. The denoised image is displayed at the bottom with the caption "Denoised Image".
Each of the noise reduction strategies is described below. The median blur and non-local means methods are the most effective for normal images.
Gaussian Blur Filter
Gaussian blur smoothens the image by applying a Gaussian function to a pixel's neighbors. The kernel size determines the area over which the blur is applied, with larger kernels leading to stronger blurs. This method preserves edges fairly well and is often used in preprocessing for tasks like object detection.
 Gaussian blur filter applied to a image using a 3x3 kernel.
This is effective at removing light noise, at the expense of sharpness.
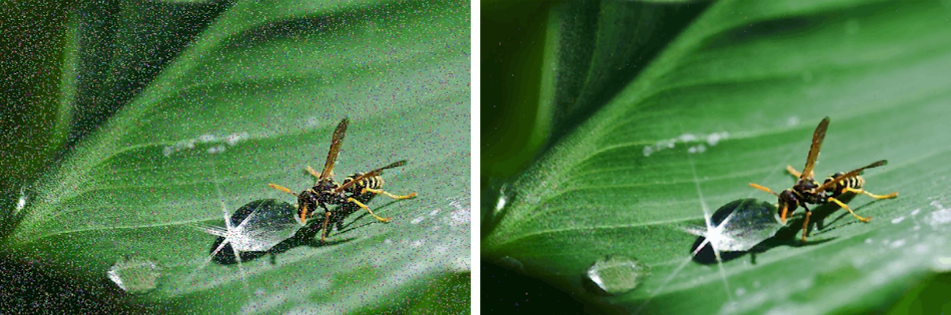
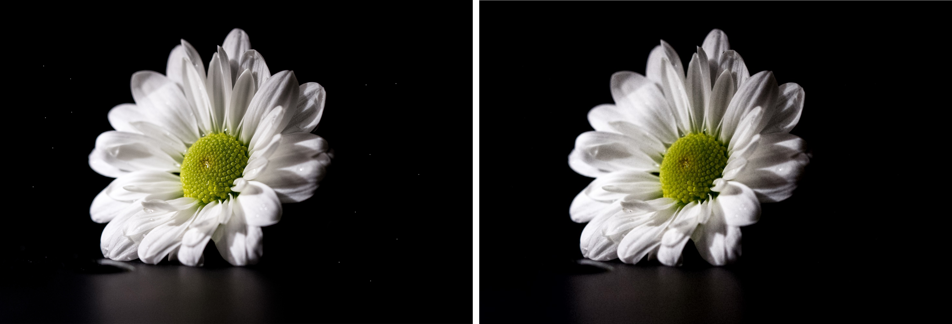
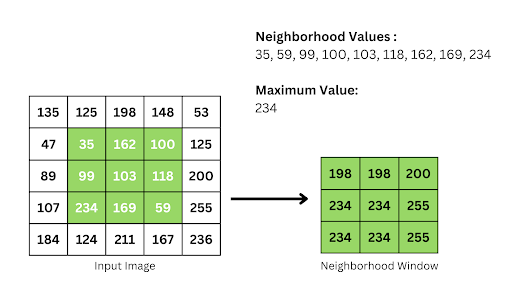
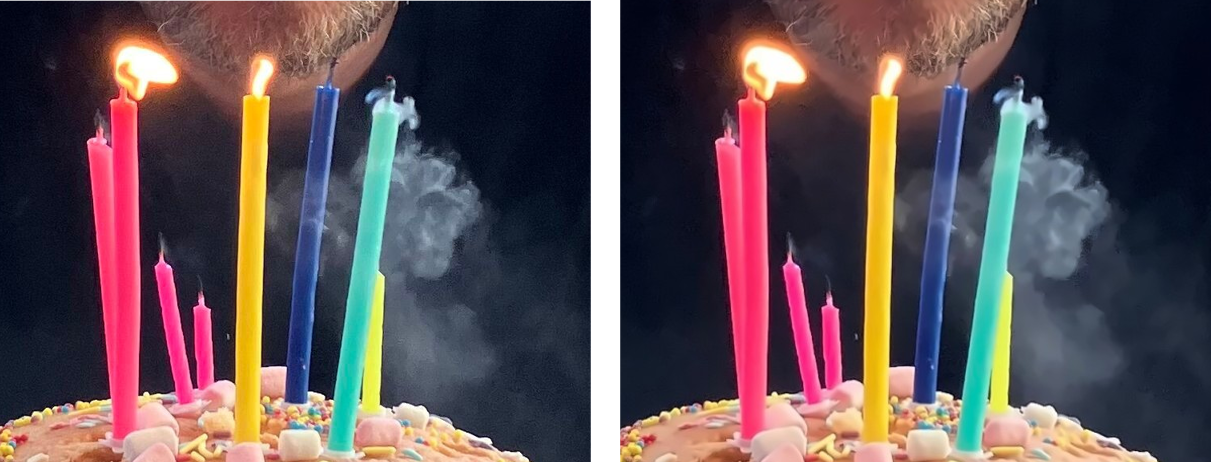
Median Blur Filter
Median blur reduces noise by replacing each pixel's value with the median value from the surrounding pixels, making it effective against salt-and-pepper noise. It preserves edges better than Gaussian blur but can still affect the sharpness of fine details.
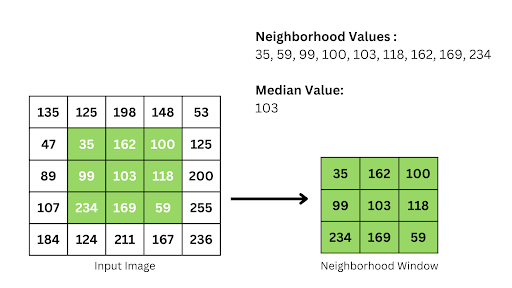 Median blur filter applied to a image using a 3x3 kernel window.
 Median blur noise reduction (kernel size = 7).
 Median blur noise reduction (kernel size = 5).
Minimum Blur (Erosion)
This filter uses the concept of morphological erosion. It shrinks bright areas in the image by sliding a small kernel over it. This filter is effective for removing noise in bright areas but may distort the overall structure if applied too strongly.
 Erosion algorithm applied to an image using 3x3 kernel window.
This works well to remove light noise from dark regions.
 Erosion noise reduction (kernel size = 5).
Maximum Blur (Dilation)
In contrast to erosion, dilation expands bright areas and is effective in eliminating dark noise spots. However, it can result in the expansion of bright regions, altering the shape of objects in the image.
 Dilation algorithm applied to an image using 3x3 kernel window.
This works well to remove dark noise from light regions.
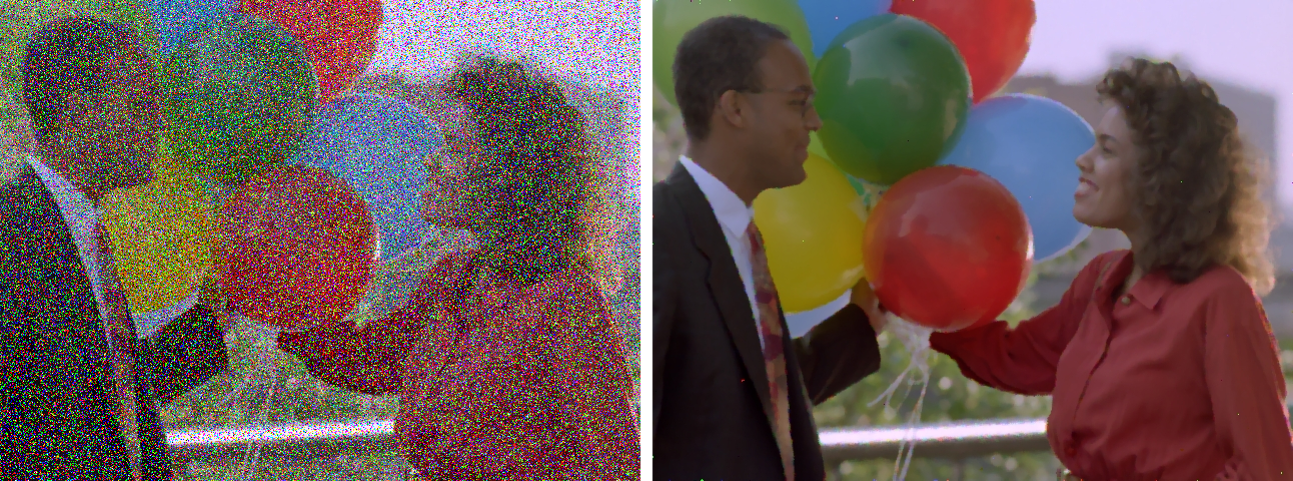
Non-Local Means Denoising
This method identifies similar regions from across the image, then combines these together to average out the noise. This works particularly well in images with repeating regions, or flat areas of color, but less well when the image has too much noise to be able to identify the similar regions.
 Non-local means noise reduction example.
Improving the Layout
It's not very user friendly having the input and output images one above the other, as you need to scroll up and down to see the effect of the algorithm. Streamlit has support for arranging widgets in columns. We'll use that to put the two images next to one another.
To create columns in Streamlit you use st.columns() passing in the number of columns to create. This returns column objects (as many as you request) which can be used as context managers to wrap your widget calls. In code, this looks like the following:
    # Displaying the denoised image in RGB format
    col1, col2 = st.columns(2)

    with col1:
        st.image(image, caption="Uploaded Image", use_container_width=True)

    with col2:
        st.image(denoised_image, caption="Denoised Image", use_container_width=True)
Here we call st.columns(2) creating two columns, returning into col1 and col2. We then use these with with to wrap the two st.image calls. This puts them into two adjacent columns.
Run this and you'll see the two images next to one another. This makes it much easier to see the impact of changes in the algorithm or parameters.
 The source and processed image arranged next to one another using columns.
Downloading the Denoised Image
Our application now allows users to upload images and process them to remove noise, with a configurable noise removal algorithm and kernel size. The final step is to allow users to download and save the processed image somewhere.
You can actually just right-click and use your browser's option to Save the image if you like. But adding this to the UI makes it more explicit and allows us to offer different image output formats.
First, we need to import the io module. In a normal image processing script, you could simply save the generated image to disk. Our Streamlit app could be running on a server somewhere, and saving the result to the server isn't useful: we want to be able to send it to the user. For that, we need to send it to the web browser. We browsers don't understand Python objects, so we need to save our image data to a simple bytes object. The io module allows us to do that.
Add an import for Python's io module to the imports at the top of the code.
import io

import cv2
import numpy as np
import streamlit as st
from PIL import Image
Now under the rest of the code we can add the widgets and logic for saving and presenting the image as a download. First add a select box to choose the image format.
    # ..snipped the rest of the code.

    # Dropdown to select the file format for downloading
    file_format = st.selectbox("Select output format", ("PNG", "JPEG"))
Next we need to take our denoised_image and convert this from a NumPy array back to a PIL image. Then we can use Pillow's native methods for saving the image to a simple bytestream, which can be sent to the web browser.
    # Converting NumPy array to PIL image in RGB mode
    denoised_image_pil = Image.fromarray(denoised_image)

    # Creating a buffer to store the image data in the selected format
    buf = io.BytesIO()
    denoised_image_pil.save(buf, format=file_format)
    byte_data = buf.getvalue()
Since OpenCV operations return a NumPy array (the same format we provide it with) it must be converted back to a PIL image before saving. The io.BytesIO() creates an in-memory file buffer to write to. That way we don't need to actually save the image. We write the image using the Image .save() method in the requested file format.
Note that this saved image is in an actual PNG/JPEG image format at this point, not just pure image data.
We can retrieve the bytes data from the buffer using .getvalue(). The resulting byte_data is a raw bytes object that can be passed to the web browser. This is handled by a Streamlit download button.
    # Button to download the processed image
    st.download_button(
        label="Download Image",
        data=byte_data,
        file_name=f"denoised_image.{file_format.lower()}",
        mime=f"image/{file_format.lower()}"
    )
Notice we've also set the filename and mimetype, using the selected file_format variable.
If you're adding additional file formats, be aware that the mimetypes are not always 1:1 with the file extensions. In this case we've used .jpeg since the mimetype is image/jpeg.
Improving the Code Structure
The complete code so far is shown below.
import io

import cv2
import numpy as np
import streamlit as st
from PIL import Image

st.title("Noise Reduction App")

uploaded_file = st.file_uploader("Choose an image...", type=["jpg", "jpeg", "png"])

algorithm = st.selectbox(
    "Select noise reduction algorithm",
    (
        "Gaussian Blur Filter",
        "Median Blur Filter",
        "Minimum Blur Filter",
        "Maximum Blur Filter",
        "Non-local Means Filter",
    ),
)

kernel_size = st.slider("Select kernel size", 1, 10, step=2)


if uploaded_file is not None:
    # Convert the uploaded file to a PIL image.
    image = Image.open(uploaded_file)

    # Convert the image to an RGB NumPy array for processing.
    image = image.convert("RGB")
    image = np.array(image)

    # Applying the selected noise reduction algorithm based on user selection
    if algorithm == "Gaussian Blur Filter":
        denoised_image = cv2.GaussianBlur(image, (kernel_size, kernel_size), 0)
    elif algorithm == "Median Blur Filter":
        denoised_image = cv2.medianBlur(image, kernel_size)
    elif algorithm == "Minimum Blur Filter":
        kernel = np.ones((kernel_size, kernel_size), np.uint8)
        denoised_image = cv2.erode(image, kernel, iterations=1)
    elif algorithm == "Maximum Blur Filter":
        kernel = np.ones((kernel_size, kernel_size), np.uint8)
        denoised_image = cv2.dilate(image, kernel, iterations=1)
    elif algorithm == "Non-local Means Filter":
        denoised_image = cv2.fastNlMeansDenoisingColored(
            image, None, kernel_size, kernel_size, 7, 15
        )

    # Displaying the denoised image in RGB format
    col1, col2 = st.columns(2)

    with col1:
        st.image(image, caption="Uploaded Image", use_container_width=True)

    with col2:
        st.image(denoised_image, caption="Denoised Image", use_container_width=True)

    # Dropdown to select the file format for downloading
    file_format = st.selectbox("Select output format", ("PNG", "JPEG", "JPG"))

    # Converting NumPy array to PIL image in RGB mode
    denoised_image_pil = Image.fromarray(denoised_image)

    # Creating a buffer to store the image data in the selected format
    buf = io.BytesIO()
    denoised_image_pil.save(buf, format=file_format)
    byte_data = buf.getvalue()

    # Button to download the processed image
    st.download_button(
        label="Download Image",
        data=byte_data,
        file_name=f"denoised_image.{file_format.lower()}",
        mime=f"image/{file_format.lower()}",
    )
If you run the completed app you can now upload images, denoise them using the different algorithms and kernel parameters and then save them as JPEG or PNG format images.
However, we can still improve this. There is a lot of code nested under the if uploaded_file is not None: branch, and the logic and processing steps aren't well organized -- everything runs together, mixed in with the UI. When developing UI applications it's a good habit to separate UI and non-UI code where possible (logic vs. presentation). That keeps related code together in the same context, aiding readability and maintainability.
Below is the same code refactored to move the file opening, denoising and file exporting logic out into separate handler functions.
import io

import cv2
import numpy as np
import streamlit as st
from PIL import Image


def image_to_array(file_to_open):
    """Load a Streamlit image into an array."""
    # Convert the uploaded file to a PIL image.
    image = Image.open(file_to_open)

    # Convert the image to an RGB NumPy array for processing.
    image = image.convert("RGB")
    image = np.array(image)
    return image


def denoise_image(image, algorithm, kernel_size):
    """Apply a denoising algorithm to the provided image, with the given kernel size."""
    # Applying the selected noise reduction algorithm based on user selection
    if algorithm == "Gaussian Blur Filter":
        denoised_image = cv2.GaussianBlur(image, (kernel_size, kernel_size), 0)
    elif algorithm == "Median Blur Filter":
        denoised_image = cv2.medianBlur(image, kernel_size)
    elif algorithm == "Minimum Blur Filter":
        kernel = np.ones((kernel_size, kernel_size), np.uint8)
        denoised_image = cv2.erode(image, kernel, iterations=1)
    elif algorithm == "Maximum Blur Filter":
        kernel = np.ones((kernel_size, kernel_size), np.uint8)
        denoised_image = cv2.dilate(image, kernel, iterations=1)
    elif algorithm == "Non-local Means Filter":
        denoised_image = cv2.fastNlMeansDenoisingColored(
            image, None, kernel_size, kernel_size, 7, 15
        )
    return denoised_image


def image_array_to_bytes(image_to_convert):
    """Given an image array, convert it to a bytes object."""

    # Converting NumPy array to PIL image in RGB mode
    image_pil = Image.fromarray(image_to_convert)

    # Creating a buffer to store the image data in the selected format
    buf = io.BytesIO()
    image_pil.save(buf, format=file_format)
    byte_data = buf.getvalue()
    return byte_data


st.title("Noise Reduction App")

uploaded_file = st.file_uploader("Choose an image...", type=["jpg", "jpeg", "png"])

algorithm = st.selectbox(
    "Select noise reduction algorithm",
    (
        "Gaussian Blur Filter",
        "Median Blur Filter",
        "Minimum Blur Filter",
        "Maximum Blur Filter",
        "Non-local Means Filter",
    ),
)

kernel_size = st.slider("Select kernel size", 1, 10, step=2)


if uploaded_file is not None:
    image = image_to_array(uploaded_file)
    denoised_image = denoise_image(image, algorithm, kernel_size)

    # Displaying the denoised image in RGB format
    col1, col2 = st.columns(2)

    with col1:
        st.image(image, caption="Uploaded Image", use_container_width=True)

    with col2:
        st.image(denoised_image, caption="Denoised Image", use_container_width=True)

    # Dropdown to select the file format for downloading
    file_format = st.selectbox("Select output format", ("PNG", "JPEG", "JPG"))

    byte_data = image_array_to_bytes(denoised_image)

    # Button to download the processed image
    st.download_button(
        label="Download Image",
        data=byte_data,
        file_name=f"denoised_image.{file_format.lower()}",
        mime=f"image/{file_format.lower()}",
    )
As you can see, the main flow of the code now consists entirely of Streamlit UI setup code and calls to the processing functions we have defined. Both the UI and processing code is now easier to read and maintain.
In larger projects you may choose to move the functions out into a separate files of related functions and import them instead.
Conclusion
In this tutorial, you created an image noise reduction application using Streamlit and OpenCV. The app allows users to upload images, apply different noise reduction algorithms, and download the denoised image.
It also allows the user to customize the kernel size, which controls the strength of the effect. This makes the app useful for a variety of noise types and image processing tasks.
Streamlit makes it simple to build powerful web applications, taking the power of Python's rich ecosystem and making it available through the browser.
Packaging Python Applications with PyInstaller by Martin Fitzpatrick
This step-by-step guide walks you through packaging your own Python applications from simple examples to complete installers and signed executables.
