Building Piecasso (a PyQt6 Paint clone) I was disappointed to discover that while QPainter comes with a huge number of paint methods, ranging from pixels and lines to fully-filled polygons, it doesn't include a method for flood filling regions of an image.
That makes a lot of sense, firstly because flood-filling is relatively slow to do — requiring a pixel-by-pixel search through an image — and it's not that useful when drawing a UI, since you usually (and probably should) know what you're drawing and where. That means you can use the faster filled shapes.
Still, I was disappointed there wasn't one, because I needed one for my app. What's Paint without being able to fill raggedy shapes in horrible colors?
 Raggedy fill
In this short walkthrough I'll cover the process of implementing a basic flood fill algorithm in PyQt6/PySide6, using QImage.pixel(). If you find yourself needing flood fill in your own apps, this will do the trick.
What Is a Flood Fill Algorithm?
The implementation here uses a basic Forest Fire flood fill algorithm. In this approach we start from any given pixel, and iteratively check if any adjacent pixels match, and then any adjacent pixels of those pixels, and …so on. Once we've tested a given pixel we don't need to return to it so we can color it with our target color.
This is analogous to a forest fire which starts from a given point and spreads outwards, but will not return to areas it's already "burnt" (changed color). The following animation gives a good visualization of the process.

Step-by-Step Flood Fill Process
The steps of the flood fill algorithm are explained below.
- Start with our start pixel, fill color, and two empty lists
seenandqueue. - Look at our current pixel's color. This is the target for our fill. Store this initial location in
queue. - Taking the first item from
queue(initially our start (x,y) location) look at each of the 4 pixels surrounding our location (cardinal points) - Then:
- If they have not been previously seen — compare their color to the one we're looking for.
- If they match, add the (x,y) location to
queueand update the pixel with the fill color. - Add the (x,y) location to
seento keep track of where we've looked before (and avoid the overhead of looking again).
- Repeat from step 3, until the queue is empty.
You can opt to check 8 directions, if you want to be able to fill through diagonal gaps.
The order you visit pixels will change depending on whether you add new locations to the beginning or end of your queue list. But this won't affect the result.
Below we'll look at implementing this flood fill algorithm in Python, using PyQt6/PySide6. The fill methods described below can each be inserted into the following app skeleton if you want to test them yourself.
Purchasing Power Parity
Developers in [[ country ]] get [[ discount.discount_pc ]]% OFF on all books & courses with code [[ discount.coupon_code ]]- PyQt6
- PySide6
from PyQt6 import QtCore, QtGui, QtWidgets

from PyQt6.QtGui import QPainter, QPen, QColor
from PyQt6.QtCore import QPoint

FILL_COLOR = '#ff0000'

class Window(QtWidgets.QLabel):

    def __init__(self, *args, **kwargs):
        super().__init__(*args, **kwargs)

        p = QtGui.QPixmap(500, 500)
        p.fill(QtGui.QColor('#ffffff')) # Fill entire canvas.
        self.setPixmap(p)

        self.fill(0, 0)

    def fill(x, y):
        # ... see below ..


app = QtWidgets.QApplication(sys.argv)
w = Window()
w.show()
app.exec_()
from PySide6 import QtCore, QtGui, QtWidgets

from PySide6.QtGui import QPainter, QPen, QColor
from PySide6.QtCore import QPoint

FILL_COLOR = '#ff0000'

class Window(QtWidgets.QLabel):

    def __init__(self, *args, **kwargs):
        super().__init__(*args, **kwargs)

        p = QtGui.QPixmap(500, 500)
        p.fill(QtGui.QColor('#ffffff')) # Fill entire canvas.
        self.setPixmap(p)

        self.fill(0, 0)

    def fill(x, y):
        # ... see below ..


app = QtWidgets.QApplication(sys.argv)
w = Window()
w.show()
app.exec_()
Reading Pixel Colors with QImage.pixel()
To identify which pixels are filled with the correct color we can use QImage.pixel(). This accepts an x and y coordinate and returns the color at the given coordinates. There are two methods available — one to return the color of the pixel as QRgb object, one as a QColor.
QImage.pixel(x, y)       # returns a QRgb object
QImage.pixelColor(x, y)  # returns a QColor object
Complete Python Flood Fill Implementation with QImage
Below is a complete implementation of the flood fill algorithm described above using direct pixel access via QImage.pixel. We'll use this to generate some timings.
    def fill(x, y):
        image = self.pixmap().toImage()
        w, h = image.width(), image.height()

        # Get our target color from origin.
        target_color = image.pixel(x,y)

        have_seen = set()
        queue = [(x, y)]

        def get_cardinal_points(have_seen, center_pos):
            points = []
            cx, cy = center_pos
            for x, y in [(1, 0), (0, 1), (-1, 0), (0, -1)]:
                xx, yy = cx + x, cy + y
                if (xx >= 0 and xx < w and
                    yy >= 0 and yy < h and
                    (xx, yy) not in have_seen):

                    points.append((xx, yy))
                    have_seen.add((xx, yy))

            return points

        # Now perform the search and fill.
        p = QPainter(self.pixmap())
        p.setPen(QColor(FILL_COLOR))

        while queue:
            x, y = queue.pop()
            if image.pixel(x, y) == target_color:
                p.drawPoint(QPoint(x, y))
                # Prepend to the queue
                queue[0:0] = get_cardinal_points(have_seen, (x, y))
                # or append,
                # queue.extend(get_cardinal_points(have_seen, (x, y))

        self.update()
This method will work as-is on a QLabel widget which is displaying a QPixmap image (returned by self.pixmap()). However you can modify it to work on any other QPixmap object.s
Let's walk through how the code works.
Getting the QImage and Target Color
First we get a QImage representation of the QPixmap, so we can perform the .pixel() lookup operation. Then we get the dimensions, to determine the limits of our search, and finally, the target color — taken from the pixel where we start the fill.
image = self.pixmap().toImage()
w, h = image.width(), image.height()

# Get our target color from origin.
target_color = image.pixel(x,y)

have_seen = set()
queue = [(x, y)]
The set() named have_seen is used to track pixels that we've already visited, and therefore do not need to revisit. This is technically not necessary since pixels we've visited will be recolored and no longer match the original point, but it's quicker.
The queue holds a list of (x, y) tuples of all locations that we still need to visit. The queue is set to our initial fill position, and have_seen is reset to an empty set.
Finding Cardinal Points (Adjacent Pixels)
To determine what to put in the queue, we call the method get_cardinal_points which for a given position looks at all surrounding positions — if they haven't been looked at yet — and tests whether it is a hit or a miss.
def get_cardinal_points(have_seen, center_pos):
    points = []
    cx, cy = center_pos
    for x, y in [(1, 0), (0, 1), (-1, 0), (0, -1)]:
        xx, yy = cx + x, cy + y
        if (xx >= 0 and xx < w and
            yy >= 0 and yy < h and
            (xx, yy) not in have_seen):

            points.append((xx, yy))
            have_seen.add((xx, yy))

    return points
If it's a hit, we return that pixel to look and fill later. The result of this method is added to the queue in the main loop of the search.
Main Flood Fill Loop
while queue:
    x, y = queue.pop()
    if image.pixel(x, y) == target_color:
        p.drawPoint(QPoint(x, y))
        # Prepend to the queue
        queue[0:0] = get_cardinal_points(have_seen, (x, y))
This loops over the current queue, which is constantly expanding. Each loop it removes the first element x and y positions, checking the pixel at that location. If it is a match, we draw our fill color. Finally, we check all cardinal points of the current location, updating the queue and have_seen as appropriate.
Flood Fill Performance Benchmarks
Now we have the flood fill method implemented, we can time it to find its' performance limitations. To do this we'll use timeit from the Python standard library, testing the fill method with an increasingly large filled area.
To do this, we just need to wrap the call to our fill() method with the timeit timer setup, start and finish.
For accurate results you should run benchmarks multiple times (calling the method multiple times and taking the minimum value). Statistics on these values (median, mean) aren't really meaningful, since the causes of slower runs can be entirely random and transient. The minimum gives you the fastest possible speed for this code on your machine.
The full benchmarking code is given below:
- python
- PySide6
import sys
import timeit

from PyQt6 import QtGui, QtWidgets
from PyQt6.QtCore import QPoint, QTimer
from PyQt6.QtGui import QColor, QPainter

FILL_COLOR = "#ff0000"


class Window(QtWidgets.QLabel):
    def benchmark(self):
        for dim in [10, 50, 100]:  # Add larger dimensions here if you dare.
            self.pix = QtGui.QPixmap(dim, 500)
            self.pix.fill(QtGui.QColor("#ffffff"))  # Fill entire canvas.
            self.setPixmap(self.pix)
            times = timeit.repeat(self.fill, number=1, repeat=10)
            print(dim, min(times))

    def fill(self, x=0, y=0):
        image = self.pix.toImage()
        w, h = image.width(), image.height()

        # Get our target color from origin.
        target_color = image.pixel(x, y)

        have_seen = set()
        queue = [(x, y)]

        def get_cardinal_points(have_seen, center_pos):
            points = []
            cx, cy = center_pos
            for x, y in [(1, 0), (0, 1), (-1, 0), (0, -1)]:
                xx, yy = cx + x, cy + y
                if (
                    xx >= 0
                    and xx < w
                    and yy >= 0
                    and yy < h
                    and (xx, yy) not in have_seen
                ):
                    points.append((xx, yy))
                    have_seen.add((xx, yy))

            return points

        # Now perform the search and fill.
        p = QPainter(self.pix)
        p.setPen(QColor(FILL_COLOR))

        while queue:
            x, y = queue.pop()
            if image.pixel(x, y) == target_color:
                p.drawPoint(QPoint(x, y))
                # Prepend to the queue
                queue[0:0] = get_cardinal_points(have_seen, (x, y))
                # or append,
                # queue.extend(get_cardinal_points(have_seen, (x, y))

        self.setPixmap(self.pix)


app = QtWidgets.QApplication(sys.argv)
window = Window()
window.show()
QTimer.singleShot(0, window.benchmark)
app.exec()
import sys
import timeit
from statistics import median

from PySide6 import QtGui, QtWidgets
from PySide6.QtCore import QPoint, QTimer
from PySide6.QtGui import QColor, QPainter

FILL_COLOR = "#ff0000"


class Window(QtWidgets.QLabel):
    def benchmark(self):
        for dim in [10, 50, 100]: # Add larger dimensions here if you dare.
            self.pix = QtGui.QPixmap(dim, 500)
            self.pix.fill(QtGui.QColor("#ffffff"))  # Fill entire canvas.
            self.setPixmap(self.pix)
            times = timeit.repeat(self.fill, number=1, repeat=10)
            print(dim, min(times))

    def fill(self, x=0, y=0):
        image = self.pix.toImage()
        w, h = image.width(), image.height()

        # Get our target color from origin.
        target_color = image.pixel(x, y)

        have_seen = set()
        queue = [(x, y)]

        def get_cardinal_points(have_seen, center_pos):
            points = []
            cx, cy = center_pos
            for x, y in [(1, 0), (0, 1), (-1, 0), (0, -1)]:
                xx, yy = cx + x, cy + y
                if (
                    xx >= 0
                    and xx < w
                    and yy >= 0
                    and yy < h
                    and (xx, yy) not in have_seen
                ):
                    points.append((xx, yy))
                    have_seen.add((xx, yy))

            return points

        # Now perform the search and fill.
        p = QPainter(self.pix)
        p.setPen(QColor(FILL_COLOR))

        while queue:
            x, y = queue.pop()
            if image.pixel(x, y) == target_color:
                p.drawPoint(QPoint(x, y))
                # Prepend to the queue
                queue[0:0] = get_cardinal_points(have_seen, (x, y))
                # or append,
                # queue.extend(get_cardinal_points(have_seen, (x, y))

        self.setPixmap(self.pix)


app = QtWidgets.QApplication(sys.argv)
window = Window()
window.show()
QTimer.singleShot(0, window.benchmark)
app.exec()
Below is a table showing the time taken to fill an area of the given size (in pixels) using this QPainter flood fill algorithm. The tests have been run under both PyQt6 and PySide6, to see if there is a meaningful difference there.
| x | y | Area | PyQt6 (s) | PySide6 (s) |
|---|---|---|---|---|
| 500 | 10 | 5000 | 0.0178566 | 0.0140302 |
| 500 | 50 | 25000 | 0.0764182 | 0.0707474 |
| 500 | 100 | 50000 | 0.1543054 | 0.1505287 |
| 500 | 500 | 250000 | 0.8219194 | 0.8073093 |
| 500 | 1000 | 500000 | 1.7699727 | 1.7569807 |
| 500 | 5000 | 2500000 | 9.5030327 | 8.7493517 |
As you can see, at smaller fill areas the speed is reasonable, later it gets quite slow. The duraction scales linearly with the area being filled.
It's also notable that the code runs very marginally faster in PySide6.
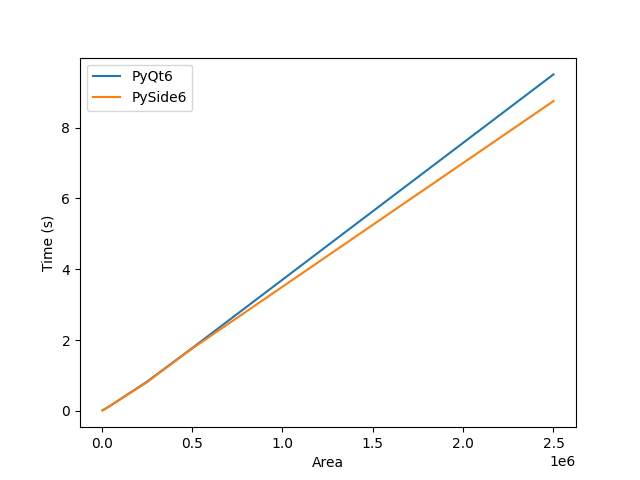 Plot of fill duration for PyQt6 vs. PySide6
You can opt to save the images on each iteration if you like, in order to check they are working.
self.pixmap().save(<filename>)
Filling an area of 500 x 100 pixels takes > 100 ms while a 500 x 5000 pixel region takes almost 8 seconds. So don't use large flood fills in parts of your application that are performance-dependent, such as when drawing custom widgets. For interactive paint applications, consider limiting the canvas size or running the flood fill in a separate thread to keep the UI responsive.
Bring Your PyQt/PySide Application to Market — Specialized launch support for scientific and engineering software built using Python & Qt.