The push button, or command button, is perhaps the most commonly used widget in any graphical user interface (GUI). A button is a rectangular widget that typically displays a text describing its aim.
When we click a button, we command the computer to perform actions or to answer a question. Typical buttons include Ok, Apply, Cancel, Close, Yes, No and Help. However, they're not restricted to this list.
In this tutorial, you'll learn how to create and customize QPushButton widgets in your PyQt6 and PySide6 GUI applications using Python.
Creating Button Widgets With QPushButton
Buttons are probably the most common widgets in GUI applications. They come in handy when you need to create dialogs for communicating with your users. You'll probably be familiar with Accept, Ok, Cancel, Yes, No, and Apply buttons, which are commonplace in modern graphical user interfaces.
In general, buttons allow you to trigger actions in response to the user's clicks on the button's area. Buttons often have a rectangular shape and include a text label that describes their intended action or command.
If you've used PyQt or PySide to create GUI applications in Python, then it'd be pretty likely that you already know about the QPushButton class. This class allows you to create buttons in your graphical interfaces quickly.
The QPushButton class provides three different constructors that you can use to create buttons according to your needs:
| Constructor | Description |
|---|---|
QPushButton(parent: QWidget = None) |
Constructs a button with a parent widget but without text or icon |
QPushButton(text: str, parent: QWidget = None) |
Constructs a button with a parent widget and the description text but without an icon |
QPushButton(icon: QIcon, text: str, parent: QWidget = None) |
Constructs a button with an icon, text, and parent widget |
To illustrate how to use the above constructors, you can code the following example:
- PyQt6
- PySide6
import sys

from PyQt6.QtCore import QSize
from PyQt6.QtGui import QIcon
from PyQt6.QtWidgets import QApplication, QPushButton, QVBoxLayout, QWidget

class Window(QWidget):
    def __init__(self, parent=None):
        super().__init__(parent)
        # Button with a parent widget
        topBtn = QPushButton(parent=self)
        topBtn.setFixedSize(100, 60)
        # Button with a text and parent widget
        centerBtn = QPushButton(text="Center", parent=self)
        centerBtn.setFixedSize(100, 60)
        # Button with an icon, a text, and a parent widget
        bottomBtn = QPushButton(
            icon=QIcon("./icons/logo.svg"),
            text="Bottom",
            parent=self
        )
        bottomBtn.setFixedSize(100, 60)
        bottomBtn.setIconSize(QSize(40, 40))
        layout = QVBoxLayout()
        layout.addWidget(topBtn)
        layout.addWidget(centerBtn)
        layout.addWidget(bottomBtn)
        self.setLayout(layout)

if __name__ == "__main__":
    app = QApplication(sys.argv)
    window = Window()
    window.show()
    sys.exit(app.exec())
import sys

from PySide6.QtCore import QSize
from PySide6.QtGui import QIcon
from PySide6.QtWidgets import QApplication, QPushButton, QVBoxLayout, QWidget

class Window(QWidget):
    def __init__(self, parent=None):
        super().__init__(parent)
        # Button with a parent widget
        topBtn = QPushButton(parent=self)
        topBtn.setFixedSize(100, 60)
        # Button with a text and parent widget
        centerBtn = QPushButton(text="Center", parent=self)
        centerBtn.setFixedSize(100, 60)
        # Button with an icon, a text, and a parent widget
        bottomBtn = QPushButton(
            icon=QIcon("./icons/logo.svg"),
            text="Bottom",
            parent=self
        )
        bottomBtn.setFixedSize(100, 60)
        bottomBtn.setIconSize(QSize(40, 40))
        layout = QVBoxLayout()
        layout.addWidget(topBtn)
        layout.addWidget(centerBtn)
        layout.addWidget(bottomBtn)
        self.setLayout(layout)

if __name__ == "__main__":
    app = QApplication(sys.argv)
    window = Window()
    window.show()
    sys.exit(app.exec())
You can download the logo here or use your own image file. You can also use PNG format images if you prefer.
This code does a lot! First, we do the required imports. Inside our Window class, we create three QPushButton instances. To create the first button, we use the first constructor of QPushButton. That's why we only pass a parent widget.
Packaging Python Applications with PyInstaller by Martin Fitzpatrick — This step-by-step guide walks you through packaging your own Python applications from simple examples to complete installers and signed executables.
For the second button, we use the second constructor of QPushButton. This time, we provide the button's text and parent. Note that the text is a regular Python string.
Our last button uses the third constructor. In this case, we need to provide the button's icon, text, and parent. We use the QIcon class with an SVG image as an argument to provide the icon. Note that we can also use a QPixmap object as the button's icon.
Save this code to a .py file and run it. You'll get a window that looks something like this:
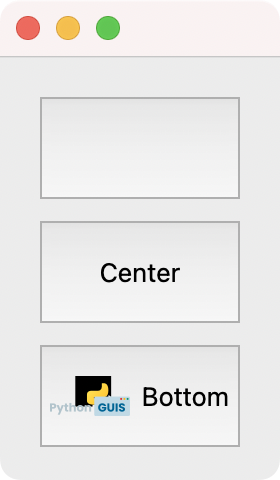 QPushButton constructors example, showing three buttons with labels & icon
The first button has no text. It's just a rectangular shape on the app's windows. The second button in the center has text only, while the third button at the bottom of the window has an icon and text. That looks great!
These buttons don't perform any action yet. If you click them, then you'll realize that nothing happens. To make your buttons perform concrete actions, you need to connect their signals to some useful slots. You'll learn how to do this in the next section.
Connecting QPushButton Signals and Slots
Depending on specific user events, the QPushButton class can emit four different signals. Here's a summary of these signals and their corresponding meaning:
| Signal | Emitted |
|---|---|
clicked(checked=false) |
When the user clicks the button and activates it. |
pressed() |
When the user presses the button down. |
released() |
When the user releases the button. |
toggled(checked=false) |
Whenever a checkable button changes its state from checked to unchecked and vice versa. |
When you're creating a GUI application, and you need to use buttons, then you need to think of the appropriate signal to use. Most of the time, you'll use the button's clicked() signal since clicking a button is the most common user event you'll ever need to process.
The other part of the signal and slot equation is the slot itself. A slot is a method or function that performs a concrete action in your application. Now, how can you connect a signal to a slot so that the slot gets called when the signal gets emitted? Here's the required syntax to do this:
button.<signal>.connect(<method>)
In this construct, button is the QPushButton object we need to connect with a given slot. The <signal> placeholder can be any of the four abovementioned signals. Finally, <method> represents the target slot or method.
Let's write an example that puts this syntax into action. For this example, we'll connect the clicked signal with a method that counts the clicks on a button:
- PyQt6
- PySide6
import sys

from PyQt6.QtWidgets import QApplication, QPushButton, QVBoxLayout, QWidget

class Window(QWidget):
    def __init__(self, parent=None):
        super().__init__(parent)
        self.count = 0
        self.button = QPushButton(f"Click Count: {self.count}", self)
        self.button.setFixedSize(120, 60)
        self.button.clicked.connect(self.count_clicks)
        layout = QVBoxLayout()
        layout.addWidget(self.button)
        self.setLayout(layout)

    def count_clicks(self):
        self.count += 1
        self.button.setText(f"Click Count: {self.count}")

if __name__ == "__main__":
    app = QApplication(sys.argv)
    window = Window()
    window.show()
    sys.exit(app.exec())
import sys

from PySide6.QtWidgets import QApplication, QPushButton, QVBoxLayout, QWidget

class Window(QWidget):
    def __init__(self, parent=None):
        super().__init__(parent)
        self.count = 0
        self.button = QPushButton(f"Click Count: {self.count}", self)
        self.button.setFixedSize(120, 60)
        self.button.clicked.connect(self.count_clicks)
        layout = QVBoxLayout()
        layout.addWidget(self.button)
        self.setLayout(layout)

    def count_clicks(self):
        self.count += 1
        self.button.setText(f"Click Count: {self.count}")

if __name__ == "__main__":
    app = QApplication(sys.argv)
    window = Window()
    window.show()
    sys.exit(app.exec())
The button variable holds an instance of QPushButton. To create this button, we use a text and parent widget. This parent widget works as our current window. Then we connect the button's clicked signal with the count_clicks() method.
The count_clicks() method counts the number of clicks on the button and updates the button's text accordingly. Go ahead and run the app!
Exploring the QPushButton API: Properties and Methods
Up to this point, you've learned about the different ways to create buttons in your GUI applications. You've also learned how to make your buttons perform actions in response to the user's actions by connecting the buttons' signals with concrete methods known as slots.
In the following sections, you'll learn about the QPushButton class's public API and its most useful properties, including the following:
| Property | Description | Getter Method | Setter Method |
|---|---|---|---|
text |
Holds the text shown on the button | text() |
setText() |
icon |
Holds the icon shown on the button | icon() |
setIcon() |
shortcut |
Holds the keyboard shortcut associated with the button | shortcut() |
setShortcut() |
Let's kick things off by learning how to set and get a button's text, icon, and keyboard shortcut. These actions can be an essential part of your GUI design process.
Setting a QPushButton's Text, Icon, and Keyboard Shortcut
In previous sections, you've learned how to create buttons using different class constructors. Some of these constructors allow you to set the button's text directly. However, sometimes you need to manipulate a button's text at runtime. To accomplish this, you can use setText() and text().
As its name suggests, the setText() method allows you to set the text of a given button. On the other hand, the text() lets you retrieve the current text of a button. Here's a toy example of how to use these methods:
- PyQt6
- PySide6
import sys

from PyQt6.QtWidgets import QApplication, QPushButton, QVBoxLayout, QWidget

class Window(QWidget):
    def __init__(self, parent=None):
        super().__init__(parent)
        self.button = QPushButton("Hello!")
        self.button.setFixedSize(120, 60)
        self.button.clicked.connect(self.onClick)
        layout = QVBoxLayout()
        layout.addWidget(self.button)
        self.setLayout(layout)

    def onClick(self):
        text = self.button.text()
        if text == "Hello!":
            self.button.setText(text[:-1] + ", World!")
        else:
            self.button.setText("Hello!")

if __name__ == "__main__":
    app = QApplication(sys.argv)
    window = Window()
    window.show()
    sys.exit(app.exec())
import sys

from PySide6.QtWidgets import QApplication, QPushButton, QVBoxLayout, QWidget

class Window(QWidget):
    def __init__(self, parent=None):
        super().__init__(parent)
        self.button = QPushButton("Hello!")
        self.button.setFixedSize(120, 60)
        self.button.clicked.connect(self.onClick)
        layout = QVBoxLayout()
        layout.addWidget(self.button)
        self.setLayout(layout)

    def onClick(self):
        text = self.button.text()
        if text == "Hello!":
            self.button.setText(text[:-1] + ", World!")
        else:
            self.button.setText("Hello!")

if __name__ == "__main__":
    app = QApplication(sys.argv)
    window = Window()
    window.show()
    sys.exit(app.exec())
In this example, we use text() and setText() inside the onClick() method to manipulate the text of our button object. These methods come in handy when we need to set and retrieve a button's text at run time, which would be useful in a few situations. For example, if we need a button to fold and unfold a tree of widgets or other objects.
Go ahead and run the app! You'll get a window like the following:
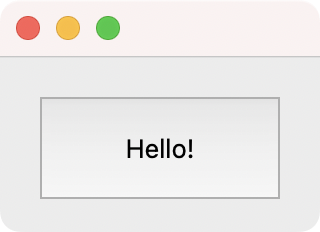 Window with a single button, with the text Hello! Click to change the text.
In this example, when you click the button, its text alternates between Hello! and Hello, World!.
QPushButton also has methods to manipulate the icon of a given button. In this case, the methods are setIcon() and icon(). You can set the button's icon at run time with the first method. The second method allows you to retrieve the icon of a given button. There's also a third method related to icons. It's called .setIconSize() and allows you to manipulate the icon size.
Here's an example that illustrates how to use these methods:
- PyQt6
- PySide6
import sys

from PyQt6.QtCore import QSize
from PyQt6.QtGui import QIcon
from PyQt6.QtWidgets import QApplication, QPushButton, QVBoxLayout, QWidget

class Window(QWidget):
    def __init__(self, parent=None):
        super().__init__(parent)
        self.btnOne = QPushButton(
            icon=QIcon("./icons/logo.svg"), text="Click me!", parent=self
        )
        self.btnOne.setFixedSize(100, 60)
        self.btnOne.clicked.connect(self.onClick)
        self.btnTwo = QPushButton(parent=self)
        self.btnTwo.setFixedSize(100, 60)
        self.btnTwo.setEnabled(False)
        self.btnTwo.clicked.connect(self.onClick)
        layout = QVBoxLayout()
        layout.addWidget(self.btnOne)
        layout.addWidget(self.btnTwo)
        self.setLayout(layout)

    def onClick(self):
        sender = self.sender()
        icon = sender.icon()

        if sender is self.btnOne:
            sender.setText("")
            sender.setIcon(QIcon())
            sender.setEnabled(False)
            self.btnTwo.setEnabled(True)
            self.btnTwo.setText("Click me!")
            self.btnTwo.setIcon(icon)
            self.btnTwo.setIconSize(QSize(20, 20))
        elif sender is self.btnTwo:
            sender.setText("")
            sender.setIcon(QIcon())
            sender.setEnabled(False)
            self.btnOne.setEnabled(True)
            self.btnOne.setText("Click me!")
            self.btnOne.setIcon(icon)
            self.btnOne.setIconSize(QSize(30, 30))

if __name__ == "__main__":
    app = QApplication(sys.argv)
    window = Window()
    window.show()
    sys.exit(app.exec())
import sys

from PySide6.QtCore import QSize
from PySide6.QtGui import QIcon
from PySide6.QtWidgets import QApplication, QPushButton, QVBoxLayout, QWidget

class Window(QWidget):
    def __init__(self, parent=None):
        super().__init__(parent)
        self.btnOne = QPushButton(
            icon=QIcon("./icons/logo.svg"), text="Click me!", parent=self
        )
        self.btnOne.setFixedSize(100, 60)
        self.btnOne.clicked.connect(self.onClick)
        self.btnTwo = QPushButton(parent=self)
        self.btnTwo.setFixedSize(100, 60)
        self.btnTwo.setEnabled(False)
        self.btnTwo.clicked.connect(self.onClick)
        layout = QVBoxLayout()
        layout.addWidget(self.btnOne)
        layout.addWidget(self.btnTwo)
        self.setLayout(layout)

    def onClick(self):
        sender = self.sender()
        icon = sender.icon()

        if sender is self.btnOne:
            sender.setText("")
            sender.setIcon(QIcon())
            sender.setEnabled(False)
            self.btnTwo.setEnabled(True)
            self.btnTwo.setText("Click me!")
            self.btnTwo.setIcon(icon)
            self.btnTwo.setIconSize(QSize(20, 20))
        elif sender is self.btnTwo:
            sender.setText("")
            sender.setIcon(QIcon())
            sender.setEnabled(False)
            self.btnOne.setEnabled(True)
            self.btnOne.setText("Click me!")
            self.btnOne.setIcon(icon)
            self.btnOne.setIconSize(QSize(30, 30))

if __name__ == "__main__":
    app = QApplication(sys.argv)
    window = Window()
    window.show()
    sys.exit(app.exec())
In this example, we create an app with two buttons. Both buttons are connected to the onClick() method. Inside the method, we first get the clicked button using the sender() method on our app's window, self.
Next, we get a reference to the sender button's icon using the icon() method. The if statement checks if the clicked object was btnOne. If that's the case, then we reset the icon with setIcon() and disable the button with setEnabled(). The following four lines enable the btnTwo button, set its text to "Click me!", change the button's icon, and resize the icon. The elif clause does something similar, but this time the target button is btnOne.
If you run this application, then you'll get a window like this:
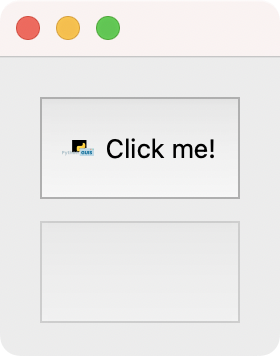 Window with two buttons, the top with a icon & label, the bottom empty. Click to toggle which button has the label & icon.
When we click the top button, the bottom button's text and icon will be set to Click me! and to the PythonGUIs.com logo, respectively. At the same time, the top button's text and icon will disappear. Note that the logo's size will change as well.
Another useful feature of buttons is that you can assign them a keyboard shortcut for those users that prefer the keyboard over the mouse. These methods are .setShortcut() and .shortcut(). Again, you can use the first method to set a shortcut and the second method to get the shortcut assigned to the underlying button.
These methods are commonly helpful in situations where we have a button that doesn't have any text. Therefore we can't assign it an automatic shortcut using the ampersand character &.
Checking the Status of a QPushButton: Down, Checked, and Enabled
Sometimes you'd need to check the status of a given button and take action accordingly. The QPushButton class provides a few methods that can help you check different properties related to the current status of your buttons:
| Property | Description | Access Method | Setter Method |
|---|---|---|---|
down |
Indicates whether the button is pressed down or not | isDown() |
setDown() |
checked |
Indicates whether the button is checked or not | isChecked() |
setChecked() |
enabled |
Indicates whether the button is enabled or not | isEnabled() |
setEnabled() |
The down status is typically transitory and naturally happens between the pressed and released statuses. However, we can use the setDown() method to manipulate the down status at runtime.
The checked status is only available when we use checkable buttons. Only checkable buttons can be at either the checked or unchecked status.
Finally, when we enable or disable a given button, we allow or disallow the user's click on the button. In other words, disabled buttons don't respond to the user's clicks or other events, while enabled buttons do respond.
Here's an example that shows how these three sets of statuses work:
- PyQt6
- PySide6
import sys

from PyQt6.QtWidgets import QApplication, QPushButton, QVBoxLayout, QWidget

class Window(QWidget):
    def __init__(self, parent=None):
        super().__init__(parent)
        self.btnOne = QPushButton(text="I'm Down!", parent=self)
        self.btnOne.setFixedSize(150, 60)
        self.btnOne.setDown(True)
        self.btnOne.clicked.connect(self.onBtnOneClicked)

        self.btnTwo = QPushButton(text="I'm Disabled!", parent=self)
        self.btnTwo.setFixedSize(150, 60)
        self.btnTwo.setEnabled(False)

        self.btnThree = QPushButton(text="I'm Checked!", parent=self)
        self.btnThree.setFixedSize(150, 60)
        self.btnThree.setCheckable(True)
        self.btnThree.setChecked(True)
        self.btnThree.clicked.connect(self.onBtnThreeClicked)

        layout = QVBoxLayout()
        layout.addWidget(self.btnOne)
        layout.addWidget(self.btnTwo)
        layout.addWidget(self.btnThree)
        self.setLayout(layout)

    def onBtnOneClicked(self):
        if not self.btnOne.isDown():
            self.btnOne.setText("I'm Up!")
            self.btnOne.setDown(False)

    def onBtnThreeClicked(self):
        if self.btnThree.isChecked():
            self.btnThree.setText("I'm Checked!")
        else:
            self.btnThree.setText("I'm Unchecked!")

if __name__ == "__main__":
    app = QApplication(sys.argv)
    window = Window()
    window.show()
    sys.exit(app.exec())
import sys

from PySide6.QtWidgets import QApplication, QPushButton, QVBoxLayout, QWidget

class Window(QWidget):
    def __init__(self, parent=None):
        super().__init__(parent)
        self.btnOne = QPushButton(text="I'm Down!", parent=self)
        self.btnOne.setFixedSize(150, 60)
        self.btnOne.setDown(True)
        self.btnOne.clicked.connect(self.onBtnOneClicked)

        self.btnTwo = QPushButton(text="I'm Disabled!", parent=self)
        self.btnTwo.setFixedSize(150, 60)
        self.btnTwo.setEnabled(False)

        self.btnThree = QPushButton(text="I'm Checked!", parent=self)
        self.btnThree.setFixedSize(150, 60)
        self.btnThree.setCheckable(True)
        self.btnThree.setChecked(True)
        self.btnThree.clicked.connect(self.onBtnThreeClicked)

        layout = QVBoxLayout()
        layout.addWidget(self.btnOne)
        layout.addWidget(self.btnTwo)
        layout.addWidget(self.btnThree)
        self.setLayout(layout)

    def onBtnOneClicked(self):
        if not self.btnOne.isDown():
            self.btnOne.setText("I'm Up!")
            self.btnOne.setDown(False)

    def onBtnThreeClicked(self):
        if self.btnThree.isChecked():
            self.btnThree.setText("I'm Checked!")
        else:
            self.btnThree.setText("I'm Unchecked!")

if __name__ == "__main__":
    app = QApplication(sys.argv)
    window = Window()
    window.show()
    sys.exit(app.exec())
In this example, we first set btnOne down using the setDown() method. Then we disable btnTwo using the setEnabled() with False as an argument. This will make this button unresponsive to user events. Finally, we set btnThree as checkable with setCheckable(). Being checkable means that we can use the checked and unchecked statuses in our code.
The onBtnOneClicked() method is connected to btnOne. This method checks if the button is not down and changes the button text accordingly.
The onBtnThreeClicked() is connected to btnThree. This method alternatively changes the button's text depending on its checked status.
If you run this app, you'll get the following window:
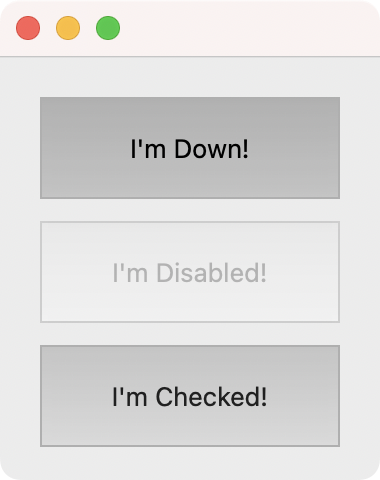 Window with 3 buttons: one starting in the down state, one disabled and one checked & toggleable.
First, note that these three buttons have different tones of gray. These different tones of gray indicate three different states. The first button is down, the second button is disabled, and the third button is checked.
If you click the first button, then it'll be released, and its text will be set to I'm Up!. The second button won't respond to your clicks or actions. The third button will alternate its status between unchecked and checked.
Default and Flat QPushButton Properties
QPushButton has several other useful properties we can use in our GUI applications. Some of these properties with their corresponding setter and getter method include:
| Property | Description | Access Method | Setter Method |
|---|---|---|---|
default |
Indicates whether the button is the default button on the containing window or not | isDefault() |
setDefault() |
flat |
Indicates whether the button border is raised or not | isFlat() |
setFlat() |
The default property comes in handy when you have several buttons on a window, and you need to set one of these buttons as the default window's action. For example, say we have a dialog with the Ok and Cancel buttons. In this case, the Ok button can be your default action.
The flat property is closely related to the look and feel of your app's GUI. If we set flat to True, then the button's border won't be visible.
Associating a Popup Menu to a QPushButton
QPushButton objects can also display a popup menu when you click them. To set up this menu, you must have a proper popup menu beforehand. Then you can use the setMenu() method to associate the menu with the button.
Here's an example that creates a button with an attached popup menu:
- PyQt6
- PySide6
import sys

from PyQt6.QtWidgets import (
    QApplication,
    QMenu,
    QPushButton,
    QVBoxLayout,
    QWidget,
)

class Window(QWidget):
    def __init__(self, parent=None):
        super().__init__(parent)
        self.btnOne = QPushButton(text="Menu!", parent=self)

        self.menu = QMenu(self)
        self.menu.addAction("First Item")
        self.menu.addAction("Second Item")
        self.menu.addAction("Third Item")

        self.btnOne.setMenu(self.menu)

        layout = QVBoxLayout()
        layout.addWidget(self.btnOne)
        self.setLayout(layout)

if __name__ == "__main__":
    app = QApplication(sys.argv)
    window = Window()
    window.show()
    sys.exit(app.exec())
import sys

from PySide6.QtWidgets import (
    QApplication,
    QMenu,
    QPushButton,
    QVBoxLayout,
    QWidget,
)

class Window(QWidget):
    def __init__(self, parent=None):
        super().__init__(parent)
        self.btnOne = QPushButton(text="Menu!", parent=self)

        self.menu = QMenu(self)
        self.menu.addAction("First Item")
        self.menu.addAction("Second Item")
        self.menu.addAction("Third Item")

        self.btnOne.setMenu(self.menu)

        layout = QVBoxLayout()
        layout.addWidget(self.btnOne)
        self.setLayout(layout)

if __name__ == "__main__":
    app = QApplication(sys.argv)
    window = Window()
    window.show()
    sys.exit(app.exec())
In this example, we create a button with an associated popup menu. To attach the menu to the target button, we use setMenu(), which turns the button into a menu button.
If you run this application, then you'll get a window that will look something like this:
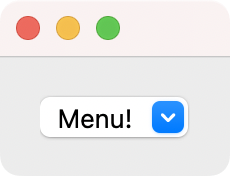 Window with a single button, with attached drop-down menu.
In some window styles, the button will show a small triangle on the right end of the button. If we click the button, then the pop-up menu will appear, allowing us to select any available menu option.
Conclusion
Push buttons are essential widgets in any Python GUI application. They allow your users to trigger actions and interact with your interface through clicks, keyboard shortcuts, and more.
In this tutorial, you've learned how to create, use, and customize QPushButton widgets in PyQt6 and PySide6, including how to connect signals and slots, set text and icons, check button status, and attach popup menus.

