The QLineEdit class is a versatile tool for single-line text input in PyQt and PySide applications. The widget facilitates text manipulation by supporting insertion, deletion, selection, and cut-copy-paste operations natively. You can use line edits when you need to accept text input from your users in a PyQt/PySide application.
The widget is highly customizable. You can set it up to include placeholder text, input masks, input validators, and more. It also supports many keyboard shortcuts out of the box and is able to process custom ones. This feature opens an opportunity to enhance user input speed and efficiency.
In this tutorial, you will learn the basics of using QLineEdit by going through its most commonly used features and capabilities, including creating line edits, manipulating text, aligning content, connecting signals and slots, and validating user input.
Creating Line Edit Widgets With QLineEdit
A line edit allows the user to enter and edit a single line of plain text with a useful collection of editing functionalities, such as insertion, deletion, selection, cut-copy-paste, and drag-and-drop operations.
If you've used PyQt or PySide to create GUI applications in Python, then it'd be likely that you already know about the QLineEdit class. This class allows you to create line edits in your graphical interfaces (GUI) quickly.
The QLineEdit class provides two different constructors that you can use to create line edits according to your needs:
| Constructor | Description |
|---|---|
QLineEdit(parent: QWidget = None) |
Constructs a line edit with a parent widget but without text |
QLineEdit(text: str, parent: QWidget = None) |
Constructs a line edit with default text and a parent widget |
The parent widget would be the window or dialog where you need to place the line edit. The text can be a default text that will appear in the line edit when you run the application.
To illustrate how to use the above constructors, we can code a demo example:
from PyQt6.QtWidgets import QApplication, QLineEdit, QVBoxLayout, QWidget

class Window(QWidget):
    def __init__(self, parent=None):
        super().__init__(parent)
        self.setWindowTitle("QLineEdit Constructors")
        self.resize(300, 100)
        # Line edit with a parent widget
        top_line_edit = QLineEdit(parent=self)
        # Line edit with a parent widget and a default text
        bottom_line_edit = QLineEdit(
            "Hello! This is a line edit.", parent=self
        )

        layout = QVBoxLayout()
        layout.addWidget(top_line_edit)
        layout.addWidget(bottom_line_edit)
        self.setLayout(layout)

app = QApplication([])
window = Window()
window.show()
app.exec()
In this example, we first do the required imports and then define the Window class inheriting from QWidget. Inside Window, we create two QLineEdit widgets.
To create the first line edit, we use the first constructor of QLineEdit, passing only a parent widget. For the second line editor, we use the second constructor, which requires the parent widget and a default text. Note that the text is a regular Python string.

Purchasing Power Parity
Developers in [[ country ]] get [[ discount.discount_pc ]]% OFF on all books & courses with code [[ discount.coupon_code ]]Save the code to a file called constructors.py file and run it from your command line. You'll get a window that looks something like this:
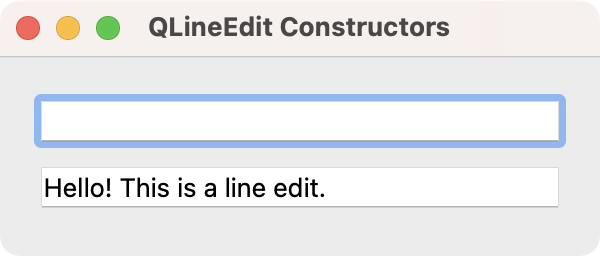 Standard window showing our two line edits.
The first line edit has no text. In most cases, this is how you would create your line edits because they're designed for accepting input. If you'd like to just display some text, then you can use a QLabel widget instead. The second line edit displays the text that you passed to the constructor.
Both line edits are ready for accepting input text. Note that you can use all the following keyboard shortcuts to optimize your text input process:
| Keys | Action |
|---|---|
| Left Arrow | Moves the cursor one character to the left |
| Shift+Left Arrow | Moves and selects text one character to the left |
| Right Arrow | Moves the cursor one character to the right |
| Shift+Right Arrow | Moves and selects text one character to the right |
| Home | Moves the cursor to the beginning of the line |
| End | Moves the cursor to the end of the line |
| Backspace | Deletes the character to the left of the cursor |
| Ctrl+Backspace | Deletes the word to the left of the cursor |
| Delete | Deletes the character to the right of the cursor |
| Ctrl+Delete | Deletes the word to the right of the cursor |
| Ctrl+A | Select all |
| Ctrl+C | Copies the selected text to the clipboard |
| Ctrl+Insert | Copies the selected text to the clipboard |
| Ctrl+K | Deletes to the end of the line |
| Ctrl+V | Pastes the clipboard text into the line edit |
| Shift+Insert | Pastes the clipboard text into the line edit |
| Ctrl+X | Deletes the selected text and copies it to the clipboard |
| Shift+Delete | Deletes the selected text and copies it to the clipboard |
| Ctrl+Z | Undoes the last operation |
| Ctrl+Y | Redoes the last undone operation |
That's a lot of shortcuts! This table is just a sample of all the features that the QLineEdit class provides out of the box.
In addition to these keyboard shortcuts, the QLineEdit class provides a context menu that you can trigger by clicking on a line edit using the right button of your mouse:
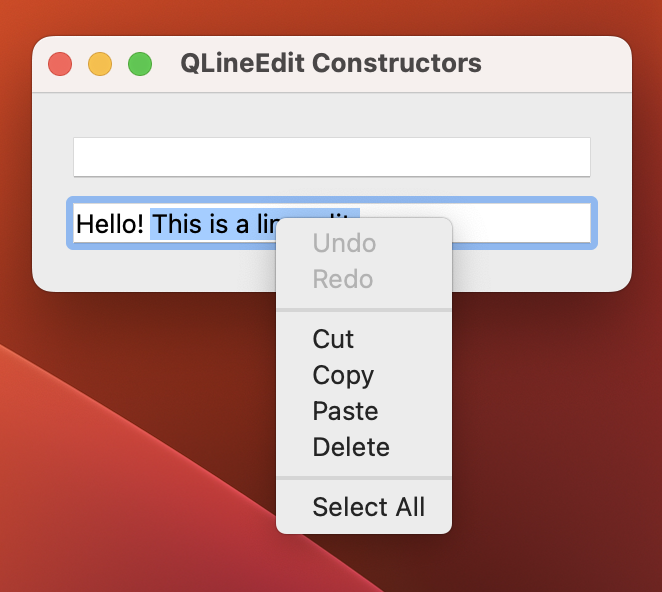 QLineEdit with a context menu visible.
The built-in context menu provides basic edition options, such as cut, copy, paste, and delete. It also has options for undoing and redoing edits, and for selecting all the content of a given line edit.
Creating Read-Only Line Edits
Sometimes, we need to make a line edit non-editable. By default, all line edits are editable because their main use case is to provide text input for the user. However, in some situations, a read-only line edit can be useful.
For example, say that you're creating a GUI application that generates some recovery keys for the users. The user must be able to copy the key to a safe place so that they can use it to recover access if they forget their password. In this situation, creating a read-only line edit can provide a suitable solution.
To make a line edit read-only, we can use the readOnly property and its setter method setReadOnly() as in the following example:
import secrets

from PyQt6.QtWidgets import (
    QApplication,
    QLabel,
    QLineEdit,
    QVBoxLayout,
    QWidget,
)

class Window(QWidget):
    def __init__(self, parent=None):
        super().__init__(parent)
        self.setWindowTitle("Non-editable QLineEdit")
        self.resize(300, 100)
        non_editable_line_edit = QLineEdit(parent=self)
        non_editable_line_edit.setReadOnly(True)
        non_editable_line_edit.setText(secrets.token_hex(16))

        layout = QVBoxLayout()
        layout.addWidget(QLabel(parent=self, text="Your secret key:"))
        layout.addWidget(non_editable_line_edit)
        self.setLayout(layout)

app = QApplication([])
window = Window()
window.show()
app.exec()
In this example, we create a read-only line edit by using the setReadOnly() method. When we set the readOnly property to True, our line edit won't accept editions. It'll only allow us to select and copy its content.
Go ahead and run the application from your command line to explore how this line edit works. You'll get a window like the following:
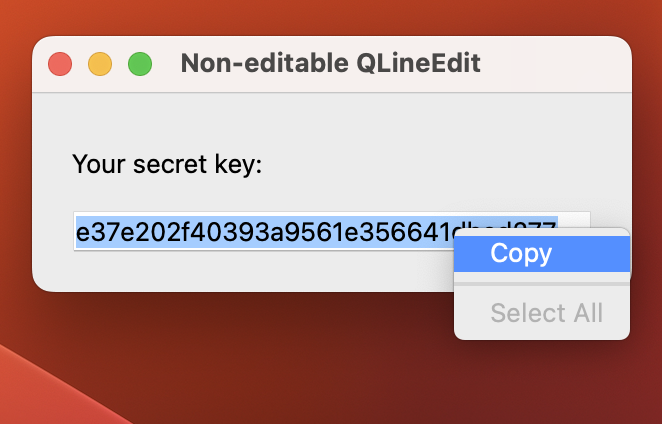 A read-only line edit with editing disabled.
If you play a bit with this line edit, you'll soon discover that you can't change its text. You'll also note that the options in the context menu are now limited to Copy and Select All.
Creating Password Input Fields With QLineEdit
Another cool feature of the QLineEdit class is that it allows you to create text input for passwords. This can be pretty convenient for those applications that manage several users, and each user needs to have access credentials.
You can create line edits for passwords by using the echoMode() method. This method takes one of the following constants as an argument:
| Constant | Value | Description |
|---|---|---|
QLineEdit.EchoMode.Normal |
0 |
Display characters as you enter them. |
QLineEdit.EchoMode.NoEcho |
1 |
Display no characters when you enter them. |
QLineEdit.EchoMode.Password |
2 |
Display platform-dependent password mask characters instead of the characters you enter. |
QLineEdit.EchoMode.PasswordEchoOnEdit |
3 |
Display characters as you enter them while editing. Display characters as the Password mode does when reading. |
The Normal mode is the default. The NoEcho mode may be appropriate for critical passwords where even the length of the password should be kept secret.
The Password mode is appropriate for most password use cases, however PasswordEchoOnEdit can be used instead if you need to give users some confirmation of what they are typing.
Here's a sample app that shows a user and password form:
from PyQt6.QtWidgets import (
    QApplication,
    QFormLayout,
    QLineEdit,
    QWidget,
)

class Window(QWidget):
    def __init__(self, parent=None):
        super().__init__(parent)
        self.setWindowTitle("Password QLineEdit")
        self.resize(300, 100)
        username_line_edit = QLineEdit(parent=self)
        password_line_edit = QLineEdit(parent=self)
        password_line_edit.setEchoMode(QLineEdit.EchoMode.Password)

        layout = QFormLayout()
        layout.addRow("Username:", username_line_edit)
        layout.addRow("Password:", password_line_edit)
        self.setLayout(layout)

app = QApplication([])
window = Window()
window.show()
app.exec()
In this example, you call setEchoMode() on the password_line_edit widget using the Password mode as an argument. When you run this code from your command line, you get the following window on your screen:
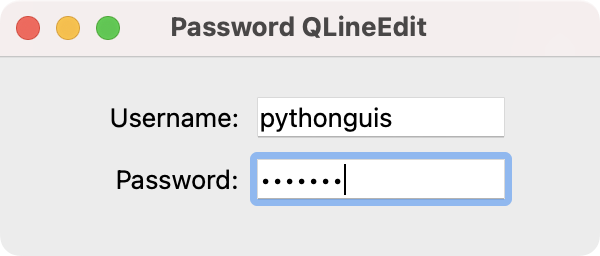 Window with a username and password line edit.
The username_line_edit line edit is in Normal mode, so we can see the characters as we type them in. In contrast, the Password line edit is in Password mode. In this case, when we enter a character, the line edit shows the platform's character for passwords.
Manipulating Text in a QLineEdit
You can change the text of a line edit using the setText() or insert() methods. You can retrieve the text with the text() method. However, these are not the only operations that you can perform with the text of a line edit.
The following table shows a summary of some of the most commonly used methods for text manipulation in line edits:
| Method | Description |
|---|---|
setText(text) |
Sets the text of a line edit to text, clears the selection, clears the undo/redo history, moves the cursor to the end of the line, and resets the modified property to false. |
insert(text) |
Deletes any selected text, inserts text, and validates the result. If it is valid, it sets it as the new contents of the line edit. |
clear() |
Clears the contents of the line edit. |
copy() |
Copies the selected text to the clipboard. |
cut() |
Copies the selected text to the clipboard and deletes it from the line edit. |
paste() |
Inserts the clipboard's text at the cursor position, deleting any selected text. |
redo() |
Redoes the last operation if redo is available. Redo becomes available once the user has performed one or more undo operations on text in the line edit. |
undo() |
Undoes the last operation if undo is available. Undo becomes available once the user has modified the text in the line edit. |
selectAll() |
Selects all the text and moves the cursor to the end. |
You can use any of these methods to manipulate the text of a line edit from your code. Consider the following example where you have two line edits and two buttons that take advantage of some of the above methods to copy some text from one line edit to the other:
from PyQt6.QtWidgets import (
    QApplication,
    QGridLayout,
    QLabel,
    QLineEdit,
    QPushButton,
    QWidget,
)

class Window(QWidget):
    def __init__(self, parent=None):
        super().__init__(parent)
        self.setWindowTitle("Copy and Paste")
        self.resize(300, 100)

        self.source_line_edit = QLineEdit(parent=self)
        self.source_line_edit.setText("Hello, World!")
        self.dest_line_edit = QLineEdit(parent=self)

        copy_button = QPushButton(parent=self, text="Copy")
        paste_button = QPushButton(parent=self, text="Paste")

        copy_button.clicked.connect(self.copy)
        paste_button.clicked.connect(self.paste)

        layout = QGridLayout()
        layout.addWidget(self.source_line_edit, 0, 0)
        layout.addWidget(copy_button, 0, 1)
        layout.addWidget(self.dest_line_edit, 1, 0)
        layout.addWidget(paste_button, 1, 1)
        self.setLayout(layout)

    def copy(self):
        self.source_line_edit.selectAll()
        self.source_line_edit.copy()

    def paste(self):
        self.dest_line_edit.clear()
        self.dest_line_edit.paste()

app = QApplication([])
window = Window()
window.show()
app.exec()
In this example, we create two line edits. The first one will hold some sample text. The second line edit will receive the text. Then, we create two buttons and connect their clicked signals to the copy() and paste() slots.
Inside the copy() method we first select all the text from the source line edit. Then we use the copy() method to copy the selected text to the clipboard. In paste(), we call clear() on the destination line edit to remove any previous text. Then, we use the paste() method to copy the clipboard's content.
Go ahead and run the application. You'll get the following window on your screen:
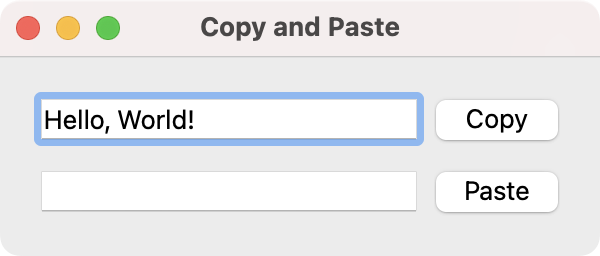 QLineEdit with Copy & Paste buttons attached to handlers.
Once you've run the app, then you can click the Copy button to copy the text in the first line edit. Next, you can click the Paste button to paste the copied text to the second line edit. Go ahead and give it a try!
Aligning and Formatting Text in a QLineEdit
You can also align and format the text in a line edit. For example, for text alignment, you can use the setAlignment() method with one or more alignment flags. Some of the most useful flags that you can find in the Qt.AlignmentFlag namespace includes the following:
| Flag | Description |
|---|---|
AlignLeft |
Aligns with the left edge. |
AlignRight |
Aligns with the right edge. |
AlignHCenter |
Centers horizontally in the available space. |
AlignJustify |
Justifies the text in the available space. |
AlignTop |
Aligns with the top. |
AlignBottom |
Aligns with the bottom. |
AlignVCenter |
Centers vertically in the available space. |
AlignCenter |
Centers in both dimensions. |
If you want to apply multiple alignment flags to a given line edit, you don't have to call setAlignment() multiple times. You can just use the bitwise OR operator (|) to combine them. Consider the following example:
from PyQt6.QtCore import Qt
from PyQt6.QtWidgets import QApplication, QLineEdit

class Window(QLineEdit):
    def __init__(self, parent=None):
        super().__init__(parent)
        self.setWindowTitle("Aligning Text")
        self.resize(300, 100)
        self.setText("Hello, World!")
        self.setAlignment(Qt.AlignmentFlag.AlignCenter)

app = QApplication([])
window = Window()
window.show()
app.exec()
In this example, we use a QLineEdit as the only component of our app's GUI. Using the setAlignment() method, we center the "Hello, World!" message in both directions, horizontally and vertically. To do this, we use the AlignCenter flag. Here's what the app looks like:
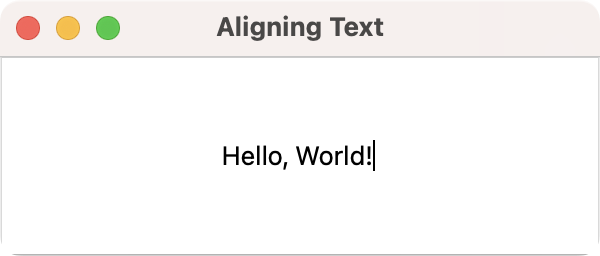 QLineEdit with text alignment set.
Go ahead and play with other flags to see their effect on the text alignment. Use the | bitwise operator to combine several alignment flags.
Setting Text Margins on a QLineEdit
Line edits also have a textMargins property that you can tweak to customize the text alignment using specific values. To set margin values for your text, you can use the setTextMargins() method, which has the following signatures:
| Method | Description |
|---|---|
setTextMargins(left, top, right, bottom) |
Sets the margins around the text to have the sizes left, top, right, and bottom. |
setTextMargins(margins) |
Sets the margins around the text using a QMargins object. |
The first signature allows you to provide four integer values as the left, top, right, and bottom margins for the text. The second signature accepts a QMargins object as an argument. To build this object, you can use four integer values with the same meaning as the left, top, right, and bottom arguments in the first signature.
Here's an example of how to set custom margins for the text in a line edit:
from PyQt6.QtWidgets import QApplication, QLineEdit

class Window(QLineEdit):
    def __init__(self, parent=None):
        super().__init__(parent)
        self.setWindowTitle("Aligning Text")
        self.resize(300, 100)
        self.setText("Hello, World!")
        self.setTextMargins(30, 30, 0, 0)

app = QApplication([])
window = Window()
window.show()
app.exec()
In this example, you set the left and top margins to custom values. Here's how this app looks when you run it:
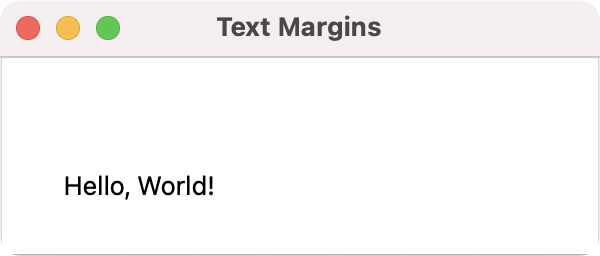 QLineEdit with text margins added.
Using the setTextMargins() method, we can place the text in the desired place in a line edit, which may be a requirement in some situations.
Connecting QLineEdit Signals and Slots
When you're creating a GUI application and you need to use line edits, you may need to perform actions when the user enters or modifies the content of the line edit. To do this, you need to connect some of the signals of the line edit to specific slots or functions.
Depending on specific user events, the QLineEdit class can emit several different signals. Here's a summary of these signals and their corresponding meaning:
| Signal | Emitted |
|---|---|
textChanged(text) |
Whenever the user changes the text either manually or programmatically. The text argument is the new text. |
textEdited(text) |
Whenever the user edits the text manually. The text argument is the new text. |
editingFinished |
When the user presses the Return or Enter key, or when the line edit loses focus, and its contents have changed since the last time this signal was emitted. |
inputRejected |
When the user presses a key that is an unacceptable input. |
returnPressed |
When the user presses the Return or Enter key. |
selectionChanged |
When the selection changes. |
We can connect either of these signals with any slot. A slot is a method or function that performs a concrete action in your application. We can connect a signal and a slot so that the slot gets called when the signal gets emitted. Here's the required syntax to do this:
line_edit.<signal>.connect(<method>)
In this construct, line_edit is the QLineEdit object that we need to connect with a given slot. The <signal> placeholder can be any of the abovementioned signals. Finally, <method> represents the target slot or method.
Let's write an example that puts this syntax into action. For this example, we'll connect the textEdited signal with a method that updates the text of a QLabel to match the text of our line edit:
from PyQt6.QtWidgets import (
    QApplication,
    QLabel,
    QLineEdit,
    QVBoxLayout,
    QWidget,
)

class Window(QWidget):
    def __init__(self, parent=None):
        super().__init__(parent)
        self.setWindowTitle("Signal and Slot")
        self.resize(300, 100)

        self.line_edit = QLineEdit(parent=self)
        self.label = QLabel(parent=self)
        self.line_edit.textEdited.connect(self.update_label)

        layout = QVBoxLayout()
        layout.addWidget(self.line_edit)
        layout.addWidget(self.label)
        self.setLayout(layout)

    def update_label(self):
        self.label.setText(self.line_edit.text())

app = QApplication([])
window = Window()
window.show()
app.exec()
In this example, we connect the line edit's textEdited signal with the update_label() method, which sets the label's text to match the text we enter in our line edit. Go ahead and run the app. Then, enter some text in the line edit and see what happens with the label at the bottom of the app's window.
Validating User Input in QLineEdit
We can provide input validators to our line edits using the setValidator() method. This method takes a QValidator object as an argument. PyQt and PySide have a few built-in validators that you can use directly on a line edit:
- QIntValidator — for integer validation
- QDoubleValidator — for floating-point validation
- QRegularExpressionValidator — for validation based on regular expressions
Validator objects process the input to check whether it's valid. In general, a validator object has three possible states:
| Constant | Value | Description |
|---|---|---|
QValidator.State.Invalid |
0 |
The input is invalid. |
QValidator.State.Intermediate |
1 |
The input is a valid intermediate value. |
QValidator.State.Acceptable |
2 |
The input is acceptable as a final result. |
When you set a validator to a given line edit, the user may change the content to any Intermediate value during editing. However, they can't edit the text to a value that is Invalid. The line edit will emit the returnPressed and editingFinished signals only when the validator validates input as Acceptable.
Here's an example where we use a QIntValidator and a QRegularExpressionValidator:
from PyQt6.QtCore import QRegularExpression
from PyQt6.QtGui import QIntValidator, QRegularExpressionValidator
from PyQt6.QtWidgets import (
    QApplication,
    QFormLayout,
    QLabel,
    QLineEdit,
    QWidget,
)

class Window(QWidget):
    def __init__(self, parent=None):
        super().__init__(parent)
        self.setWindowTitle("Input Validators")
        self.resize(300, 100)

        self.int_line_edit = QLineEdit(parent=self)
        self.int_line_edit.setValidator(QIntValidator())

        self.uppercase_line_edit = QLineEdit(parent=self)
        input_validator = QRegularExpressionValidator(
            QRegularExpression("[A-Z]+"), self.uppercase_line_edit
        )
        self.uppercase_line_edit.setValidator(input_validator)
        self.uppercase_line_edit.returnPressed.connect(self.update_label)

        self.signal_label = QLabel(parent=self)

        layout = QFormLayout()
        layout.addRow("Integers:", self.int_line_edit)
        layout.addRow("Uppercase letters:", self.uppercase_line_edit)
        layout.addRow("Signal:", self.signal_label)
        self.setLayout(layout)

    def update_label(self):
        self.signal_label.setText("Return pressed!")

if __name__ == "__main__":
    app = QApplication([])
    window = Window()
    window.show()
    app.exec()
In this example, we have two line edits. In the first line edit, we've used a QIntValidator object. This way, the line edit will only accept valid integer numbers. If you try to type in something different, then the line edit won't accept your input.
In the second line edit, we've used a QRegularExpressionValidator. In this specific case, the regular expression accepts one or more uppercase letters. Again if you try to enter something else, then the line edit won't accept the input.
The QLabel will show the text Return pressed! if the input in the second line edit is valid and you press the Enter key. Here's what the app looks like:
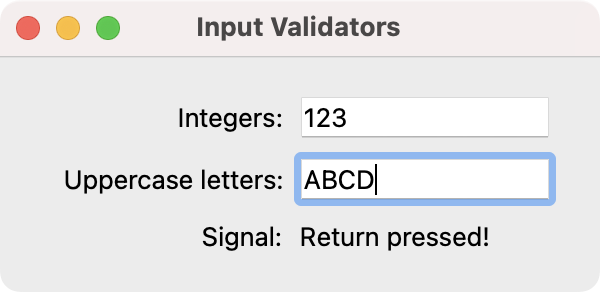 QLineEdit with input validators restricting user input.
Validators provide a quick way to restrict the user input and set our own validation rules. This way, we can ensure valid user input in our PyQt/PySide applications.
Conclusion
The QLineEdit widget is one of the most commonly used widgets in PyQt and PySide applications. It provides a single-line text editor with many built-in features including keyboard shortcuts, copy-paste support, and a context menu.
In this tutorial, you've learned how to:
- Create line edits using the
QLineEditconstructors - Make line edits read-only with
setReadOnly() - Build password fields using echo modes
- Manipulate text programmatically with
setText(),copy(),paste(), and more - Align and format text using alignment flags and text margins
- Connect signals and slots to respond to user input events
- Validate input using
QIntValidator,QDoubleValidator, andQRegularExpressionValidator
With these skills, you can effectively add and customize text input fields in your Python GUI applications built with PyQt or PySide.
Packaging Python Applications with PyInstaller by Martin Fitzpatrick — This step-by-step guide walks you through packaging your own Python applications from simple examples to complete installers and signed executables.